CSS3 彈性盒子
CSS3 彈性盒子(Flex Box)
#彈性盒子是 CSS3 的一種新的佈局模式。
CSS3 彈性盒( Flexible Box 或 flexbox),是一種當頁面需要適應不同的螢幕大小以及裝置類型時確保元素擁有恰當的行為的佈局方式。
引入彈性盒佈局模型的目的是提供一種更有效的方式來對一個容器中的子元素進行排列、對齊和分配空白空間。
CSS3 彈性盒子內容
#彈性盒子由彈性容器(Flex container)和彈性子元素(Flex item)組成。
彈性容器透過設定 display 屬性的值為 flex 或 inline-flex將其定義為彈性容器。
彈性容器內包含了一個或多個彈性子元素。
註: 彈性容器外及彈性子元素內是正常渲染的。彈性盒子只定義了彈性子元素如何在彈性容器內佈置。
彈性子元素通常在彈性盒子內一行顯示。預設情況每個容器只有一行。
以下元素展示了彈性子元素在一行內顯示,從左到右:
<!DOCTYPE html>
<html>
<head>
<meta charset="utf-8">
<title>php中文网(php.cn)</title>
<style>
.flex-container {
    display: -webkit-flex;
    display: flex;
    width: 400px;
    height: 250px;
    background-color: lightgrey;
}
.flex-item {
    background-color: cornflowerblue;
    width: 100px;
    height: 100px;
    margin: 10px;
}
</style>
</head>
<body>
<div class="flex-container">
  <div class="flex-item">flex item 1</div>
  <div class="flex-item">flex item 2</div>
  <div class="flex-item">flex item 3</div>
</div>
</body>
</html>
運行程式嘗試
當然我們可以修改排列方式。
如果我們設定 direction 屬性為 rtl (right-to-left),彈性子元素的排列方式也會改變,頁面佈局也跟著改變:
#實例
<!DOCTYPE html>
<html>
<head>
<meta charset="utf-8">
<title>php中文网(php.cn)</title>
<style>
body {
    direction: rtl;
}
.flex-container {
    display: -webkit-flex;
    display: flex;
    width: 400px;
    height: 250px;
    background-color: lightgrey;
}
.flex-item {
    background-color: cornflowerblue;
    width: 100px;
    height: 100px;
    margin: 10px;
}
</style>
</head>
<body>
<div class="flex-container">
  <div class="flex-item">flex item 1</div>
  <div class="flex-item">flex item 2</div>
  <div class="flex-item">flex item 3</div>
</div>
</body>
</html>
執行程式嘗試
#flex-direction
##flex-direction順序指定了彈性子元素在父容器中的位置。文法
flex-direction: row | row-reverse | column | column-reverse
flex-direction的值有:
#row:橫向從左到右排列(左對齊),預設的排列方式。
row-reverse:反轉橫向排列(右對齊,從後往前排,最後一項排在最前面。
column:縱向排列。 ##以下實例示範了 row-reverse 的使用:
<!DOCTYPE html>
<html>
<head>
<meta charset="utf-8">
<title>php中文网(php.cn)</title>
<style>
.flex-container {
    display: -webkit-flex;
    display: flex;
    -webkit-flex-direction: row-reverse;
    flex-direction: row-reverse;
    width: 400px;
    height: 250px;
    background-color: lightgrey;
}
.flex-item {
    background-color: cornflowerblue;
    width: 100px;
    height: 100px;
    margin: 10px;
}
</style>
</head>
<body>
<div class="flex-container">
  <div class="flex-item">flex item 1</div>
  <div class="flex-item">flex item 2</div>
  <div class="flex-item">flex item 3</div>
</div>
</body>
</html>
執行程式嘗試
以下實例示範了 column 的使用:<!DOCTYPE html>
<html>
<head>
<meta charset="utf-8">
<title>php中文网(php.cn)</title>
<style>
.flex-container {
display: -webkit-flex;
display: flex;
-webkit-flex-direction: column;
flex-direction: column;
width: 400px;
height: 250px;
background-color: lightgrey;
}
.flex-item {
background-color: cornflowerblue;
width: 100px;
height: 100px;
margin: 10px;
}
</style>
</head>
<body>
<div class="flex-container">
<div class="flex-item">flex item 1</div>
<div class="flex-item">flex item 2</div>
<div class="flex-item">flex item 3</div>
</div>
</body>
</html>執行程式嘗試一下
以下實例示範了 column-reverse 的使用:
<!DOCTYPE html>
<html>
<head>
<meta charset="utf-8">
<title>php中文网(php.cn)</title>
<style>
.flex-container {
    display: -webkit-flex;
    display: flex;
    -webkit-flex-direction: column-reverse;
    flex-direction: column-reverse;
    width: 400px;
    height: 250px;
    background-color: lightgrey;
}
.flex-item {
    background-color: cornflowerblue;
    width: 100px;
    height: 100px;
    margin: 10px;
}
</style>
</head>
<body>
<div class="flex-container">
  <div class="flex-item">flex item 1</div>
  <div class="flex-item">flex item 2</div>
  <div class="flex-item">flex item 3</div>
</div>
</body>
</html>
執行程式嘗試
##justify-content 屬性
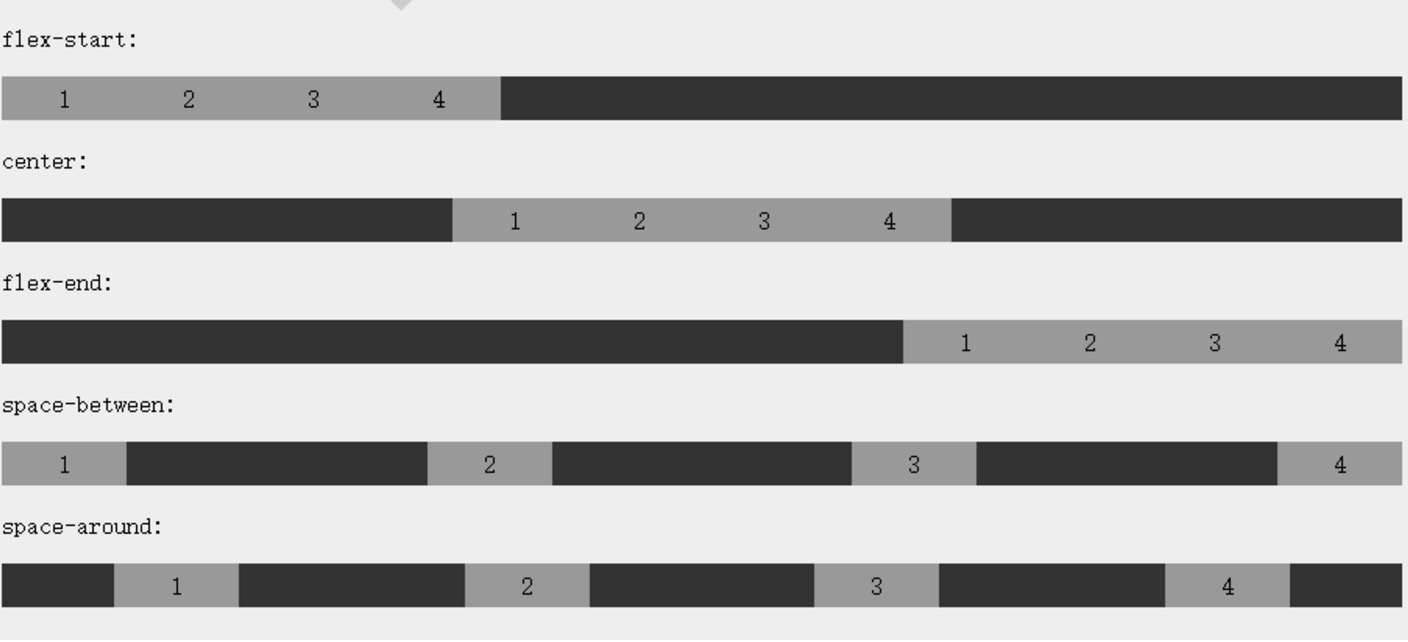
內容對齊(justify-content)屬性應用在彈性容器上,把彈性項沿著彈性容器的主軸線(main axis)對齊。 #justify-content 語法如下:
- justify-content: flex-start | flex-end | center | space-between | space-around
#各個值解析:
flex-start:彈性項目向行頭緊鄰填充。在該行的main-start邊線,而後續彈性項依次平齊擺放。 。 :
彈性項目居中緊鄰填滿。 space-between: 彈性項目平均分佈在該行上。 -start邊線對齊,而最後1個彈性項的外邊距和行的main-end邊線對齊,然後剩餘的彈性項分佈在該行上,相鄰項目的間隔相等。space-around:彈性項目平均分佈在該行上,兩邊留有一半的間隔空間。如果剩餘空間為負值或只有一個彈性項,則該值等同於center。否則,彈性項目沿著該行分佈,且彼此間隔相等(例如是20px),同時首尾兩邊和彈性容器之間留有一半的間隔(1/2*20px=10px)。
效果圖顯示:
#以下實例示範了 flex-end 的使用:
<!DOCTYPE html>
<html>
<head>
<meta charset="utf-8">
<title>php中文网(php.cn)</title>
<style>
.flex-container {
    display: -webkit-flex;
    display: flex;
    -webkit-justify-content: flex-end;
    justify-content: flex-end;
    width: 400px;
    height: 250px;
    background-color: lightgrey;
}
.flex-item {
    background-color: cornflowerblue;
    width: 100px;
    height: 100px;
    margin: 10px;
}
</style>
</head>
<body>
<div class="flex-container">
  <div class="flex-item">flex item 1</div>
  <div class="flex-item">flex item 2</div>
  <div class="flex-item">flex item 3</div>
</div>
</body>
</html>
執行程式嘗試
以下實例示範了 center 的使用:
<!DOCTYPE html>
<html>
<head>
<meta charset="utf-8">
<title>php中文网(php.cn)</title>
<style>
.flex-container {
    display: -webkit-flex;
    display: flex;
    -webkit-justify-content: center;
    justify-content: center;
    width: 400px;
    height: 250px;
    background-color: lightgrey;
}
.flex-item {
    background-color: cornflowerblue;
    width: 100px;
    height: 100px;
    margin: 10px;
}
</style>
</head>
<body>
<div class="flex-container">
  <div class="flex-item">flex item 1</div>
  <div class="flex-item">flex item 2</div>
  <div class="flex-item">flex item 3</div>
</div>
</body>
</html>
執行程式嘗試
以下實例示範了 space-between 的使用:
<!DOCTYPE html>
<html>
<head>
<meta charset="utf-8">
<title>php中文网(php.cn)</title>
<style>
.flex-container {
    display: -webkit-flex;
    display: flex;
    -webkit-justify-content: space-between;
    justify-content: space-between;
    width: 400px;
    height: 250px;
    background-color: lightgrey;
}
.flex-item {
    background-color: cornflowerblue;
    width: 100px;
    height: 100px;
    margin: 10px;
}
</style>
</head>
<body>
<div class="flex-container">
  <div class="flex-item">flex item 1</div>
  <div class="flex-item">flex item 2</div>
  <div class="flex-item">flex item 3</div>
</div>
</body>
</html>執行程式嘗試以下實例示範了 space-around 的使用:<!DOCTYPE html>
<html>
<head>
<meta charset="utf-8">
<title>php中文网(php.cn)</title>
<style>
.flex-container {
display: -webkit-flex;
display: flex;
-webkit-justify-content: space-around;
justify-content: space-around;
width: 400px;
height: 250px;
background-color: lightgrey;
}
.flex-item {
background-color: cornflowerblue;
width: 100px;
height: 100px;
margin: 10px;
}
</style>
</head>
<body>
<div class="flex-container">
<div class="flex-item">flex item 1</div>
<div class="flex-item">flex item 2</div>
<div class="flex-item">flex item 3</div>
</div>
</body>
</html>執行程序試試
align-items 屬性
align-items: flex-start | flex-end | center | baseline | stretchalign-items 設定或檢索彈性盒子元素在側軸(縱軸)方向上的對齊方式。
語法
- 各個值解析:
- flex-start:彈性盒子元素的側軸(縱軸)起始位置的邊界緊靠住該行的側軸起始邊界。
- flex-end:彈性盒子元素的側軸(縱軸)起始位置的邊界緊靠住該行的側軸結束邊界。
- center:彈性盒子元素在該行的側軸(縱軸)上居中放置。 (如果該行的尺寸小於彈性盒子元素的尺寸,則會向兩個方向溢出相同的長度)。
- baseline:如彈性盒子元素的行內軸與側軸為同一條,則該值與'flex-start'等效。其它情況下,該值將參與基線對齊。
stretch:如果指定側軸大小的屬性值為'auto',則其值會使項目的邊距盒的尺寸盡可能接近所在行的尺寸,但同時會遵照'min/max-width/height'屬性的限制。
#########以下實例示範了 stretch(預設值) 的使用:###<!DOCTYPE html>
<html>
<head>
<meta charset="utf-8">
<title>php中文网(php.cn)</title>
<style>
.flex-container {
display: -webkit-flex;
display: flex;
-webkit-align-items: stretch;
align-items: stretch;
width: 400px;
height: 250px;
background-color: lightgrey;
}
.flex-item {
background-color: cornflowerblue;
width: 100px;
margin: 10px;
}
</style>
</head>
<body>
<div class="flex-container">
<div class="flex-item">flex item 1</div>
<div class="flex-item">flex item 2</div>
<div class="flex-item">flex item 3</div>
</div>
</body>
</html>###執行程式嘗試###以下實例示範了 flex-start 的使用:
<!DOCTYPE html>
<html>
<head>
<meta charset="utf-8">
<title>php中文网(php.cn)</title>
<style>
.flex-container {
    display: -webkit-flex;
    display: flex;
    -webkit-align-items: flex-start;
    align-items: flex-start;
    width: 400px;
    height: 250px;
    background-color: lightgrey;
}
.flex-item {
    background-color: cornflowerblue;
    width: 100px;
    margin: 10px;
}
</style>
</head>
<body>
<div class="flex-container">
  <div class="flex-item">flex item 1</div>
  <div class="flex-item">flex item 2</div>
  <div class="flex-item">flex item 3</div>
</div>
</body>
</html>
執行程式嘗試
以下實例示範了 flex-end 的使用:
<!DOCTYPE html>
<html>
<head>
<meta charset="utf-8">
<title>php中文网(php.cn)</title>
<style>
.flex-container {
    display: -webkit-flex;
    display: flex;
    -webkit-align-items: flex-end;
    align-items: flex-end;
    width: 400px;
    height: 250px;
    background-color: lightgrey;
}
.flex-item {
    background-color: cornflowerblue;
    width: 100px;
    margin: 10px;
}
</style>
</head>
<body>
<div class="flex-container">
  <div class="flex-item">flex item 1</div>
  <div class="flex-item">flex item 2</div>
  <div class="flex-item">flex item 3</div>
</div>
</body>
</html>
執行程式嘗試一下
以下實例示範了 center 的使用:
<!DOCTYPE html>
<html>
<head>
<style>
.flex-container {
    display: -webkit-flex;
    display: flex;
    -webkit-align-items: center;
    align-items: center;
    width: 400px;
    height: 250px;
    background-color: lightgrey;
}
.flex-item {
    background-color: cornflowerblue;
    width: 100px;
    margin: 10px;
}
</style>
</head>
<body>
<div class="flex-container">
  <div class="flex-item">flex item 1</div>
  <div class="flex-item">flex item 2</div>
  <div class="flex-item">flex item 3</div>
</div>
</body>
</html>
執行程式嘗試一下
以下實例示範了 baseline 的使用:
<!DOCTYPE html>
<html>
<head>
<meta charset="utf-8">
<title>php中文网(php.cn)</title>
<style>
.flex-container {
    display: -webkit-flex;
    display: flex;
    -webkit-align-items: baseline;
    align-items: baseline;
    width: 400px;
    height: 250px;
    background-color: lightgrey;
}
.flex-item {
    background-color: cornflowerblue;
    width: 100px;
    margin: 10px;
}
</style>
</head>
<body>
<div class="flex-container">
  <div class="flex-item">flex item 1</div>
  <div class="flex-item">flex item 2</div>
  <div class="flex-item">flex item 3</div>
</div>
</body>
</html>
執行程式試試看
flex-wrap 屬性
flex-wrap 屬性用於指定彈性盒子的子元素換行方式。
語法
flex-flow: ||
各個值解析:
nowrap - 默認, 彈性容器為單行。此情況下彈性子項可能會溢出容器。
wrap - 彈性容器為多行。此情況下彈性子項溢出的部分會被放置到新行,子項內部會發生斷行
#wrap-reverse -反轉 wrap 排列。
以下範例示範了 nowrap 的使用:
<!DOCTYPE html>
<html>
<head>
<meta charset="utf-8">
<title>php中文网(php.cn)</title>
<style>
.flex-container {
    display: -webkit-flex;
    display: flex;
    -webkit-flex-wrap: nowrap;
    flex-wrap: nowrap;
    width: 300px;
    height: 250px;
    background-color: lightgrey;
}
.flex-item {
    background-color: cornflowerblue;
    width: 100px;
    height: 100px;
    margin: 10px;
}
</style>
</head>
<body>
<div class="flex-container">
  <div class="flex-item">flex item 1</div>
  <div class="flex-item">flex item 2</div>
  <div class="flex-item">flex item 3</div>
</div>
</body>
</html>
執行程式嘗試
##以下範例示範了 wrap 的使用:
<!DOCTYPE html>
<html>
<head>
<meta charset="utf-8">
<title>php中文网(php.cn)</title>
<style>
.flex-container {
    display: -webkit-flex;
    display: flex;
    -webkit-flex-wrap: wrap;
    flex-wrap: wrap;
    width: 300px;
    height: 250px;
    background-color: lightgrey;
}
.flex-item {
    background-color: cornflowerblue;
    width: 100px;
    height: 100px;
    margin: 10px;
}
</style>
</head>
<body>
<div class="flex-container">
  <div class="flex-item">flex item 1</div>
  <div class="flex-item">flex item 2</div>
  <div class="flex-item">flex item 3</div>
</div>
</body>
</html>執行程式嘗試以下實例示範了 wrap-reverse 的使用:
<!DOCTYPE html>
<html>
<head>
<meta charset="utf-8">
<title>php中文网(php.cn)</title>
<style>
.flex-container {
    display: -webkit-flex;
    display: flex;
    -webkit-flex-wrap: wrap-reverse;
    flex-wrap: wrap-reverse;
    width: 300px;
    height: 250px;
    background-color: lightgrey;
}
.flex-item {
    background-color: cornflowerblue;
    width: 100px;
    height: 100px;
    margin: 10px;
}
</style>
</head>
<body>
<div class="flex-container">
  <div class="flex-item">flex item 1</div>
  <div class="flex-item">flex item 2</div>
  <div class="flex-item">flex item 3</div>
</div>
</body>
</html>執行程式嘗試align-content 屬性
align-content 屬性用於修改 flex-wrap 屬性的行為。類似 align-items, 但它不是設定彈性子元素的對齊,而是設定各個行的對齊。文法
align-content: flex-start | flex-end | center | space-between | space-around | stretch
各個值解析:
stretch - 預設。各行將會伸展以佔用剩餘的空間。
flex-start - 各行向彈性盒容器的起始位置堆疊。
flex-end - 各行向彈性盒容器的結束位置堆疊。
center -各行向彈性盒容器的中間位置堆疊。
space-between -各行在彈性盒容器中平均分佈。
space-around - 各行在彈性盒容器中平均分佈,兩端保留子元素與子元素之間間距大小的一半。
以下實例示範了 center 的使用:
<!DOCTYPE html>
<html>
<head>
<meta charset="utf-8">
<title>php中文网(php.cn)</title>
<style>
.flex-container {
    display: -webkit-flex;
    display: flex;
    -webkit-flex-wrap: wrap;
    flex-wrap: wrap;
    -webkit-align-content: center;
    align-content: center;
    width: 300px;
    height: 300px;
    background-color: lightgrey;
}
.flex-item {
    background-color: cornflowerblue;
    width: 100px;
    height: 100px;
    margin: 10px;
}
</style>
</head>
<body>
<div class="flex-container">
  <div class="flex-item">flex item 1</div>
  <div class="flex-item">flex item 2</div>
  <div class="flex-item">flex item 3</div>
</div>
</body>
</html>
執行程式嘗試
彈性子元素屬性
語法
##各個值解析:order:
- <integer>:用整數值定義排列順序,數值小的則排在前面。可以為負值。
<!DOCTYPE html>
<html>
<head>
<meta charset="utf-8">
<title>php中文网(php.cn)</title>
<style>
.flex-container {
    display: -webkit-flex;
    display: flex;
    width: 400px;
    height: 250px;
    background-color: lightgrey;
}
.flex-item {
    background-color: cornflowerblue;
    width: 100px;
    height: 100px;
    margin: 10px;
}
.first {
    -webkit-order: -1;
    order: -1;
}
</style>
</head>
<body>
<div class="flex-container">
  <div class="flex-item">flex item 1</div>
  <div class="flex-item first">flex item 2</div>
  <div class="flex-item">flex item 3</div>
</div>
</body>
</html>執行程式嘗試##對齊設定"margin"值為"auto"值,自動取得彈性容器中剩餘的空間。所以設定垂直方向margin值為"auto",可以讓彈性子元素在彈性容器的兩上軸方向完全集中。
以下實例在第一個彈性子元素上設定了 margin-right: auto; 。 它將剩餘的空間放置在元素的右側:
<!DOCTYPE html>
<html>
<head>
<meta charset="utf-8">
<title>php中文网(php.cn)</title>
<style>
.flex-container {
    display: -webkit-flex;
    display: flex;
    width: 400px;
    height: 250px;
    background-color: lightgrey;
}
.flex-item {
    background-color: cornflowerblue;
    width: 75px;
    height: 75px;
    margin: 10px;
}
.flex-item:first-child {
    margin-right: auto;
}
</style>
</head>
<body>
<div class="flex-container">
  <div class="flex-item">flex item 1</div>
  <div class="flex-item">flex item 2</div>
  <div class="flex-item">flex item 3</div>
</div>
</body>
</html>
運行程式嘗試
完美的居中
以下實例將完美解決我們平常碰到的居中問題。
使用彈性盒子,居中變的很簡單,只想要設定 margin: auto; 可以讓彈性子元素在兩上軸方向上完全居中:
<!DOCTYPE html>
<html>
<head>
<meta charset="utf-8">
<title>php中文网(php.cn)</title>
<style>
.flex-container {
    display: -webkit-flex;
    display: flex;
    width: 400px;
    height: 250px;
    background-color: lightgrey;
}
.flex-item {
    background-color: cornflowerblue;
    width: 75px;
    height: 75px;
    margin: auto;
}
</style>
</head>
<body>
<div class="flex-container">
  <div class="flex-item">Perfect centering!</div>
</div>
</body>
</html>
運行程式試試看
align-self
#align-self 屬性用於設定彈性元素本身在側軸(縱軸)方向上的對齊方式。
語法
align-self: auto | flex-start | flex-end | center | baseline | stretch
各個值解析:
auto:如果'align-self'的值為'auto',則其計算值為元素的父元素的'align-items'值,如果沒有父元素,則計算值為'stretch'。
flex-start:彈性盒子元素的側軸(縱軸)起始位置的邊界緊靠住該行的側軸起始邊界。
flex-end:彈性盒子元素的側軸(縱軸)起始位置的邊界緊靠住該行的側軸結束邊界。
center:彈性盒子元素在該行的側軸(縱軸)上居中放置。 (如果該行的尺寸小於彈性盒子元素的尺寸,則會向兩個方向溢出相同的長度)
baseline:如彈性盒子元素的行內軸與側軸為同一條,則該值與'flex-start'等效。其它情況下,該值將參與基線對齊。
stretch:如果指定側軸大小的屬性值為'auto',則其值會使項目的邊距盒的尺寸盡可能接近所在行的尺寸,但同時會遵照'min/max-width/height'屬性的限制。
以下實例示範了彈性子元素上 align-self 不同值的應用效果:
<!DOCTYPE html>
<html>
<head>
<meta charset="utf-8">
<title>php中文网(php.cn)</title>
<style>
.flex-container {
    display: -webkit-flex;
    display: flex;
    width: 400px;
    height: 250px;
    background-color: lightgrey;
}
.flex-item {
    background-color: cornflowerblue;
    width: 60px;
    min-height: 100px;
    margin: 10px;
}
.item1 {
    -webkit-align-self: flex-start;
    align-self: flex-start;
}
.item2 {
    -webkit-align-self: flex-end;
    align-self: flex-end;
}
.item3 {
    -webkit-align-self: center;
    align-self: center;
}
.item4 {
    -webkit-align-self: baseline;
    align-self: baseline;
}
.item5 {
    -webkit-align-self: stretch;
    align-self: stretch;
}
</style>
</head>
<body>
<div class="flex-container">
  <div class="flex-item item1">flex-start</div>
  <div class="flex-item item2">flex-end</div>
  <div class="flex-item item3">center</div>
  <div class="flex-item item4">baseline</div>
  <div class="flex-item item5">stretch</div>
</div>
</body>
</html>
執行程式嘗試
flex
flex 屬性用於指定彈性子元素如何指派空間。
語法
flex:none | [ flex-grow ] || [ flex-shrink ] || [ flex-basis ]
#各個值解析:
none:none關鍵字的計算值為: 0 0 auto
[ flex -grow ]:定義彈性盒子元素的擴展比率。
[ flex-shrink ]:定義彈性盒子元素的縮小比。
[ flex-basis ]:定義彈性盒子元素的預設基準值。
以下實例中,第一個彈性子元素佔用了2/4 的空間,其他兩個各佔1/4 的空間:
<!DOCTYPE html>
<html>
<head>
<meta charset="utf-8">
<title>php中文网(php.cn)</title>
<style>
.flex-container {
    display: -webkit-flex;
    display: flex;
    width: 400px;
    height: 250px;
    background-color: lightgrey;
}
.flex-item {
    background-color: cornflowerblue;
    margin: 10px;
}
.item1 {
    -webkit-flex: 2;
    flex: 2;
}
.item2 {
    -webkit-flex: 1;
    flex: 1;
}
.item3 {
    -webkit-flex: 1;
    flex: 1;
}
</style>
</head>
<body>
<div class="flex-container">
  <div class="flex-item item1">flex item 1</div>
  <div class="flex-item item2">flex item 2</div>
  <div class="flex-item item3">flex item 3</div>
</div>
</body>
</html>
運行程序試試看
CSS3 彈性盒子屬性
#下表列出了在彈性盒子中常用到的屬性:
| 屬性 | 描述 |
|---|---|
| #display | #指定 HTML 元素盒子類型。 |
| flex-direction | 指定了彈性容器中子元素的排列方式 |
| justify-content | 設定彈性盒子元素在主軸(橫軸)方向上的對齊方式。 |
| align-items | 設定彈性盒子元素在側軸(縱軸)方向上的對齊方式。 |
| flex-wrap | 設定彈性盒子的子元素超出父容器時是否換行。 |
| align-content | 修改 flex-wrap 屬性的行為,類似 align-items, 但不是設定子元素對齊,而是設定行對齊 |
| flex-flow | flex-direction 和flex-wrap 的簡寫 |
| #order | 設定彈性盒子的子元素排列順序。 |
| align-self | 在彈性子元素上使用。覆蓋容器的 align-items 屬性。 |
| flex | 設定彈性盒子的子元素如何分配空間。 |


