
A web crawler is a program that crawls data on the Internet. It can be used to crawl the HTML data of a specific web page. Although we use some libraries to develop a crawler program, using a framework can greatly improve efficiency and shorten development time. Scrapy is written in Python, lightweight, simple and easy to use. Using Scrapy can easily complete the collection of online data. It has completed a lot of work for us without having to expend great efforts to develop it ourselves.
First of all, I need to answer a question.
Q: How many steps does it take to install a website into a crawler?
The answer is simple, four steps:
New Project (Project): Create a new crawler project
Clear Target (Items): Clarify the goals you want to crawl
Create a Spider (Spider): Create a crawler to start crawling web pages
Storage content (Pipeline): Design a pipeline to store crawled content
Okay, now that the basic process has been determined, just complete it step by step.
1. Create a new project (Project)
Hold down the Shift key and right-click in the empty directory, select "Open command window here", and enter the command:
scrapy startproject tutorial
Where tutorial is the project name.
You can see that a tutorial folder will be created, with the directory structure as follows:
tutorial/
    scrapy.cfg
    tutorial/
        __init__.py
        items.py
        pipelines.py
        settings.py
        spiders/
            __init__.py
...The following is a brief introduction to the role of each file:
scrapy.cfg: the project’s configuration file
tutorial/: the project’s Python module, which will be The code quoted here
tutorial/items.py: the project’s items file
tutorial/pipelines.py: the project’s pipelines file
tutorial/settings.py: the project’s settings file
tutorial/spiders/: the directory where the crawler is stored
2. Clear target (Item)
In Scrapy, items are containers used to load crawled content, a bit like Dic in Python, which is a dictionary, but provide some additional protection to reduce errors.
Generally speaking, items can be created using the scrapy.item.Item class, and properties can be defined using the scrapy.item.Field object (which can be understood as a mapping relationship similar to ORM).
Next, we start to build the item model.
First of all, the content we want is:
Name (name)
Link (url)
Description (description)
Modify the items.py file in the tutorial directory and add our own class after the original class.
Because we want to capture the content of the dmoz.org website, we can name it DmozItem:
# Define here the models for your scraped items
#
# See documentation in:
# http://doc.scrapy.org/en/latest/topics/items.html

from scrapy.item import Item, Field

class TutorialItem(Item):
    # define the fields for your item here like:
    # name = Field()
    pass

class DmozItem(Item):
    title = Field()
    link = Field()
desc = Field()It may seem a little confusing at first, but defining these items allows you to know your items when using other components what exactly is it.
Item can be simply understood as an encapsulated class object.
3. Make a crawler (Spider)
Making a crawler is generally divided into two steps: crawl first and then fetch.
That is to say, first you need to get all the content of the entire web page, and then take out the parts that are useful to you.
3.1 Crawling
Spider is a class written by the user to crawl information from a domain (or domain group).
They define the list of URLs for downloading, the scheme for tracking links, and the way to parse the content of the web page to extract items.
To build a Spider, you must create a subclass with scrapy.spider.BaseSpider and determine three mandatory attributes:
name: the identification name of the crawler, which must be unique. You must define different names in different crawlers. name.
start_urls: list of crawled URLs. The crawler starts fetching data from here, so the first download of data will start from these URLs. Other sub-URLs will be generated inherited from these starting URLs.
parse(): The parsing method. When calling, pass in the Response object returned from each URL as the only parameter. It is responsible for parsing and matching the captured data (parsing into items) and tracking more URLs.
Here you can refer to the ideas mentioned in the width crawler tutorial to help understand. Tutorial delivery: [Java] Zhihu Chin Episode 5: Using the HttpClient toolkit and width crawler.
That is to say, store the Url and gradually spread it as a starting point, grab all the webpage URLs that meet the conditions, store them and continue crawling.
Let’s write the first crawler, named dmoz_spider.py, and save it in the tutorialspiders directory.
dmoz_spider.py code is as follows:
from scrapy.spider import Spider

class DmozSpider(Spider):
    name = "dmoz"
    allowed_domains = ["dmoz.org"]
    start_urls = [
        "http://www.dmoz.org/Computers/Programming/Languages/Python/Books/",
        "http://www.dmoz.org/Computers/Programming/Languages/Python/Resources/"
    ]

    def parse(self, response):
        filename = response.url.split("/")[-2]
open(filename, 'wb').write(response.body)allow_domains is the domain name range of the search, which is the constraint area of the crawler. It stipulates that the crawler only crawls web pages under this domain name.
As can be seen from the parse function, the last two addresses of the link are taken out and stored as file names.
Then run it and take a look. Hold down shift and right-click in the tutorial directory, open the command window here, enter:
scrapy crawl dmoz
The running result is as shown in the figure:
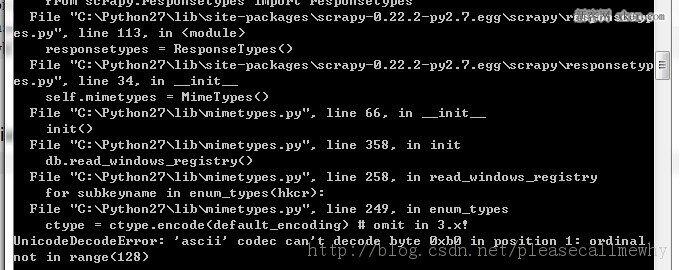
The error is reported:
UnicodeDecodeError: 'ascii' codec can 't decode byte 0xb0 in position 1: ordinal not in range(128)
I got an error when I ran the first Scrapy project. It was really ill-fated.
There should be a coding problem. I googled and found the solution:
Create a new sitecustomize.py in the Libsite-packages folder of python:
import sys
sys.setdefaultencoding('gb2312')
Run it again, OK, the problem is solved, take a look at the result:
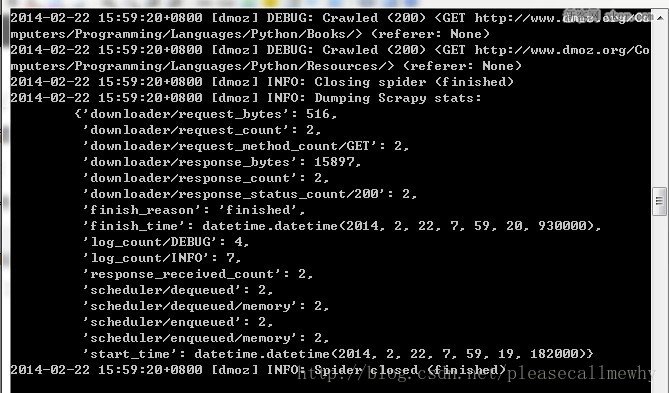
最后一句INFO: Closing spider (finished)表明爬虫已经成功运行并且自行关闭了。
包含 [dmoz]的行 ,那对应着我们的爬虫运行的结果。
可以看到start_urls中定义的每个URL都有日志行。
还记得我们的start_urls吗?
http://www.dmoz.org/Computers/Programming/Languages/Python/Books
http://www.dmoz.org/Computers/Programming/Languages/Python/Resources
因为这些URL是起始页面,所以他们没有引用(referrers),所以在它们的每行末尾你会看到 (referer:
在parse 方法的作用下,两个文件被创建:分别是 Books 和 Resources,这两个文件中有URL的页面内容。
那么在刚刚的电闪雷鸣之中到底发生了什么呢?
首先,Scrapy为爬虫的 start_urls属性中的每个URL创建了一个 scrapy.http.Request 对象 ,并将爬虫的parse 方法指定为回调函数。
然后,这些 Request被调度并执行,之后通过parse()方法返回scrapy.http.Response对象,并反馈给爬虫。
3.2取
爬取整个网页完毕,接下来的就是的取过程了。
光存储一整个网页还是不够用的。
在基础的爬虫里,这一步可以用正则表达式来抓。
在Scrapy里,使用一种叫做 XPath selectors的机制,它基于 XPath表达式。
如果你想了解更多selectors和其他机制你可以查阅资料:点我点我
这是一些XPath表达式的例子和他们的含义
/html/head/title: 选择HTML文档
当然title这个标签对我们来说没有太多的价值,下面我们就来真正抓取一些有意义的东西。
使用火狐的审查元素我们可以清楚地看到,我们需要的东西如下:

我们可以用如下代码来抓取这个
sel.xpath('//ul/li')
从
sel.xpath('//ul/li/text()').extract()
可以这样获取网站的标题:
sel.xpath('//ul/li/a/text()').extract()
从
sel.xpath('//ul/li/text()').extract()
可以这样获取网站的标题:
sel.xpath('//ul/li/a/text()').extract()
可以这样获取网站的超链接:
sel.xpath('//ul/li/a/@href').extract()
当然,前面的这些例子是直接获取属性的方法。
我们注意到xpath返回了一个对象列表,
那么我们也可以直接调用这个列表中对象的属性挖掘更深的节点
(参考:Nesting selectors andWorking with relative XPaths in the Selectors):
sites = sel.xpath('//ul/li')
for site in sites:
title = site.xpath('a/text()').extract()
link = site.xpath('a/@href').extract()
desc = site.xpath('text()').extract()
print title, link, desc
3.4xpath实战
我们用shell做了这么久的实战,最后我们可以把前面学习到的内容应用到dmoz_spider这个爬虫中。
在原爬虫的parse函数中做如下修改:
from scrapy.spider import Spider
from scrapy.selector import Selector

class DmozSpider(Spider):
    name = "dmoz"
    allowed_domains = ["dmoz.org"]
    start_urls = [
        "http://www.dmoz.org/Computers/Programming/Languages/Python/Books/",
        "http://www.dmoz.org/Computers/Programming/Languages/Python/Resources/"
    ]

    def parse(self, response):
        sel = Selector(response)
        sites = sel.xpath('//ul/li')
        for site in sites:
            title = site.xpath('a/text()').extract()
            link = site.xpath('a/@href').extract()
            desc = site.xpath('text()').extract()
print title注意,我们从scrapy.selector中导入了Selector类,并且实例化了一个新的Selector对象。这样我们就可以像Shell中一样操作xpath了。
我们来试着输入一下命令运行爬虫(在tutorial根目录里面):
scrapy crawl dmoz
运行结果如下:
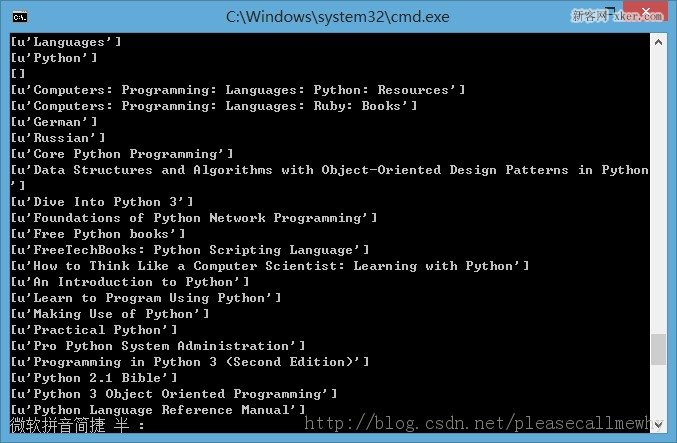
果然,成功的抓到了所有的标题。但是好像不太对啊,怎么Top,Python这种导航栏也抓取出来了呢?
我们只需要红圈中的内容:

看来是我们的xpath语句有点问题,没有仅仅把我们需要的项目名称抓取出来,也抓了一些无辜的但是xpath语法相同的元素。
审查元素我们发现我们需要的
from scrapy.spider import Spider
from scrapy.selector import Selector

class DmozSpider(Spider):
    name = "dmoz"
    allowed_domains = ["dmoz.org"]
    start_urls = [
        "http://www.dmoz.org/Computers/Programming/Languages/Python/Books/",
        "http://www.dmoz.org/Computers/Programming/Languages/Python/Resources/"
    ]

    def parse(self, response):
        sel = Selector(response)
        sites = sel.xpath('//ul[@class="directory-url"]/li')
        for site in sites:
            title = site.xpath('a/text()').extract()
            link = site.xpath('a/@href').extract()
            desc = site.xpath('text()').extract()
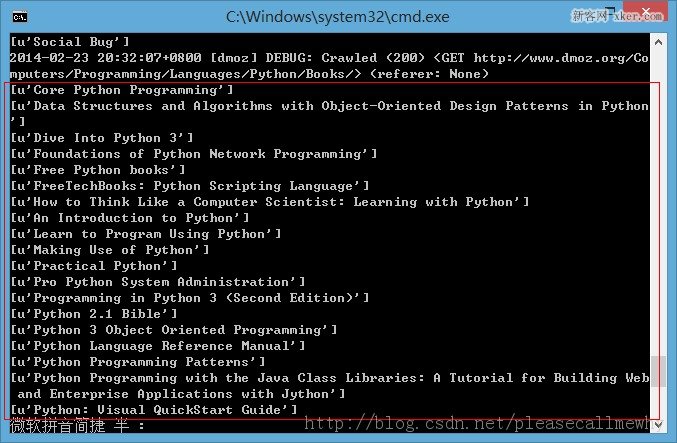
print title成功抓出了所有的标题,绝对没有滥杀无辜:
3.5使用Item
接下来我们来看一看如何使用Item。
前面我们说过,Item 对象是自定义的python字典,可以使用标准字典语法获取某个属性的值:
>>> item = DmozItem()
>>> item['title'] = 'Example title'
>>> item['title']
'Example title'
作为一只爬虫,Spiders希望能将其抓取的数据存放到Item对象中。为了返回我们抓取数据,spider的最终代码应当是这样:
from scrapy.spider import Spider
from scrapy.selector import Selector

from tutorial.items import DmozItem

class DmozSpider(Spider):
    name = "dmoz"
    allowed_domains = ["dmoz.org"]
    start_urls = [
        "http://www.dmoz.org/Computers/Programming/Languages/Python/Books/",
        "http://www.dmoz.org/Computers/Programming/Languages/Python/Resources/"
    ]

    def parse(self, response):
        sel = Selector(response)
        sites = sel.xpath('//ul[@class="directory-url"]/li')
        items = []
        for site in sites:
            item = DmozItem()
            item['title'] = site.xpath('a/text()').extract()
            item['link'] = site.xpath('a/@href').extract()
            item['desc'] = site.xpath('text()').extract()
            items.append(item)
return items4.存储内容(Pipeline)
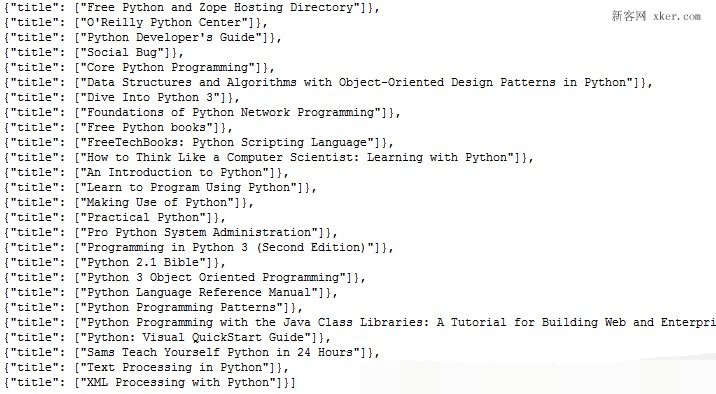
保存信息的最简单的方法是通过Feed exports,主要有四种:JSON,JSON lines,CSV,XML。
我们将结果用最常用的JSON导出,命令如下:
scrapy crawl dmoz -o items.json -t json
-o 后面是导出文件名,-t 后面是导出类型。
然后来看一下导出的结果,用文本编辑器打开json文件即可(为了方便显示,在item中删去了除了title之外的属性):
因为这个只是一个小型的例子,所以这样简单的处理就可以了。
如果你想用抓取的items做更复杂的事情,你可以写一个 Item Pipeline(条目管道)。
这个我们以后再慢慢玩^_^
以上便是python爬虫框架Scrapy制作爬虫抓取网站内容的全部过程了,非常的详尽吧,希望能够对大家有所帮助,有需要的话也可以和我联系,一起进步


