最近有几个小项目用到了easyUI,一开始决定使用easyUI就注定了项目整体上前后端分离,基本上所有的请求都采用Ajax来完成。在文件上传的时候用到了Ajax上传文件,以及图片在上传之前的预览效果,解决了这两个小问题,和小伙伴们分享下,希望能帮助到大家。
上传之前的预览
方式一
先来说说图片上传之前的预览问题。这里主要采用了HTML5中的FileReader对象来实现,关于FileReader对象,如果小伙伴们不了解,可以查看这篇文章HTML5学习之FileReader接口。我们来看看实现方式:
nbsp;html>Ajax上传文件 用户名:
用户图像:
这里对于支持FileReader的浏览器直接使用FileReader来实现,不支持FileReader的浏览器则采用微软的滤镜来实现(注意给图片上传的input标签设置onchange函数)。
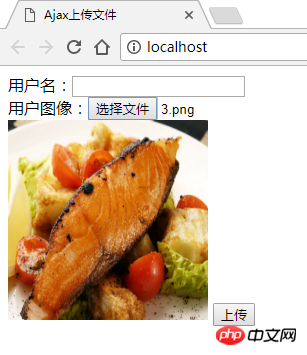
实现效果如下:

方式二
除了这种方式之外我们也可以采用网上现成的一个jQuery实现的方式。这里主要参考了这里。
不过由于原文年代久远,里边使用的$.browser.msie从jQuery1.9就被移除掉了,所以如果我们想使用这个得做一点额外的处理,我修改后的uploadPreview.js文件内容如下:
jQuery.browser={};(function(){jQuery.browser.msie=false; jQuery.browser.version=0;if(navigator.userAgent.match(/MSIE ([0-9]+)./)){ jQuery.browser.msie=true;jQuery.browser.version=RegExp.$1;}})(); jQuery.fn.extend({ uploadPreview: function (opts) { var _self = this, _this = $(this); opts = jQuery.extend({ Img: "ImgPr", Width: 100, Height: 100, ImgType: ["gif", "jpeg", "jpg", "bmp", "png"], Callback: function () {} }, opts || {}); _self.getObjectURL = function (file) { var url = null; if (window.createObjectURL != undefined) { url = window.createObjectURL(file) } else if (window.URL != undefined) { url = window.URL.createObjectURL(file) } else if (window.webkitURL != undefined) { url = window.webkitURL.createObjectURL(file) } return url }; _this.change(function () { if (this.value) { if (!RegExp("\.(" + opts.ImgType.join("|") + ")$", "i").test(this.value.toLowerCase())) { alert("选择文件错误,图片类型必须是" + opts.ImgType.join(",") + "中的一种"); this.value = ""; return false } if ($.browser.msie) { try { $("#" + opts.Img).attr('src', _self.getObjectURL(this.files[0])) } catch (e) { var src = ""; var obj = $("#" + opts.Img); var p = obj.parent("p")[0]; _self.select(); if (top != self) { window.parent.document.body.focus() } else { _self.blur() } src = document.selection.createRange().text; document.selection.empty(); obj.hide(); obj.parent("p").css({ 'filter': 'progid:DXImageTransform.Microsoft.AlphaImageLoader(sizingMethod=scale)', 'width': opts.Width + 'px', 'height': opts.Height + 'px' }); p.filters.item("DXImageTransform.Microsoft.AlphaImageLoader").src = src } } else { $("#" + opts.Img).attr('src', _self.getObjectURL(this.files[0])) } opts.Callback() } }) } });
然后在我们的html文件中引入这个js文件即可:
nbsp;html>Ajax上传文件 用户名:
用户图像:
这里有如下几点需要注意:
1.HTML页面中要引入我们自定义的uploadPreview.js文件
2.预先定义好要显示预览图片的img标签,该标签要有id。
3.查找到img标签然后调用uploadPreview函数
执行效果如下:

Ajax上传图片文件
Ajax上传图片文件就简单了,没有那么多方案,核心代码如下:
var formData = new FormData(); formData.append("username", $("#username").val()); formData.append("file", $("#userface")[0].files[0]); $.ajax({ url: '/fileupload', type: 'post', data: formData, processData: false, contentType: false, success: function (msg) { alert(msg); } });
核心就是定义一个FormData对象,将要上传的数据包装到这个对象中去。然后在ajax上传数据的时候设置data属性就为formdata,processData属性设置为false,表示jquery不要去处理发送的数据,然后设置contentType属性的值为false,表示不要设置请求头的contentType属性。OK,主要就是设置这三个,设置成功之后,其他的处理就和常规的ajax用法一致了。
后台的处理代码大家可以在文末的案例中下载,这里我就不展示不出来了。
相关推荐:
The above is the detailed content of How to implement Ajax upload image and preview function. For more information, please follow other related articles on the PHP Chinese website!


