


When we log in to a web page online, most of us have to enter a verification code for verification before we can log in. , and PHP programmers can draw verification codes by themselves according to the situation. In PHP, we can use PHP's own drawing function to draw simple verification codes, and we can also use PHP's drawing to add watermarks to pictures...
When we learn mathematics, we must learn the coordinate system. I will not explain it here. Coordinate systems also exist in programming languages. But the coordinate system of programming languages is different from the coordinate system of mathematics.
In the PHP coordinate system, the coordinate origin is located in the upper left corner
, the X-axis is the horizontal direction, the Y-axis is the vertical direction of the current position, and the unit of the coordinate system is pixels. 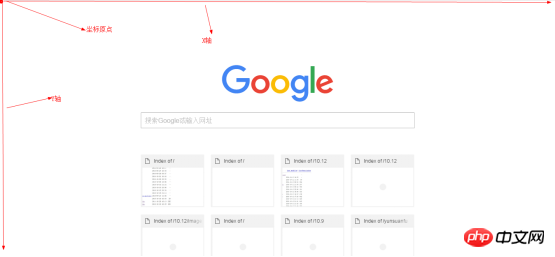
As mentioned above, the coordinate points of the coordinate system are pixels. The pixel is a density unit, and its size is the same as the user's screen. relation.
Pixels: The content displayed by the computer on the screen is composed of each pixel on the screen. For example, the resolution of the computer monitor is 800×600, which means that each line on the computer screen is composed of 800 dots. Composed of 600 lines, the entire computer screen has a total of 480,000 pixels.
Note: Pixel is the unit of density and centimeter is the unit of length.
If you want to use drawing technology in PHP, you must open the gd2 extension library. Open it in the PHP.ini file and restart the server after opening it.

The functions in the PHP drawing function all start with image. And the entire function is lowercase . There are many functions in the help documentation. When we need it, we can find it in: Function Reference-Image Generation and Processing-GD-GD and Image Processing Functions. When we are doing PHP drawing, we can generally follow the steps to complete it step by step.
Create an image resource, which is equivalent to a canvas. We can draw on this canvas (equivalent to a piece of paper ), one of the ways to create a canvas:
$canva = imagecreatetruecolor(宽,高)
Create a brush, use the brush to paint on the canvas, and the color of the brush can be configured with RGB. The parameters in the method are integers from 0 to 255 or hexadecimal 0x00 to 0xFF.
$paint = imagecolorallocate(画布,三原色(r,g,b));
Draw graphics, here we just draw a straight line, you can also draw any other image.
imageline(画布,startX,startY,endX,endY,画笔);
The drawing is completed and can be output to the web page. It can also be saved in a certain directory.
Destroy drawing resources and release memory in a timely manner.
imagedestroy(画布);
We can follow the above steps to draw different graphics. When drawing graphics, we can perform different operations to splice graphics, and we can also create different Brush to draw different colors.
We can draw different patterns according to the above steps. It's just that different functions are needed to draw different graphics. The parameters of the function can be queried in the help document.
<?php

    //创建一个画布
    $canvas = imagecreatetruecolor(300, 300);
    //创建一个画笔
    $paint = imagecolorallocate($canvas, 255, 0, 0);

    //绘制不同的图形,可以修改函数进行不同图形的绘制
    //绘制一条直线
    imageline($canvas, 10, 10, 50, 50, $paint);
    //绘制一个矩形
    imagerectangle($canvas, 10, 100, 30, 120, $paint);

    //绘制一个椭圆
    imageellipse($canvas, 100, 121, 100, 50, $paint);
    //绘制一个圆,也是上面的函数,不过是把宽和高写成一样的就行了。
    imageellipse($canvas,200,100,50,50,$paint);
    //绘制弧形
    imagearc($canvas, 200,50,40, 40, 0, 90, $paint);
    //画一个填充的圆形
    imagefilledellipse($canvas, 250, 230, 60, 60, $paint);
    //输出到浏览器
    header("content-type:image/png");
    //以png的形式输出到浏览器上
    imagepng($canvas);

    //销毁图形,释放内存
    imagedestroy($canvas);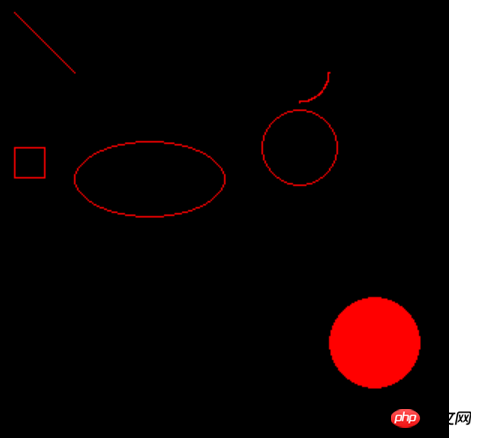
The above code uses different functions to create different graphics, but in the above code we only have one to fill the image. For example, we draw a circle and fill it with color. You can use the imagefilledellipse() function. This function just has one more filled than the imageellipse() function, and the parameters inside are still the same. When drawing graphics, if you want to fill the graphics, you usually just add the letter filled after the image.
PHP can also use ready-made pictures to draw graphics. In this way, it can be understood that the canvas has a pattern from the beginning, and we just draw on the pattern.
<?php
//使用现有的图形进行绘制
$canvas = imagecreatefromjpeg('Desert.jpg');
//创建画笔
$paint_red = imagecolorallocate($canvas,255,0,0);
//在创建一个蓝色的笔。
$paint_blue = imagecolorallocate($canvas,0,0,255);
//绘制一个填充的弧形,最后一个参数是连接的样式。
imagefilledarc($canvas, 100, 100, 100, 100, 0, 180, $paint_blue,IMG_ARC_PIE
);
//输出到浏览器
header("content-type:image/png");
//以png的形式输出到浏览器上
imagepng($canvas);
//销毁图形,释放内存
imagedestroy($canvas);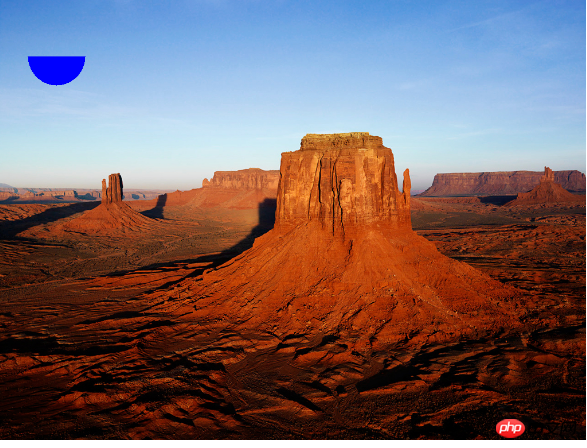
You can see from the results that a filled semicircle is drawn in the upper left corner of the graphic.
Of course, if we don’t want to modify the original graphics, we can use the copy method to copy the existing graphics. In this way, your modifications to the graphics will not reflect the original graphics.
<?php
//创建一个空白的画布
$canvas = imagecreatetruecolor(500,500);
//创建一个图片
$image = imagecreatefromjpeg('Desert.jpg');
//使用函数获取图片的信息,里面包括了图片的宽高。
$image_info = getimagesize('Desert.jpg');
//使用imagecopy()方法进行拷贝
//第一个参数是把图形拷贝到那个画布,第二个参数是从哪里拷贝,第三,四个参数是拷贝到的画布从哪里开始,第五六七八个参数是被拷贝的图形从哪里开始,宽和高是多少
imagecopy($canvas, $image, 0, 0, 0, 0, $image_info[0], $image_info[1]);
//在拷贝的图形上绘制一个填充的矩形。
$paint = imagecolorallocate($canvas,0,255,0);
imagefilledrectangle($canvas, 100, 100, 300, 300, $paint);
//输出到浏览器
header("content-type:image/png");
//以png的形式输出到浏览器上
imagepng($canvas);
//销毁图形,释放内存
imagedestroy($canvas);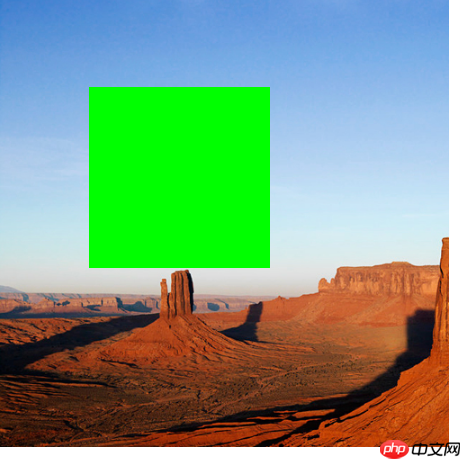
The imagecopy() function is used above. We need to pay attention to the parameters inside when using this function.
在开发中我们会遇到在一张图片上打印上水印。这里我们有两个函数都可以进行imagestring()函数和imagettftext()函数,但是这两个函数是有不同的,imagestring()函数不支持中文,并且它支持的字体太少,只有五种字体,imagettftext()函数可以很好的输出中文,并且它的字体可以自由的设置,但是这个函数需要一个字体文件。
<?php
//创建一个空白的画布
$canvas = imagecreatetruecolor(500,500);
//创建一个图片
$image = imagecreatefromjpeg('Desert.jpg');
//使用函数获取图片的信息,里面包括了图片的宽高。
$image_info = getimagesize('Desert.jpg');
//使用imagecopy()方法进行拷贝
imagecopy($canvas, $image, 0, 0, 0, 0, $image_info[0], $image_info[1]);
//绘制水印的
$paint = imagecolorallocate($canvas, 255, 0, 0);
//使用imagestring()函数
$str = 'lijiafei';
//这个函数第二个参数是设置字体的,只能是1-5,
imagestring($canvas, 5, 100, 300, $str, $paint);
//使用imagettftext()函数
$text = '这是一张中文的水印';
imagettftext($canvas, 30, 0, 100, 200, $paint, 'STXINGKA.TTF', $text);
header("content-type:image/png");
//以png的形式输出到浏览器上
imagepng($canvas);
//销毁图形,释放内存
imagedestroy($canvas);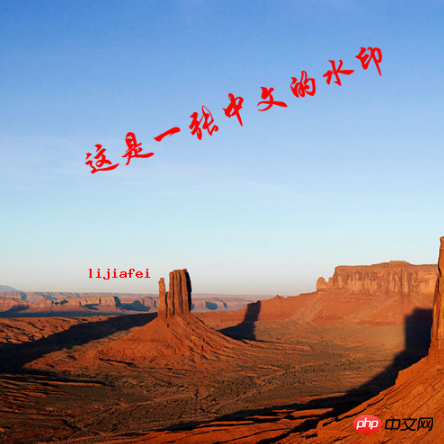
在上面的代码中我们可以看到使用两个函数进行水印的打印。
imagestring(resource $image , int $font , int $x , int $y , string $s , int $col )
第一个参数可以理解为是一个画布,
第二个参数是水印的字体大小,这里只支持1-5五种字体。
第三、四个参数是水印位于图片的那个位置,坐标位于字体的左上角。
第五个参数是需要打印的字体。
第六个参数字体的颜色。
imagettftext(resource $image,float $size,float $angle,int $x,int $y,int $color,string $fontfile,string $text)这个函数的参数有点多,但是也不难理解。
第一个参数是一个画布
第二个参数是字体的大小,这里的字体的大小我们可以自由的设置,数字越大,字体越大。
第三个参数是字体倾斜的度数,按照逆时针的顺序进行倾斜。
第四、五个参数是字体位于图片的位置,这里的坐标是从字体的左下角计算的,和上面的不同。
第六个参数是字体的颜色。
第七个参数是一个字体文件的名字,在我们的C:\Windows\Fonts下有很多字体,我们可以选择一种字体,字体文件我们需要粘贴到当前文件下面才能生效。
第八个参数是需要打印的字。
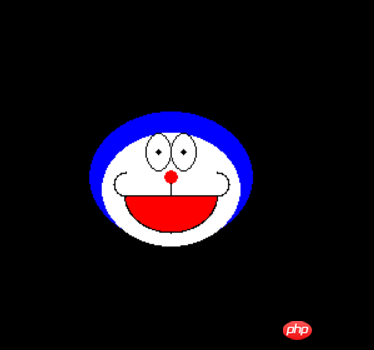
上面我们介绍了大多数函数的介绍,这里我们做一个案列,这个案例说白了就是利用不同的函数进行拼接图形。
代码:
<?php
    //创建一个画布
    $canvas = imagecreatetruecolor(500, 500);
    //蓝色的笔
    $blue = imagecolorallocate($canvas, 0, 0, 255);
    //白的的笔
    $white = imagecolorallocate($canvas,255,255,255);
    //黑色的笔
    $black = imagecolorallocate($canvas,0,0,0);
    //红色的笔
    $red = imagecolorallocate($canvas,255,0,0);
    //画头,画一个填充颜色是蓝色的圆。
    imagefilledellipse($canvas, 150, 150, 130, 105, $blue);
    //画脸,画一个填充颜色是白色的圆。但是圆的原点比头的原点要往下一点。
    imagefilledellipse($canvas, 150, 160, 110, 90, $white);
    //画两个眼睛
    imageellipse($canvas, 140, 130, 20, 30, $black);
    imageellipse($canvas, 160, 130, 20, 30, $black);
    //画两个眼珠
    imagefilledellipse($canvas, 140, 130, 5, 5, $black);
    imagefilledellipse($canvas, 160, 130, 5, 5, $black);
    //画鼻子
    imagefilledellipse($canvas, 150, 150, 10, 10, $red);
    //画鼻子下面的一条线
    imageline($canvas,150,155,150,165,$black);
    //画嘴
    imagefilledarc($canvas, 150,165, 75, 60, 0, 180, $red,IMG_ARC_PIE);
    //画嘴的两个角
    imagearc($canvas, 114,156, 20, 20, 90, 270, $black);
    imageline($canvas,114,165,187,165,$black);
    imagearc($canvas, 187,156, 20, 20, 270, 90, $black);
    //把嘴巴画成黑色
    imagearc($canvas, 150,165, 75, 60, 0, 180, $black);


    header("content-type:image/png");

    imagepng($canvas);
imagedestroy($canvas);我们在开头提到过,我们可以利用绘图技术来进行网站验证码的制作,而验证码的生成可以看成在一张图片上把随机产生的字体打印在图片上。同时在图片上有一些点进行视线的骚扰,这里我们可以创建一个类,然后通过不同的方法进行不同的操作。
创建一个方法进行随机数的生成。
/*
生成随机码
*/
private function mkCode(){
//通过类的参数获取需要的随机数的个数。这个值可以自由的指定
$len = $this -> _len;
//我们生成的随机数的字母喝数字就是在这里面进行随机生成。
$str = 'ABCDEFGHIGKLMNOPQRST1234567890';
$code = '';
//通过循环的生成随机数进行获取
for($i = 0; $i < $len; $i++){
//生成随机数
$j = mt_rand(0,strlen($str)-1);
//把随机生成的随机数拼接起来。
$code .= $str[$j];
}
//把生成的随机数,保存在session中,便于当我们输入验证码是验证是否正确。
@session_start();
$_SESSION['code'] = $code;
return $code;
}我们在生成随机码的时候,可以指定生成的随机数的长度,默认是4个。通过mt_rand(参数1,参数2)函数生成不同的数字。这个函数返回一个参数1和参数2之间(包括这两个数)的int类型的数字。
上面我们已经生成一个随机的验证码。那么接下来就可以把随机生成的随机数打印到一个画布上。
//生成验证码
    public function makeImage(){
        //获取随机生成的随机码
        $code = $this -> mkCode();
        //通过类的属性指定图形的大小,默认是100,20
        $canvas = imagecreatetruecolor($this -> _width, $this -> _height);
        //随机生成一个颜色的画笔
        $paint = imagecolorallocate($canvas,mt_rand(0,255),mt_rand(0,255),mt_rand(0,255));
        //把背景的颜色进行改变,默认是黑色的。
        imagefill($canvas, 10, 10, $paint);
        //创建一个画随机码的笔,颜色也是随机生成的。
        $paint_str = imagecolorallocate($canvas,mt_rand(0,255),mt_rand(0,255),mt_rand(0,255));
        //把随机码打印在画布上。
        imagestring($canvas, 4, 20, 2, $code, $paint_str);
        //绘制干扰点的颜色
        $paint_pixel = imagecolorallocate($canvas,mt_rand(0,255),mt_rand(0,255),mt_rand(0,255));
        //通过类的属性指定需要多少个干扰点。
        for($i = 0; $i < $this -> _pixel; $i++){
            //绘制不同的干扰点,而绘制的位置也是随机生成的。
            imagesetpixel($canvas, mt_rand(0,imagesx($canvas)),  mt_rand(0,imagesy($canvas)), $paint_pixel);
        }
        header("content-type:image/png");
        imagepng($canvas);
        imagedestroy($canvas);
}先通过本类的方法获取一个随机生成的随机数。
把画布的背景进行不同颜色的转变
把随机码绘制在画布上。
通过循环绘制不同的干扰点。
源代码:
<?php
Class Cap{
//生成的字符的长度
private $_len = 4;
//干扰点的个数
private $_pixel = 100;
private $_width = 100;
private $_height = 20;
public function __set($pro,$val){
if(property_exists($this, $pro)){
$this -> $pro = $val;
}
}
/*
生成随机码
*/
private function mkCode(){
//通过类的参数获取需要的随机数的个数。这个值可以自由的指定
$len = $this -> _len;
//我们生成的随机数的字母喝数字就是在这里面进行随机生成。
$str = 'ABCDEFGHIGKLMNOPQRST1234567890';
$code = '';
//通过循环的生成随机数进行获取
for($i = 0; $i < $len; $i++){
//生成随机数
$j = mt_rand(0,strlen($str)-1);
//把随机生成的随机数拼接起来。
$code .= $str[$j];
}
//把生成的随机数,保存在session中,便于当我们输入验证码是验证是否正确。
@session_start();
$_SESSION['code'] = $code;
return $code;
}
//生成验证码
public function makeImage(){
//获取随机生成的随机码
$code = $this -> mkCode();
//通过类的属性指定图形的大小,默认是100,20
$canvas = imagecreatetruecolor($this -> _width, $this -> _height);
//随机生成一个颜色的画笔
$paint = imagecolorallocate($canvas,mt_rand(0,255),mt_rand(0,255),mt_rand(0,255));
//把背景的颜色进行改变,默认是黑色的。
imagefill($canvas, 10, 10, $paint);
//创建一个画随机码的笔,颜色也是随机生成的。
$paint_str = imagecolorallocate($canvas,mt_rand(0,255),mt_rand(0,255),mt_rand(0,255));
//把随机码打印在画布上。
imagestring($canvas, 4, 20, 2, $code, $paint_str);
//绘制干扰点的颜色
$paint_pixel = imagecolorallocate($canvas,mt_rand(0,255),mt_rand(0,255),mt_rand(0,255));
//通过类的属性指定需要多少个干扰点。
for($i = 0; $i < $this -> _pixel; $i++){
//绘制不同的干扰点,而绘制的位置也是随机生成的。
imagesetpixel($canvas, mt_rand(0,imagesx($canvas)), mt_rand(0,imagesy($canvas)), $paint_pixel);
}
header("content-type:image/png");
imagepng($canvas);
imagedestroy($canvas);
}
//判断验证码和填写的验证码是否正确
public function checkCode($code){
@session_start();
if(strtolower($code) === strtolower($_SESSION['code'])){
return true;
}
return false;
}
}
$cap = new Cap();
$cap -> makeImage();运行代码,每次刷新都可以生成一个不同的验证码。

PHP的图形绘制,简单的可以理解为不同的函数的利用。上面的案列几乎都是函数的利用。同时也要理解绘制图形的步骤,在绘制图形时,注意坐标是那几个参数。
以上就是PHP基础教程十六之使用GD库进行图形绘制的内容,更多相关内容请关注PHP中文网(m.sbmmt.com)!


![[Web front-end] Node.js quick start](https://img.php.cn/upload/course/000/000/067/662b5d34ba7c0227.png)


