本篇文章介绍了使用ThinkPHP实现定时任务的方法,和cron实现定时任务的方法,希望对学习thinkphp的朋友有帮助!

ThinkPHP实现定时任务案例
定时任务常见的是Linux中的crontab定时任务,这种是通过编写脚本来执行的,它会在后台一直循环执行。但是有时候我们没有服务器权限或者说我们没有独立的服务器,那又该怎么办?其实,定时任务还有一种就是被动是,只要访问项目就会触发,被动式定时任务一般用于虚拟主机,因为没有服务器权限我们只能通过代码来实现。下面我们以thinkPHP为例来分析这两种定时任务的区别。
(推荐教程:thinkphp教程)
被动式定时任务
①、tags.php
在/Application/Common/Conf目录下新建tags.php文件。(此和方法一处一样)
<?php
return array(
//'配置项'=>'配置值'
'app_begin' =>array('Behavior\CronRunBehavior'),
);②、crons.php
在/Application/Common/Conf目录下新建crons.php文件。(此处和方法一有区别,注意区分。)
<?php
return array(
//myplan为我们计划定时执行的方法文件,2是间隔时间,nextruntime下次执行时间
//此文件位于/Application/Cron/目录下
'cron' => array('myplan', 2, nextruntime),
);③、myplan.php
在/Application/Common/目录下新建 Cron文件夹,里面新建文件myplan.php文件。
<?php

echo date("Y-m-d H:i:s")."执行定时任务!" . "\r\n<br>";此时我们就可以访问项目的url,然后我们会发现在Application/Runtime/目录下生成了~crons.php文件,同时页面出现如下效果,文件内容如下:
<?php
return array (
'cron' =>
array (
0 => 'myplan',
1 => 2,
2 => 1502089802,
),
);
?>
主动式定时任务
①、登录Linux服务器
[root@iZwz924w5t4862mn4tgcyqZ ~]# crontab -e
*/1 * * * * /usr/local/php/bin/php /data/wwwroot/door/test.php//执行PHP文件
*/1 * * * * /usr/bin/curl http://www.100txy.com/wechatapi.php//访问url
②、编辑test.php
<?php
$txt = "/data/wwwroot/door/test.txt";
// die(var_dump($txt));
$date=date('Y-m-d H:i:s',time());
$content = file_get_contents($txt);
if($content!=''){
$arr=explode('#',$content);
$num=$arr['1']+1;
$string=$date.'#'.$num;
}else{
$string=$date.'#'.'1';
}
file_put_contents($txt,$string);
$content_last = file_get_contents($txt);
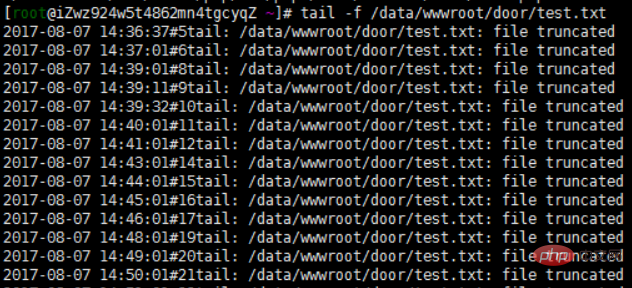
return $content_last;③、后台监测test.txt文件
[root@iZwz924w5t4862mn4tgcyqZ ~]# tail -f /data/wwwroot/door/test.txt

(免费学习视频教程分享:php视频教程)
Atas ialah kandungan terperinci ThinkPHP实现定时任务案例. Untuk maklumat lanjut, sila ikut artikel berkaitan lain di laman web China PHP!
 Mana satu lebih mudah, thinkphp atau laravel?
 Bagaimanakah prestasi thinkphp?
 Apa yang Matcha Exchange lakukan?
 Apakah penghalaan lembut
 Sebab mengapa fungsi pengepala mengembalikan 404 kegagalan
 Penjelasan terperinci tentang pengendali anjakan java
 Pengenalan kepada fungsi menukar huruf besar kepada huruf kecil dalam Python
 javac tidak diiktiraf sebagai arahan dalaman atau luaran atau program yang boleh dikendalikan Bagaimana untuk menyelesaikan masalah?