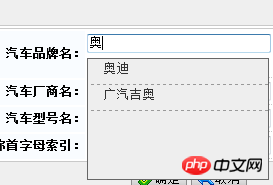
这篇文章主要介绍了通过ajax实现输入框文字改变展示下拉列表的效果,需要的朋友可以参考下
1.样式
<style type="text/css">
<!--
body{background:#fff}
.Menu {
position:relative;
width:180px;
height:120px;
z-index:1;
background: #EEE;
border:1px solid #666;
margin-top:-100px;
display:none;
}
.Menu2 {
position: absolute;
left:0;
top:0;
width:100%;
height:120px;
overflow:hidden;
z-index:1;
OVERFLOW-y:auto;
}
.Menu2 ul{margin:0;padding:0}
.Menu2 ul li{width:100%;height:25px;line-height:20px;text-indent:15px;
border-bottom:1px dashed #999;color:#333;cursor:pointer;
change:expression(
this.onmouseover=function(){
this.style.background="";
},
this.onmouseout=function(){
this.style.background="";
}
)
}
input{width:120px}
#List1,#List2{left:0px;top:103px;}
-->
</style>2. html脚本
........省略常规脚本
<tr>
<th>汽车品牌名:</th>
<td>
<input type="text" id="generalBrandName" name="generalBrandName" value="${*.generalBrandName}" style="width:180px" data-validation-engine="validate[required]" <c:if test="${!empty carType.brandIdGeneral}"> disabled="disabled" </c:if> onfocus="showAndHide('List1','show');" onblur="showAndHide('List1','hide');"/>
<input type="hidden" id="brandIdGeneral" name="brandIdGeneral" value="${*.brandIdGeneral}" style="width:180px" />
<span class="required">必填*</span>
<p class="Menu" id="List1">
<p class="Menu2" id="ListLi1">
<%-- <ul>--%>
<%-- <li onmousedown="getValue('generalBrandName','宝马','brandIdGeneral','idx');showAndHide('List1','hide');">宝马</li>--%>
<%-- <li onmousedown="getValue('generalBrandName','奥迪','brandIdGeneral','idx');showAndHide('List1','hide');">奥迪</li>--%>
<%-- </ul>--%>
</p>
</p>
</td>
</tr>
........省略常规脚本
<tr>
<th>汽车厂商名:</th>
<td>
<input type="text" id="brandName" name="brandName" value="${*.brandName}" style="width:180px" data-validation-engine="validate[required]" <c:if test="${!empty carType.brandId}"> disabled="disabled" </c:if> onfocus="showAndHide('List2','show');" onblur="showAndHide('List2','hide');" />
<input type="hidden" id="brandId" name="brandId" value="${*.brandId}" style="width:180px" />
<span class="required">必填*</span>
<p class="Menu" id="List2">
<p class="Menu2" id="ListLi2">
</p>
</p>
</td>
</tr>3.通过JS来实现ajax异步请求 根据输入的内容过滤
//页面加载的时候
jQuery(function($) {
if (navigator.userAgent.indexOf("MSIE") > 0) {
document.getElementById('generalBrandName').attachEvent("onPropertyChange", appendList);
document.getElementById('brandName').attachEvent("onPropertyChange", appendList);
}
else if (navigator.userAgent.indexOf("Firefox") > 0) {
document.getElementById('generalBrandName').addEventListener("input", appendList, false);
document.getElementById('brandName').addEventListener("input", appendList, false);
}
});
//////// 预加载
jQuery(function($) {
txtValue = $("#generalBrandName").val();
//////// 给txtbox绑定键盘事件
$("#generalBrandName").bind("keyup", function() {
var currentValue = $(this).val();
if (currentValue != txtValue) {
appendList('List1',currentValue);
txtValue = currentValue;
}
});
txtValue = $("#brandName").val();
//////// 给txtbox绑定键盘事件
$("#brandName").bind("keyup", function() {
var currentValue = $(this).val();
if (currentValue != txtValue) {
appendList('List2',currentValue);
txtValue = currentValue;
}
});
});
//实现动态显示下拉列表内容的function
//根据输入框中的值来筛选obj中的值
function appendList(obj,value){
value = encodeURIComponent(value); value = encodeURIComponent(value); //两次使用encodeURI()
switch(obj){
case "List1": //根据车品牌名来刷选List1中的值
$.getJSON(
ctx + "/car/carmodel/**.do",
{keyWord : value, id : new Date().getTime()}, <!-- 产生一个时间戳,不让IE以为是相同的URL而使用cache -->
function (json) {
createLis('ListLi1',json);
}
);
break;
case "List2": //根据车厂商名来刷选List2中的值
$.getJSON(
ctx + "/car/carmodel/**.do",
{keyWord : value, id : new Date().getTime()}, <!-- 产生一个时间戳,不让IE以为是相同的URL而使用cache -->
function (json) {
createLis('ListLi2',json);
}
);
break;
}
}
function createLis(obj,json){
switch(obj){
case "ListLi1": //根据车品牌名来刷选List1中的值
var executerp = document.getElementById(obj); //动态生成下拉列表框
executerp.innerHTML="";
var ul=document.createElement("ul");
$.each(json, function (i, item) {
var li=document.createElement("li");
var str = "getValue('generalBrandName','"+item.brandNameGeneral+"','brandIdGeneral','"+item.brandIdGeneral+"');showAndHide('List1','hide')";
li.setAttribute("onmousedown",str);
li.appendChild(document.createTextNode(item.brandNameGeneral));
ul.appendChild(li);
});
executerp.appendChild(ul);
break;
case "ListLi2": //根据车厂商名来刷选List2中的值
var executerp = document.getElementById(obj); //动态生成下拉列表框
executerp.innerHTML="";
var ul=document.createElement("ul");
$.each(json, function (i, item) {
var li=document.createElement("li");
var str = "getValue('brandName','"+item.brandName+"','brandId','"+item.brandId+"');showAndHide('List1','hide')";
li.setAttribute("onmousedown",str);
li.appendChild(document.createTextNode(item.brandName));
ul.appendChild(li);
});
executerp.appendChild(ul);
break;
}
}
//显示或者隐藏层
function showAndHide(obj,types){
var Layer=window.document.getElementById(obj);
switch(types){
case "show":
Layer.style.display="block";
appendList(obj,'');
break;
case "hide":
Layer.style.display="none";
break;
}
}
//获取选中节点的内容
function getValue(obj1,str,obj2,idx){
var input=window.document.getElementById(obj1);
input.value=str;
var input=window.document.getElementById(obj2);
input.value=idx;
}4.展示效果 
以上就是本文的全部内容,希望对大家的学习有所帮助,更多相关内容请关注PHP中文网!
相关推荐:
JQuery使用$.ajax和checkbox实现下次不在通知功能
Atas ialah kandungan terperinci ajax实现输入框文字改变展示下拉列表的效果. Untuk maklumat lanjut, sila ikut artikel berkaitan lain di laman web China PHP!
 tutorial ajax
 Penyelesaian kod kacau Cina Ajax
 Apa yang perlu dilakukan jika ajax menghantar aksara Cina yang kacau
 Pengenalan kepada kandungan kerja utama bahagian belakang
 Cara menggunakan kumpulan mengikut
 Bagaimana untuk membuka kunci kata laluan pada telefon Apple anda jika anda terlupa
 Bagaimana untuk menyemak pautan mati laman web
 Bagaimana untuk mengkonfigurasi pembolehubah persekitaran JDK


