这次给大家带来怎样使用VUE对element-ui内ElTableColumn扩展,使用VUE对element-ui内ElTableColumn扩展的注意事项有哪些,下面就是实战案例,一起来看一下。
公司有一个新的需求,点击ElTableColumn的头部可以进行搜索,这个功能同事已经做出来了,但是使用有些不方便,自己就打算封装成一个组件,学习一下。
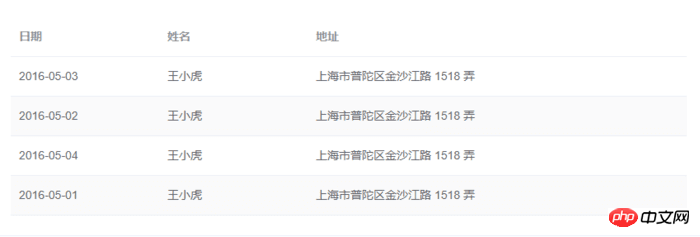
ElTableColumn本来是这个样子的:

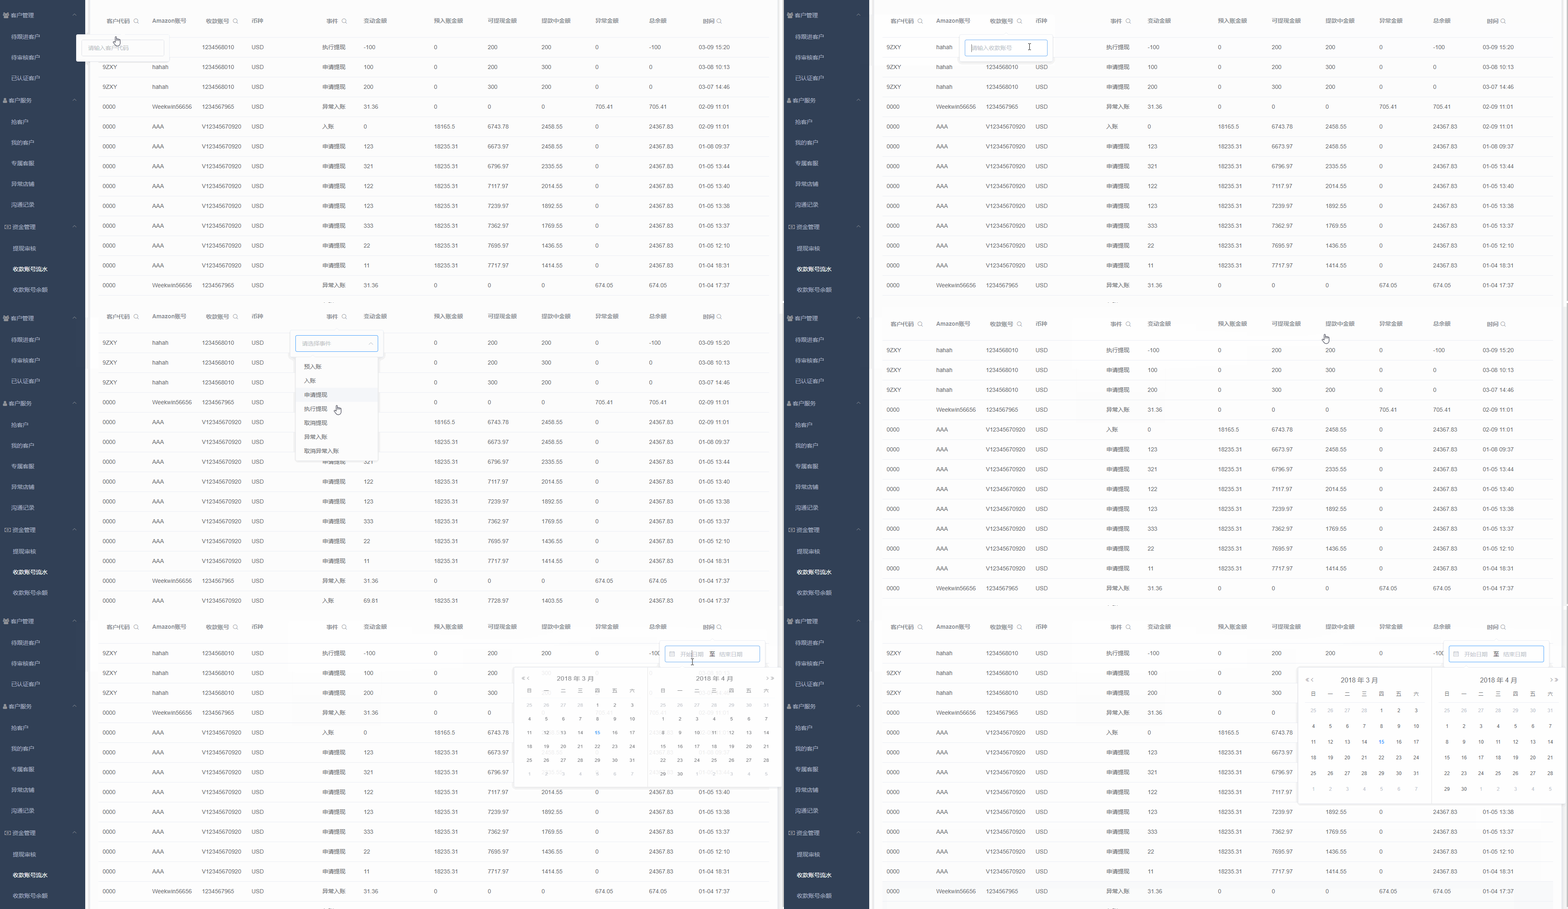
要做成的是这个样子:

我直接就放代码了,挨着挨着说明太多了。
代码的结构:

组件
<!-- ElTableColumnPro.vue -->
<template>
<el-table-column v-if="visible" :formatter="formatter" :align='align' :prop="prop" :header-align="headerAlign" :label="label" :width="width" :render-header="renderHeader" >
<template slot-scope="scope">
<slot :row="scope.row" :$index="scope.$index" >
<span>{{fomatMethod(scope.row[prop])}}</span>
</slot>
</template>
</el-table-column>
</template>
<script>
import moment from "moment";
export default {
name: "el-table-column-pro",
props: {
prop: {
type: String
},
label: {
type: String
},
width: {
type: Number
},
renderType: {
type: String,
validator: value => ["date", "input", "select"].includes(value)
},
placeholder: {
type: String
},
rederWidth: {
type: String,
default: "230px"
},
param: {
type: String,
default: ""
},
startDate: {
type: String
},
endDate: {
type: String
},
selectList: {
type: Array
},
isClear: {
type: Boolean,
default:true
},
visible: {
type: Boolean,
default: true
},
filterIcon: {
type: String,
default: "el-icon-search"
},
callback: {
type: Function
},
formatter: {
type: Function,
default:(row, column, cellValue)=>cellValue
},
align:{
type:String
},
headerAlign:{
type:String
}
},
data() {
return {
formatD:this.filterIcon
};
},
methods: {
fomatMethod(value){
return this.formatter('','',value)
},
renderHeader(createElement, { column, $index }) {
switch (this.renderType) {
case "date":
return this.renderDate(createElement, { column, $index });
case "input":
return this.rederInput(createElement, { column, $index });
case "select":
return this.rederSelect(createElement, { column, $index });
default:
return column.label;
}
},
rederInput(createElement, { column, $index }) {
return createElement(
"p",
{
class: "filters",
style: {
color: column.color
}
},
[
createElement(
"el-popover",
{
props: {
placement: "bottom",
width: "200",
trigger: "click"
}
},
[
createElement("el-input", {
props: {
placeholder: this.placeholder,
value: this.param
},
nativeOn: {
keyup: event => {
if (event.keyCode === 13) {
this.$emit("update:param", event.target.value);
this.callback && this.callback();
}
}
},
on: {
blur: event => {
this.$emit("update:param", event.target.value);
this.callback && this.callback();
}
}
}),
createElement(
"span",
{
slot: "reference"
},
[
column.label,
createElement("i", {
class: this.filterIcon,
style: {
marginLeft: "4px"
}
})
]
)
]
)
]
);
},
rederSelect(createElement, { column, $index }) {
return createElement(
"p",
{
class: "filters",
style: {
color: column.color
}
},
[
createElement(
"el-popover",
{
props: {
placement: "bottom",
width: "200",
trigger: "click"
}
},
[
createElement(
"el-select",
{
props: {
placeholder: this.placeholder,
value: this.param,
clearable: this.isClear
},
on: {
input: value => {
this.$emit("update:param", value);
this.callback && this.callback();
}
}
},
[
this.selectList.map(item => {
return createElement("el-option", {
props: {
value: item.value,
label: item.label
}
});
})
]
),
createElement(
"span",
{
slot: "reference"
},
[
column.label,
createElement("i", {
class: this.filterIcon,
style: {
marginLeft: "4px"
}
})
]
)
]
)
]
);
},
renderDate(createElement, { column, $index }) {
return createElement(
"p",
{
class: "filters"
},
[
createElement(
"el-popover",
{
props: {
placement: "bottom",
width: this.rederWidth,
trigger: "click"
}
},
[
createElement("el-date-picker", {
props: {
placeholder: this.placeholder,
value: this.value,
type: "daterange",
rangeSeparator:"至",
startPlaceholder:"开始日期",
endPlaceholder:"结束日期",
},
style: {
width: this.rederWidth
},
on: {
input: value => {
if (value) {
const startDate = moment(value[0]).format("YYYY-MM-DD");
const endDate = moment(value[1]).format("YYYY-MM-DD");
this.$emit("update:startDate", startDate);
this.$emit("update:endDate", endDate);
this.callback && this.callback();
}
}
}
}),
createElement(
"span",
{
slot: "reference"
},
[
column.label,
createElement("i", {
class: this.filterIcon,
style: {
marginLeft: "4px"
}
})
]
)
]
)
]
);
}
}
};
</script>
<!-- index.js -->
import ElTableColumnPro from './ElTableColumnPro'
ElTableColumnPro.install = function(Vue) {
Vue.component(ElTableColumnPro.name, ElTableColumnPro);
};
export default ElTableColumnPro;安装
import ElTableColumnPro from 'components/ElTableColumnPro/index'
...
...
...
Vue.use(ElTableColumnPro)
使用
 <el-table :data="bankFlow" style="width:100%" stripe>
    <el-table-column-pro :visible="showMore" prop="transactionId" label="流水号" :width="120"> </el-table-column-pro>
    <el-table-column-pro prop="clientCode" label="客户代码 " :width="120" placeholder="请输入客户代码" :callback="requestTransactionLogs" renderType="input" :param.sync="request_params.clientCode"> </el-table-column-pro>
    <el-table-column-pro prop="eventTypeName" label="事件 " placeholder="请选择事件"  :selectList="listEventEnum" :callback="requestTransactionLogs" renderType="select" :param.sync="request_params.event" :width="100"> </el-table-column-pro>
    <el-table-column-pro prop="createTime" :callback="requestTransactionLogs" :startDate.sync="request_params.startDate" :endDate.sync="request_params.endDate" :formatter="$timeformat" label="时间" renderType="date" :width="180" ></el-table-column-pro>
 </el-table>
 <el-table :data="lists.content" v-loading="loading" @row-dblclick="detail" >
    <el-table-column-pro :width="120" prop="clientCode" label="客户代码 " align="center" header-align="center" placeholder="请输入客户代码" :callback="getLists" renderType="input" :param.sync="params.clientCode"></el-table-column-pro>
    <el-table-column-pro label="内容 " placeholder="请输入内容" :callback="getLists" renderType="input" :param.sync="params.content">
        <template slot-scope="scope">
           <pre class="brush:php;toolbar:false">{{scope.row.content}}
相信看了本文案例你已经掌握了方法,更多精彩请关注php中文网其它相关文章!
推荐阅读:
Atas ialah kandungan terperinci 怎样使用VUE对element-ui内ElTableColumn扩展. Untuk maklumat lanjut, sila ikut artikel berkaitan lain di laman web China PHP!
 kuasa komputer riba
 Apakah yang perlu saya lakukan jika video web tidak boleh dibuka?
 Apakah penghalaan lembut
 Apakah maksud pdf?
 Bagaimana untuk menyelesaikan halaman html yang kacau
 Apakah sebab mengapa skrin komputer berwarna hitam tetapi komputer dihidupkan?
 Pengenalan kepada perisian pemodelan parametrik
 Perisian pangkalan data yang biasa digunakan


