本篇文章主要介绍了详解PyTorch批训练及优化器比较,详细的介绍了什么是PyTorch批训练和PyTorch的Optimizer优化器,非常具有实用价值,需要的朋友可以参考下
一、PyTorch批训练
1. 概述
PyTorch提供了一种将数据包装起来进行批训练的工具——DataLoader。使用的时候,只需要将我们的数据首先转换为torch的tensor形式,再转换成torch可以识别的Dataset格式,然后将Dataset放入DataLoader中就可以啦。
import torch
import torch.utils.data as Data

torch.manual_seed(1) # 设定随机数种子

BATCH_SIZE = 5

x = torch.linspace(1, 10, 10)
y = torch.linspace(0.5, 5, 10)

# 将数据转换为torch的dataset格式
torch_dataset = Data.TensorDataset(data_tensor=x, target_tensor=y)

# 将torch_dataset置入Dataloader中
loader = Data.DataLoader(
  dataset=torch_dataset,
  batch_size=BATCH_SIZE, # 批大小
  # 若dataset中的样本数不能被batch_size整除的话,最后剩余多少就使用多少
  shuffle=True, # 是否随机打乱顺序
  num_workers=2, # 多线程读取数据的线程数
  )

for epoch in range(3):
  for step, (batch_x, batch_y) in enumerate(loader):
    print('Epoch:', epoch, '|Step:', step, '|batch_x:',
       batch_x.numpy(), '|batch_y', batch_y.numpy())
'''''
shuffle=True
Epoch: 0 |Step: 0 |batch_x: [ 6. 7. 2. 3. 1.] |batch_y [ 3.  3.5 1.  1.5 0.5]
Epoch: 0 |Step: 1 |batch_x: [ 9. 10.  4.  8.  5.] |batch_y [ 4.5 5.  2.  4.  2.5]
Epoch: 1 |Step: 0 |batch_x: [ 3.  4.  2.  9. 10.] |batch_y [ 1.5 2.  1.  4.5 5. ]
Epoch: 1 |Step: 1 |batch_x: [ 1. 7. 8. 5. 6.] |batch_y [ 0.5 3.5 4.  2.5 3. ]
Epoch: 2 |Step: 0 |batch_x: [ 3. 9. 2. 6. 7.] |batch_y [ 1.5 4.5 1.  3.  3.5]
Epoch: 2 |Step: 1 |batch_x: [ 10.  4.  8.  1.  5.] |batch_y [ 5.  2.  4.  0.5 2.5]

shuffle=False
Epoch: 0 |Step: 0 |batch_x: [ 1. 2. 3. 4. 5.] |batch_y [ 0.5 1.  1.5 2.  2.5]
Epoch: 0 |Step: 1 |batch_x: [ 6.  7.  8.  9. 10.] |batch_y [ 3.  3.5 4.  4.5 5. ]
Epoch: 1 |Step: 0 |batch_x: [ 1. 2. 3. 4. 5.] |batch_y [ 0.5 1.  1.5 2.  2.5]
Epoch: 1 |Step: 1 |batch_x: [ 6.  7.  8.  9. 10.] |batch_y [ 3.  3.5 4.  4.5 5. ]
Epoch: 2 |Step: 0 |batch_x: [ 1. 2. 3. 4. 5.] |batch_y [ 0.5 1.  1.5 2.  2.5]
Epoch: 2 |Step: 1 |batch_x: [ 6.  7.  8.  9. 10.] |batch_y [ 3.  3.5 4.  4.5 5. ]
'''2. TensorDataset
classtorch.utils.data.TensorDataset(data_tensor, target_tensor)
TensorDataset类用来将样本及其标签打包成torch的Dataset,data_tensor,和target_tensor都是tensor。
3. DataLoader
复制代码 代码如下:
classtorch.utils.data.DataLoader(dataset, batch_size=1, shuffle=False, sampler=None,num_workers=0, collate_fn=
dataset就是Torch的Dataset格式的对象;batch_size即每批训练的样本数量,默认为;shuffle表示是否需要随机取样本;num_workers表示读取样本的线程数。
二、PyTorch的Optimizer优化器
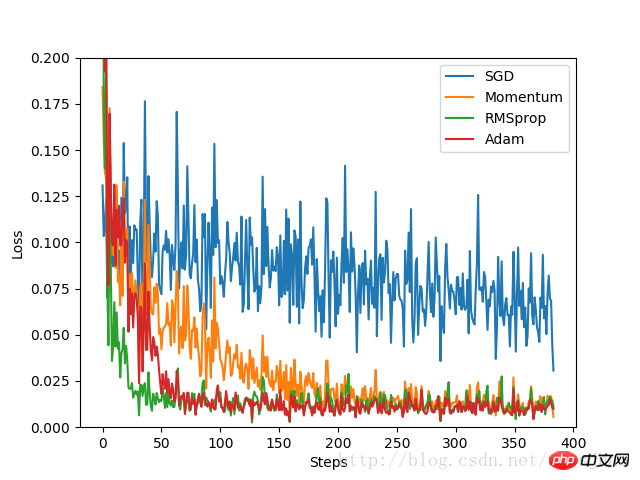
本实验中,首先构造一组数据集,转换格式并置于DataLoader中,备用。定义一个固定结构的默认神经网络,然后为每个优化器构建一个神经网络,每个神经网络的区别仅仅是优化器不同。通过记录训练过程中的loss值,最后在图像上呈现得到各个优化器的优化过程。
代码实现:
import torch
import torch.utils.data as Data
import torch.nn.functional as F
from torch.autograd import Variable
import matplotlib.pyplot as plt
torch.manual_seed(1) # 设定随机数种子

# 定义超参数
LR = 0.01 # 学习率
BATCH_SIZE = 32 # 批大小
EPOCH = 12 # 迭代次数

x = torch.unsqueeze(torch.linspace(-1, 1, 1000), dim=1)
y = x.pow(2) + 0.1*torch.normal(torch.zeros(*x.size()))

#plt.scatter(x.numpy(), y.numpy())
#plt.show()

# 将数据转换为torch的dataset格式
torch_dataset = Data.TensorDataset(data_tensor=x, target_tensor=y)
# 将torch_dataset置入Dataloader中
loader = Data.DataLoader(dataset=torch_dataset, batch_size=BATCH_SIZE,
             shuffle=True, num_workers=2)

class Net(torch.nn.Module):
  def __init__(self):
    super(Net, self).__init__()
    self.hidden = torch.nn.Linear(1, 20)
    self.predict = torch.nn.Linear(20, 1)

  def forward(self, x):
    x = F.relu(self.hidden(x))
    x = self.predict(x)
    return x

# 为每个优化器创建一个Net
net_SGD = Net()
net_Momentum = Net()
net_RMSprop = Net()
net_Adam = Net()
nets = [net_SGD, net_Momentum, net_RMSprop, net_Adam]

# 初始化优化器
opt_SGD = torch.optim.SGD(net_SGD.parameters(), lr=LR)
opt_Momentum = torch.optim.SGD(net_Momentum.parameters(), lr=LR, momentum=0.8)
opt_RMSprop = torch.optim.RMSprop(net_RMSprop.parameters(), lr=LR, alpha=0.9)
opt_Adam = torch.optim.Adam(net_Adam.parameters(), lr=LR, betas=(0.9, 0.99))

optimizers = [opt_SGD, opt_Momentum, opt_RMSprop, opt_Adam]

# 定义损失函数
loss_function = torch.nn.MSELoss()
losses_history = [[], [], [], []] # 记录training时不同神经网络的loss值

for epoch in range(EPOCH):
  print('Epoch:', epoch + 1, 'Training...')
  for step, (batch_x, batch_y) in enumerate(loader):
    b_x = Variable(batch_x)
    b_y = Variable(batch_y)

    for net, opt, l_his in zip(nets, optimizers, losses_history):
      output = net(b_x)
      loss = loss_function(output, b_y)
      opt.zero_grad()
      loss.backward()
      opt.step()
      l_his.append(loss.data[0])

labels = ['SGD', 'Momentum', 'RMSprop', 'Adam']

for i, l_his in enumerate(losses_history):
  plt.plot(l_his, label=labels[i])
plt.legend(loc='best')
plt.xlabel('Steps')
plt.ylabel('Loss')
plt.ylim((0, 0.2))
plt.show()实验结果:

由实验结果可见,SGD的优化效果是最差的,速度很慢;作为SGD的改良版本,Momentum表现就好许多;相比RMSprop和Adam的优化速度就非常好。实验中,针对不同的优化问题,比较各个优化器的效果再来决定使用哪个。
三、其他补充
1. Python的zip函数
zip函数接受任意多个(包括0个和1个)序列作为参数,返回一个tuple列表。
x = [1, 2, 3]
y = [4, 5, 6]
z = [7, 8, 9]
xyz = zip(x, y, z)
print xyz
[(1, 4, 7), (2, 5, 8), (3, 6, 9)]

x = [1, 2, 3]
x = zip(x)
print x
[(1,), (2,), (3,)]

x = [1, 2, 3]
y = [4, 5, 6, 7]
xy = zip(x, y)
print xy
[(1, 4), (2, 5), (3, 6)]
相关推荐:
Atas ialah kandungan terperinci 详解PyTorch批训练及优化器比较. Untuk maklumat lanjut, sila ikut artikel berkaitan lain di laman web China PHP!
 apa itu pengoptimuman
 Perisian pengoptimuman kata kunci Baidu
 Kaedah pengoptimuman kedudukan kata kunci SEO Baidu
 Peranan isset dalam php
 Berapakah nilai Dimensity 9000 bersamaan dengan Snapdragon?
 sambungan jauh mstsc gagal
 js rentetan kepada tatasusunan
 Cara menghidupkan dan mematikan Douyin Xiaohuoren


