

这次给大家带来vue axios请求超时处理详解(附代码),vue axios请求超时处理详解的注意事项有哪些,下面就是实战案例,一起来看一下。
自从使用Vue2之后,就使用官方推荐的axios的插件来调用API,在使用过程中,如果服务器或者网络不稳定掉包了, 你们该如何处理呢? 下面我给你们分享一下我的经历。
具体原因
最近公司在做一个项目, 服务端数据接口用的是Php输出的API, 有时候在调用的过程中会失败, 在谷歌浏览器里边显示Provisional headers are shown。

按照搜索引擎给出来的解决方案,解决不了我的问题.
最近在研究AOP这个开发编程的概念,axios开发说明里边提到的栏截器(axios.Interceptors)应该是这种机制,降低代码耦合度,提高程序的可重用性,同时提高了开发的效率。
带坑的解决方案一
我的经验有限,觉得唯一能做的,就是axios请求超时之后做一个重新请求。通过研究 axios的使用说明,给它设置一个timeout = 6000
axios.defaults.timeout = 6000;
然后加一个栏截器.
// Add a request interceptor
axios.interceptors.request.use(function (config) {
 // Do something before request is sent
 return config;
 }, function (error) {
 // Do something with request error
 return Promise.reject(error);
});
// Add a response interceptor
axios.interceptors.response.use(function (response) {
 // Do something with response data
 return response;
 }, function (error) {
 // Do something with response error
 return Promise.reject(error);
});这个栏截器作用是 如果在请求超时之后,栏截器可以捕抓到信息,然后再进行下一步操作,也就是我想要用 重新请求。
这里是相关的页面数据请求。
this.$axios.get(url, {params:{load:'noload'}}).then(function (response) {
	//dosomething();
}).catch(error => {
	//超时之后在这里捕抓错误信息.
	if (error.response) {
		console.log('error.response')
		console.log(error.response);
	} else if (error.request) {
		console.log(error.request)
		console.log('error.request')
		if(error.request.readyState == 4 && error.request.status == 0){
			//我在这里重新请求
		}
	} else {
		console.log('Error', error.message);
	}
	console.log(error.config);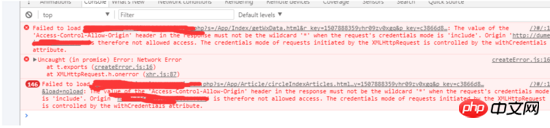
});超时之后, 报出 Uncaught (in promise) Error: timeout of xxx ms exceeded的错误。

在 catch那里,它返回的是error.request错误,所以就在这里做 retry的功能, 经过测试是可以实现重新请求的功功能, 虽然能够实现 超时重新请求的功能,但很麻烦,需要每一个请API的页面里边要设置重新请求。

看上面,我这个项目有几十个.vue 文件,如果每个页面都要去设置超时重新请求的功能,那我要疯掉的.
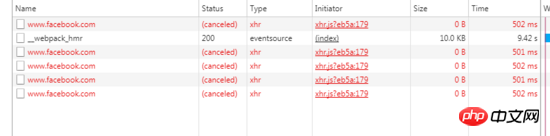
而且这个机制还有一个严重的bug,就是被请求的链接失效或其他原因造成无法正常访问的时候,这个机制失效了,它不会等待我设定的6秒,而且一直在刷,一秒种请求几十次,很容易就把服务器搞垮了,请看下图, 一眨眼的功能,它就请求了146次。
带坑的解决方案二
研究了axios的源代码,超时后, 会在拦截器那里 axios.interceptors.response 捕抓到错误信息, 且 error.code = "ECONNABORTED",具体链接
https://github.com/axios/axios/blob/26b06391f831ef98606ec0ed406d2be1742e9850/lib/adapters/xhr.js#L95-L101
// Handle timeout
 request.ontimeout = function handleTimeout() {
  reject(createError('timeout of ' + config.timeout + 'ms exceeded', config, 'ECONNABORTED',
  request));
  // Clean up request
  request = null;
};所以,我的全局超时重新获取的解决方案这样的。
axios.interceptors.response.use(function(response){
....
}, function(error){
	var originalRequest = error.config;
	if(error.code == 'ECONNABORTED' && error.message.indexOf('timeout')!=-1 && !originalRequest._retry){
			originalRequest._retry = true
			return axios.request(originalRequest);
	}
});这个方法,也可以实现得新请求,但有两个问题,1是它只重新请求1次,如果再超时的话,它就停止了,不会再请求。第2个问题是,我在每个有数据请求的页面那里,做了许多操作,比如 this.$axios.get(url).then之后操作。
完美的解决方法
以AOP编程方式,我需要的是一个 超时重新请求的全局功能, 要在axios.Interceptors下功夫,在github的axios的issue找了别人的一些解决方法,终于找到了一个完美解决方案,就是下面这个。
https://github.com/axios/axios/issues/164#issuecomment-327837467
//在main.js设置全局的请求次数,请求的间隙
axios.defaults.retry = 4;
axios.defaults.retryDelay = 1000;
axios.interceptors.response.use(undefined, function axiosRetryInterceptor(err) {
 var config = err.config;
 // If config does not exist or the retry option is not set, reject
 if(!config || !config.retry) return Promise.reject(err);
 // Set the variable for keeping track of the retry count
 config.retryCount = config.retryCount || 0;
 // Check if we've maxed out the total number of retries
 if(config.retryCount >= config.retry) {
  // Reject with the error
  return Promise.reject(err);
 }
 // Increase the retry count
 config.retryCount += 1;
 // Create new promise to handle exponential backoff
 var backoff = new Promise(function(resolve) {
  setTimeout(function() {
   resolve();
  }, config.retryDelay || 1);
 });
 // Return the promise in which recalls axios to retry the request
 return backoff.then(function() {
  return axios(config);
 });
});其他的那个几十个.vue页面的 this.$axios的get 和post 的方法根本就不需要去修改它们的代码。
在这个过程中,谢谢jooger给予大量的技术支持,这是他的个人信息 https://github.com/jo0ger , 谢谢。
以下是我做的一个试验。。把axios.defaults.retryDelay = 500, 请求 www.facebook.com
如有更好的建议,请告诉我,谢谢。
补充:
axios基本用法
vue更新到2.0之后,作者就宣告不再对vue-resource更新,而是推荐的axios,前一段时间用了一下,现在说一下它的基本用法。
首先就是引入axios,如果你使用es6,只需要安装axios模块之后
import axios from 'axios';
//安装方法
npm install axios
//或
bower install axios
当然也可以用script引入
axios提供了一下几种请求方式
axios.request(config)
axios.get(url[, config])
axios.delete(url[, config])
axios.head(url[, config])
axios.post(url[, data[, config]])
axios.put(url[, data[, config]])
axios.patch(url[, data[, config]])
这里的config是对一些基本信息的配置,比如请求头,baseURL,当然这里提供了一些比较方便配置项
//config
import Qs from 'qs'
{
 //请求的接口,在请求的时候,如axios.get(url,config);这里的url会覆盖掉config中的url
 url: '/user',
 // 请求方法同上
 method: 'get', // default
 // 基础url前缀
 baseURL: 'https://some-domain.com/api/',


 transformRequest: [function (data) {
  // 这里可以在发送请求之前对请求数据做处理,比如form-data格式化等,这里可以使用开头引入的Qs(这个模块在安装axios的时候就已经安装了,不需要另外安装)
  data = Qs.stringify({});
  return data;
 }],
 transformResponse: [function (data) {
  // 这里提前处理返回的数据
  return data;
 }],
 // 请求头信息
 headers: {'X-Requested-With': 'XMLHttpRequest'},
 //parameter参数
 params: {
  ID: 12345
 },
 //post参数,使用axios.post(url,{},config);如果没有额外的也必须要用一个空对象,否则会报错
 data: {
  firstName: 'Fred'
 },
 //设置超时时间
 timeout: 1000,
 //返回数据类型
 responseType: 'json', // default
}有了配置文件,我们就可以减少很多额外的处理代码也更优美,直接使用
axios.post(url,{},config)
  .then(function(res){
    console.log(res);
  })
  .catch(function(err){
    console.log(err);
  })
//axios请求返回的也是一个promise,跟踪错误只需要在最后加一个catch就可以了。
//下面是关于同时发起多个请求时的处理
axios.all([get1(), get2()])
 .then(axios.spread(function (res1, res2) {
  // 只有两个请求都完成才会成功,否则会被catch捕获
}));最后还是说一下配置项,上面讲的是额外配置,如果你不想另外写也可以直接配置全局
axios.defaults.baseURL = 'https://api.example.com';
axios.defaults.headers.common['Authorization'] = AUTH_TOKEN;
axios.defaults.headers.post['Content-Type'] = 'application/x-www-form-urlencoded';
//当然还可以这么配置
var instance = axios.create({
 baseURL: 'https://api.example.com'
});本文只是介绍基本的用法,详细看官方文档https://github.com/axios
我写的两个例子:
使用vue2.0+mintUI+axios+vue-router: https://github.com/Stevenzwzhai/vue-mobile-application
使用vue2.0+elementUI+axios+vue-router: https://github.com/Stevenzwzhai/vue2.0-elementUI-axios-vueRouter, 之前由于没做后端接口,所以运行没数据,现在加了mockjs来返回一些数据,以便于参考。
总结
相信看了本文案例你已经掌握了方法,更多精彩请关注php中文网其它相关文章!
推荐阅读:
Atas ialah kandungan terperinci vue axios请求超时处理详解(附代码). Untuk maklumat lanjut, sila ikut artikel berkaitan lain di laman web China PHP!
 Pengesyoran kedudukan perisian pengesanan perkakasan komputer
 Kaedah input simbol terbitan
 Nama domain tapak web percuma
 Kedudukan sepuluh platform dagangan formal teratas
 Akhiran nama fail pengubahsuaian kelompok Linux
 kaedah pembukaan fail cdr
 Pengenalan kepada kandungan kerja utama bahagian belakang
 laluan tambah pengenalan arahan


![[Web front-end] Permulaan pantas Node.js](https://img.php.cn/upload/course/000/000/067/662b5d34ba7c0227.png)


