在现代办公环境中,阅读或者编辑较长篇幅的Word文档时,想要在文档中某一处或者几处留下标记,方便日后查找、修改时,需要在相对应的文档位置插入书签。那对于开发者而言,在C#或者VB.NET语言环境中,如何来快速、简便的插入书签呢,我分享一下我的经验。这里我用到了一款E-iceblue公司发布的一款免费的Word组件(Free Spire.Doc for .NET),方法很简单,如下:
步骤一:初始化Document实例并加载Word文档
Document document = new Document();
document.LoadFromFile(@"C:\Users\Administrator\Desktop\中国梦.docx ");
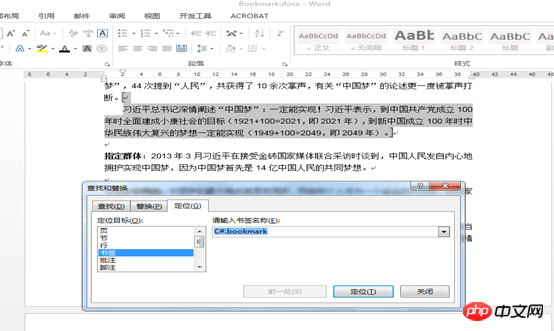
步骤二:于第七段末和第八段间插入书签,命名书签为“C#.bookmark”
Section section = document.Sections[0];
section.Paragraphs[7].AppendBookmarkStart("C#.bookmark");
section.Paragraphs[8].AppendBookmarkEnd("C#.bookmark ");步骤三:保存文件
document.SaveToFile("Bookmark.docx", FileFormat.Docx);
System.Diagnostics.Process.Start("Bookmark.docx");完成后以上步骤后,文档中查找定位即可,文档自动定位到当前所设书签位置。

以上简单三个步骤即可完成对word文档书签插入。
完整代码如下,供参考:
C#
using System;using Spire.Doc;using Spire.Doc.Documents;namespace WordBookmark
{    class Bookmark
    {        static void Main(string[] args)
        {            //Load Document
            Document document = new Document();
            document.LoadFromFile(@"C:\Users\Administrator\Desktop\中国梦.docx ");            //Insert Bookmark
            Section section = document.Sections[0];
            section.Paragraphs[7].AppendBookmarkStart(".NETFramework");
section.Paragraphs[8].AppendBookmarkEnd(".NETFramework");            //Save and Launch
            document.SaveToFile("Bookmark.docx", FileFormat.Docx);
            System.Diagnostics.Process.Start("Bookmark.docx");
        }
    }
}VB.NET:
Imports System
Imports Spire.Doc
Imports Spire.Doc.Documents

Namespace WordBookmark

    Class Bookmark

        Private Shared Sub Main(ByVal args() As String)            'Load Document
            Dim document As Document = New Document
            document.LoadFromFile("C:\Users\Administrator\Desktop\中国梦.docx ")            'Insert Bookmark
            Dim section As Section = document.Sections(0)
            section.Paragraphs(7).AppendBookmarkStart(".NETFramework")
            section.Paragraphs(8).AppendBookmarkEnd(".NETFramework")            'Save and Launch
            document.SaveToFile("Bookmark.docx", FileFormat.Docx)
            System.Diagnostics.Process.Start("Bookmark.docx")
        End Sub
    End Class
End Namespace同样的,撤销书签也可以参考执行我下面的操作
步骤一:加载需要撤销书签的Word文档
Document doc = new Document();
doc.LoadFromFile(@"C:\Users\Administrator\Desktop\中国梦(书签).docx");步骤二:撤销已有书签
doc.Bookmarks.RemoveAt(0);
步骤三:保存文件
doc.SaveToFile("Remove Bookmark.docx", FileFormat.Docx);
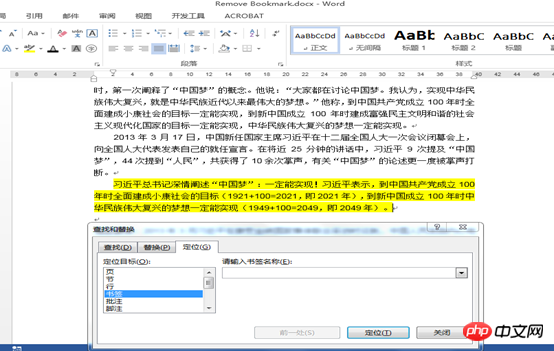
System.Diagnostics.Process.Start("Remove Bookmark.docx");撤销书签后,得到以下文档效果

如图,原本插入书签的段落已撤销书签
完整代码如下
C#:
using Spire.Doc;namespace Removing
{    class Program
    {        static void Main(string[] args)
        {            //Load Document
            Document doc = new Document();
            doc.LoadFromFile(@"C:\Users\Administrator\Desktop\中国梦(书签).docx ");            //Remove Bookmark
            doc.Bookmarks.RemoveAt(0);            //Save and Launch
            doc.SaveToFile("Remove Bookmark.docx", FileFormat.Docx);
            System.Diagnostics.Process.Start("Remove Bookmark.docx");
        }
    }
}VB.NET:
Imports Spire.Doc

Namespace Removing

    Class Program

        Private Shared Sub Main(ByVal args() As String)            'Load Document
            Dim doc As Document = New Document
            doc.LoadFromFile("C:\Users\Administrator\Desktop\中国梦(书签).docx ")            'Remove Bookmark
            doc.Bookmarks.RemoveAt(0)            'Save and Launch
            doc.SaveToFile("Remove Bookmark.docx", FileFormat.Docx)
            System.Diagnostics.Process.Start("Remove Bookmark.docx")
        End Sub
    End Class
End NamespaceAtas ialah kandungan terperinci C#中VB.NET给Word文档添加/撤销书签的实例. Untuk maklumat lanjut, sila ikut artikel berkaitan lain di laman web China PHP!
 Bagaimana untuk menukar warna latar belakang perkataan kepada putih
 Bagaimana untuk memadam halaman kosong terakhir dalam word
 Mengapa saya tidak boleh memadamkan halaman kosong terakhir dalam perkataan?
 Word halaman tunggal menukar orientasi kertas
 perkataan kepada ppt
 Nombor halaman perkataan bermula dari halaman ketiga sebagai 1 tutorial
 Tutorial menggabungkan beberapa perkataan menjadi satu perkataan
 jadual sisipan perkataan


