
作为编码者,美工基础是偏弱的。我们可以参考一些成熟的网页PS教程,提高自身的设计能力。套用一句话,“熟读唐诗三百首,不会作诗也会吟”。
本系列的教程来源于网上的PS教程,都是国外的,全英文的。本人尝试翻译这些优秀的教程。因为翻译能力有限,翻译的细节上还有待推敲,希望广大网友不吝赐教。
约定:
1、本文的软件是Photoshop CS5版本
2、原教程的截图是英文的,本人在重新制作的基础上,重新截了中文版的图
3、原文中有些操作没有给出参数。本人在反复测试的情况下测定了一些参数,以红色的文字显示。有些错误的参数,直接以红色文字显示正确的参数
例如:(90,22,231,77),表示矩形的左上角的坐标是(90,22),宽231,高77
例如:(90,22),表示矩形的左上角的坐标是(90,22),矩形的其他两个参数教程里已经指定
4、在教程的最后会附上本人的心得。有些是对教程中的一些步骤的优化等。
1. Firstly download the grid system, unzip the archive file you downloaded, go to the "templates" folder and then go to the Photoshop folder. Choose the 12 Grid file. The psd file will come with a premade grid guide to help you arrange the website. To activate the guides, go to View > Show > Guides.
Will need to make the canvas bigger, go to Image > Canvas Size and put in the new width and height below:
1、首先下载网格系统,解压你下载的文件,到templates文件夹,到Photoshop子文件夹。选择12 Grid文件。该PSD文件预制了网格参考线帮助你对齐网页布局。激活参考线,点击:视图 > 显示 > 参考线
我们需要使画布变大,点击:图像 > 画布大小,按照下图设置新的宽度与高度。
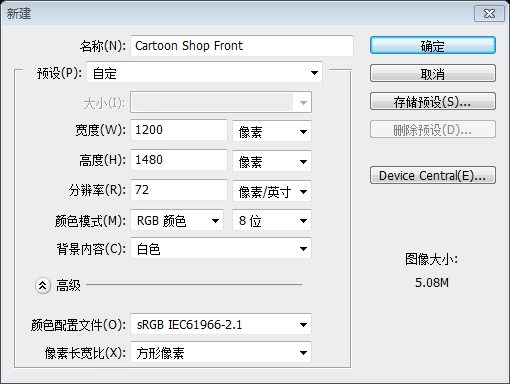
由于本翻译教程不使用网格系统。故此步改为新建文档,文档大小:1200px*1480px,如下图所示:
2. To unlock the background layer click on the layer and press the lock icon to unlock.
2、双击背景图层上的锁定图标,去解锁背景图层
3. Using the Rectangle Tool draw a rectangle shape like below using the blue lines as a guide. Press ctrl+t to make the shape transformable and drag each top corner to in while holding down the alt key. Double click on the layer to bring up Blending Options and put in the settings below:
3、用矩形工具画一个矩形(132,200,936,135),和下图一样参照蓝色的参考线。按Ctrl+T进入变形模式,然后按住Alt键按下图拖动顶部的两个控制点(应该是Ctrl+T后,右键选择透视,拖动左上角控制点向内侧移动70px)。双击该图层打开图层混合选项,按照下图设置样式。命名该图层为roof

渐变叠加的颜色: #7e1416,#ee2a28


4. Using the circle draw a shape like below while holding down the shift key. Double click into Blending Options and make a stroke of 1px. Duplicate the circle by dragging it to the new layer icon. Make the circles alternate from dark red to white. If the circles don't fit hold down the ctrl key and select all the circle layers and drag them all to the new folder icon. On the folder press ctrl+t and drag a bottom corner across while holding down the shift key.
用椭圆工具按住Shift键按下图去画一个圆。双击打开图层样式,添加描边1px。拖动该图层到创建新图层的图标上去复制该图层多次。保证这些圆深红和白交替出现。如果这些圆没有出现在合适的位置,按住Ctrl键去全选这些圆,拖动他们到新建组的图标上,在组上按Ctrl+T,按住Shift键,拖动一个底部的控制点到合适的位置
参考原图,一共12个圆,计算得知,每个圆的直径就是78px,按照下面的操作,完成12个半圆的操作
先在左侧位置用椭圆工具创建一个圆(132,296,78,78),颜色用深红: #7e1416

双击该图层添加如下的样式
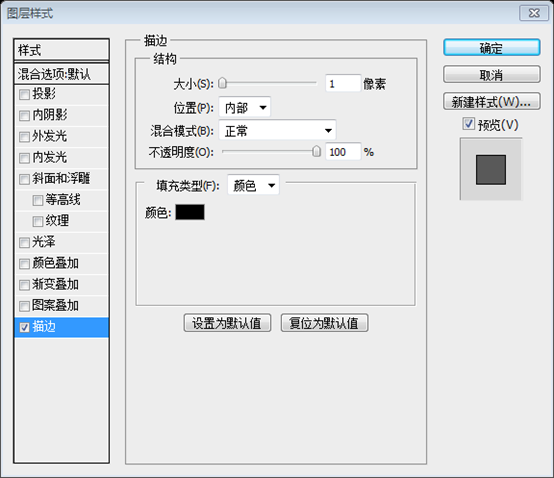
Ctrl+J复制该图层,Ctrl+T自由变形,移动新图层到原图层右侧的156px处

按Ctrl+Shift+Alt+T复制新图层并移动到合适的位置(自动移到原图层右侧的156px处)

重复刚才的操作,直到6个深红色的圆都被创建好

用同样的方法,创建6个白色的圆

将这些圆合并到一个新组,命名为circles,点击:图层 > 图层蒙版 > 显示全部
如下图,用矩形选择框创建一个矩形选区

按Delete键,不显示矩形选择框里的内容,按Ctrl+D取消选择,把roof图层移到circles组的上方

5. Go to the background layer and double click into Blending Options > Gradient Overlay and put in the colours below:
5、回到背景层双击打开图层样式窗口添加渐变叠加样式,样式按下图设置
颜色叠加的颜色: #09a0df,#80ddff


6. With the rectangle tool draw a top part on the 'roof' using the same Gradient Overlay colours as the red roof. Using the font Bebe Neue write out the menu, then double click into Blending Options > Drop Shadow and put in the settings below:
6、用矩形工具在roof的上方创建一个矩形(202,142,796,58),添加和roof图层一样的渐变叠加的样式。(直接复制roof图层样式,然后在本图层粘贴,包括了描边样式)

在矩形上添加一些菜单文字,字体:Bebe Neue (找不到该字体,用Arial Rounded MT Bold代替,字体颜色:白色)。双击文字图层按照下图添加投影的图层样式:

字体的相关设置如下:

调整各个菜单的位置,结果如下:

7. Using the rectangle tool draw a search box, double clock into Blending Options & put in the settings below. Next Go into Custom Shape tool and select the magnifying glass icon, holding down the shift key (so the shape stays perfect) draw the icon.
7、用矩形工具画一个搜索框(770,152,210,36),双击图层添加图层样式,按照下图设置样式。接下来选择自定义形状工具,选择放大镜图标,按住Shift键(能保留完好的形状)画该图标


在搜索框中添加文本Type in here and Press Enter,设置如下的格式,字体颜色: #6d6d6d

最终如下:

8. Next using the rectangle tool draw the page background, double click into Blending Options > Gradient overlay and put in the colours I have below, then put a dark grey 1px stroke.
8、用矩形工具画一个页面的背景(132,335,936,1070),双击打开图层样式,按下图设置渐变叠加和添加1px的深灰色的描边
渐变叠加的颜色: #4b3226,#2b1915

描边的颜色: #343434


9. Again with the rectangle tool draw a white 'window', double click into Blending Options and put in the settings below.
9、再用矩形工具画窗户(168,335,864,274),双击打开图层样式,按下图设置样式


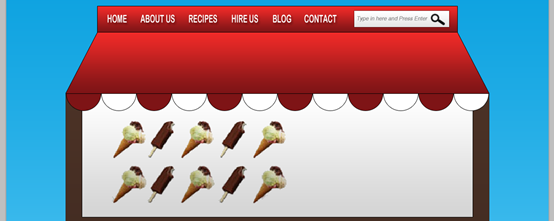
10. Next for the slider I've got some ice cream images, I've shrunk the images down (using the ctrl+t method we used earlier). To make the white background of the images transparent I've put all the ice cream images into a folder and set the Blending Mode to Multiply.
10、接下来在左边将用到一些冰激淋图片,缩小这些图片(用之前的Ctrl+T的方法)。为了使白色背景看起来象透明的,我将这些图片归并一组,然后设置组的混合选项为正片叠底

11. For the slider I've used the font Heartbreaker, I've rotated the text by pressing ctrl+t and rotating the edges. I've gotten an Hand Drawn , copied & pasted it into the canvas and have changed the size & rotated it using the ctrl+t method & changed the colour by double clicking into Blending Options > Color Overlay.
11、另一边我用Heartbreaker字体(用Pristina字体替代,具体的设置如下图)添加一些文本,按Ctrl+T,旋转文字。我获得一些手绘图案,拷贝到画布上,用Ctrl+T调整大小,旋转角度,双击打开图层样式窗口,设置颜色叠加样式去更改颜色
文字的格式设置如下图

由于图案比较简单,直接自己手绘了。先新建图层,然后在新图层上用画笔工具手绘,仔细点就可以了

12. Now draw a box with the rounded rectangle tool, double click into Blending Options and put in the settings below & rotate the box. Using the circle tool draw a black circle & with the line tool draw 2 lines for strings. Place the blue sign layers into a folder.
12、用圆角矩形画一个方块(宽80px,高60px),双击打开图层样式窗口按照下图设置样式,旋转该方块,用椭圆工具画一个小黑圆,用直线工具画两条直线。把这些蓝色符号的层归并到一个组

渐变叠加的颜色: #3789cd,#2f6ba3,#3789cd

方块旋转的角度建议是159度,因为之前设置的渐变叠加的角度是111度,通过计算可知159度是渐变的方向和方块的方向一致

13. Duplicate the blue sign folder by dragging them to the new layer icon. Go into the Custom Shape tool and choose the arrow, draw a white arrow on each blue sign.
13、复制蓝色符号的文件夹,拖动到新建图层的图标上。用自定义形状工具,选择箭头,在每一个蓝色的符号上添加一个箭头

14. Next draw a 'title' box using the rectangle tool, double click into Blending Options and put in the same red gradient as the 'roof' & put in a 1px dark grey stroke. Next draw a white box with a 1px stroke. Holding down the ctrl key select the 2 shapes you created and duplicate them 4 more times. Place each of them where you want. To make a box larger press ctrl+t and stretch out the box.
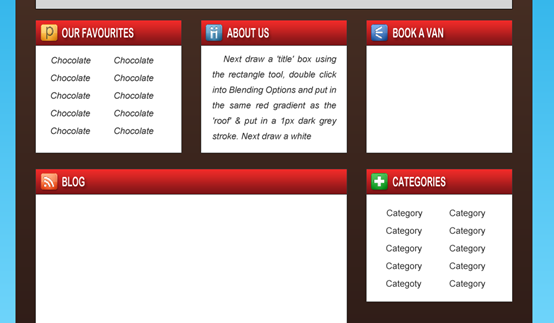
14、接下来用矩形工具画标题方块(168,630,264,45),双击打开图层样式窗口,添加和roof图层一样的渐变叠加,并添加1px的深灰色(#343434)的描边,接下来画一个白色的方块(168,675,264,195),1px的描边。

按住Ctrl键选择两个图层,复制四次。移动每个方块到合适的位置。然后用Ctrl+T更改一个方块的大小
如下图,五个标题方块的位置分别是(168,630),(468,630),(768,630),(168,900),(768,900)
左下角的大方块的宽度为564px,大方块中白色方块的高度为416

15. I've put in the headings with the font Bebe Neue, and written out the content in Arial font. I've gotten the icons from the Danish Royalty Free Icon set.
15、在每个方块书写标题,用字体Bebe Neue;书写内容,用字体Arial。我从Danish Royalty Free Icon上获得了一些免费的图标
直接复制roof图层上的文字图层,移到合适的位置,修改标题文字。Danish Royalty Free Icon的链接已经失效,改从其他地方获得图标
16. Using the rectangle shape tool draw out some boxes for the contact form using the colour below. Double click into Blending Options > Stroke and put a 1px dark grey stroke. Draw a button with the rounded rectangle tool & put in the same gradient and stroke as the red title box.
16、用矩形工具在contact表单里画一些方块,颜色如后所示(#ebebeb)。双击打开图层样式窗口,添加1px的深色(#343434)描边。用圆角矩形工具添加一个按钮,给按钮添加和标题栏一样的渐变叠加和描边样式


17, Next holding down the shift key draw 2 boxed with the rectangle tool like below, one white & small and the second large. On the larger box double click into Blending Options and put in the settings below:
17、接下来用矩形工具按住Shift键画两个正方形,如下图所示,一个白色小点的,和一个白色大点的。在大点的正方形上双击打开图层样式,按下图设置样式
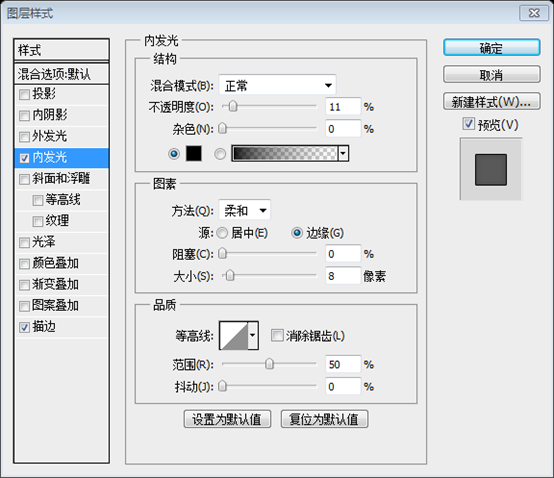

为了醒目,小的白色正方形颜色改成红色
Write out the example post title & post description.
书写博客的标题和说明,标题的字体和标题栏里的字体一样,颜色为红色,说明文字的字体和其他栏目里的字体一样

18. Next copy & paste an example image, right click and Create Clipping Mask (this will crop the image to the size of the white square).
18、接下来复制粘贴一个示意图片,右键创建一个剪贴蒙版(这会使你的图片限制在白色正方形中,本示例为了醒目,已经改成红色)

19. Duplicate the send button you created earlier and place it as a button under the post, change the 'send' to 'continue reading'.
19、复制你之前创建的第二个按钮,把按钮移到说明文字的下方,把send改成continue reading

20. Next I've gotten some icy pole social icons and placed them on top of the layout.
20、接下来,下载一些icy pole social icons,把它移到布局的合适位置

21. Next write out the title of your website, I've used the font Heartbreaker. Double click on the title into Blending Options and put in the settings below:
21、接下来添加网站的标题,字体:Heartbreaker,双击文字图层打开图层样式,按下图设置样式:

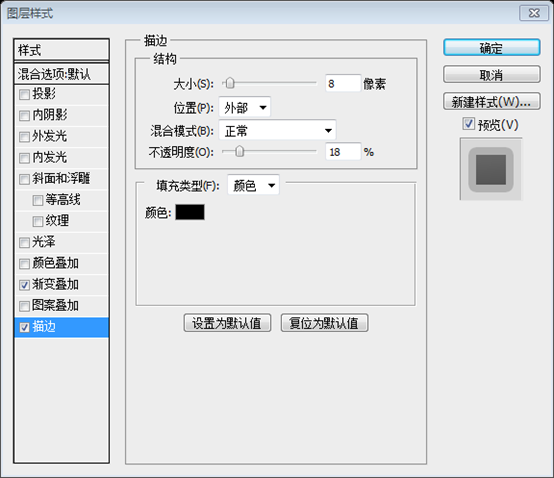

Go into the Custom Shape Tool & choose this snow flake symbol & while holding down the shift key draw some snow flakes.
切换到自定义形状工具,选择雪花形状,按住Shift键,添加一些雪花

22. Lastly write out some Copyright details for the footer.
22、最后在页脚添加一些版权信息

Final Result
最终结果

后记:
夏日里的清凉。由于该教程是参照960布局系统完成的,有些局部的尺寸比较随意。在翻译的时候,计算这些尺寸费了一番功夫。
对设计师来说,天生对尺寸有很好的把握,就是鼠标拖拖,尺寸也能拿捏的到位。
对编码者来说,初期学习阶段,还是要仔细计算各部分的尺寸为好。等将来做的多了,感觉到位了,再随意点也不迟。
更多PS网页设计教程VII——在Photoshop中设计卡通店面布局相关文章请关注PHP中文网!


