一、概述
在写代码之前,我必须得问几个问题:
1、ViewGroup的职责是啥?
ViewGroup相当于一个放置View的容器,并且我们在写布局xml的时候,会告诉容器(凡是以layout为开头的属性,都是为用于告诉容器的),我们的宽度(layout_width)、高度(layout_height)、对齐方式(layout_gravity)等;当然还有margin等;于是乎,ViewGroup的职能为:给childView计算出建议的宽和高和测量模式 ;决定childView的位置;为什么只是建议的宽和高,而不是直接确定呢,别忘了childView宽和高可以设置为wrap_content,这样只有childView才能计算出自己的宽和高。
2、View的职责是啥?
View的职责,根据测量模式和ViewGroup给出的建议的宽和高,计算出自己的宽和高;同时还有个更重要的职责是:在ViewGroup为其指定的区域内绘制自己的形态。
3、ViewGroup和LayoutParams之间的关系?
大家可以回忆一下,当在LinearLayout中写childView的时候,可以写layout_gravity,layout_weight属性;在RelativeLayout中的childView有layout_centerInParent属性,却没有layout_gravity,layout_weight,这是为什么呢?这是因为每个ViewGroup需要指定一个LayoutParams,用于确定支持childView支持哪些属性,比如LinearLayout指定LinearLayout.LayoutParams等。如果大家去看LinearLayout的源码,会发现其内部定义了LinearLayout.LayoutParams,在此类中,你可以发现weight和gravity的身影。
二、View的3种测量模式
上面提到了ViewGroup会为childView指定测量模式,下面简单介绍下三种测量模式:
EXACTLY:表示设置了精确的值,一般当childView设置其宽、高为精确值、match_parent时,ViewGroup会将其设置为EXACTLY;
AT_MOST:表示子布局被限制在一个最大值内,一般当childView设置其宽、高为wrap_content时,ViewGroup会将其设置为AT_MOST;
UNSPECIFIED:表示子布局想要多大就多大,一般出现在AadapterView的item的heightMode中、ScrollView的childView的heightMode中;此种模式比较少见。
注:上面的每一行都有一个一般,意思上述不是绝对的,对于childView的mode的设置还会和ViewGroup的测量mode有一定的关系;当然了,这是第一篇自定义ViewGroup,而且绝大部分情况都是上面的规则,所以为了通俗易懂,暂不深入讨论其他内容。
三、从API角度进行浅析
上面叙述了ViewGroup和View的职责,下面从API角度进行浅析。
View的根据ViewGroup传人的测量值和模式,对自己宽高进行确定(onMeasure中完成),然后在onDraw中完成对自己的绘制。
ViewGroup需要给View传入view的测量值和模式(onMeasure中完成),而且对于此ViewGroup的父布局,自己也需要在onMeasure中完成对自己宽和高的确定。此外,需要在onLayout中完成对其childView的位置的指定。
四、完整的例子
需求:我们定义一个ViewGroup,内部可以传入0到4个childView,分别依次显示在左上角,右上角,左下角,右下角。
1、决定该ViewGroup的LayoutParams
对于我们这个例子,我们只需要ViewGroup能够支持margin即可,那么我们直接使用系统的MarginLayoutParams
@Override
 public ViewGroup.LayoutParams generateLayoutParams(AttributeSet attrs)
 {
  return new MarginLayoutParams(getContext(), attrs);
}重写父类的该方法,返回MarginLayoutParams的实例,这样就为我们的ViewGroup指定了其LayoutParams为MarginLayoutParams。
2、onMeasure
在onMeasure中计算childView的测量值以及模式,以及设置自己的宽和高:
/**
  * 计算所有ChildView的宽度和高度 然后根据ChildView的计算结果,设置自己的宽和高
  */
 @Override
 protected void onMeasure(int widthMeasureSpec, int heightMeasureSpec)
 {
  /**
   * 获得此ViewGroup上级容器为其推荐的宽和高,以及计算模式
   */
  int widthMode = MeasureSpec.getMode(widthMeasureSpec);
  int heightMode = MeasureSpec.getMode(heightMeasureSpec);
  int sizeWidth = MeasureSpec.getSize(widthMeasureSpec);
  int sizeHeight = MeasureSpec.getSize(heightMeasureSpec);


  // 计算出所有的childView的宽和高
  measureChildren(widthMeasureSpec, heightMeasureSpec);
  /**
   * 记录如果是wrap_content是设置的宽和高
   */
  int width = 0;
  int height = 0;

  int cCount = getChildCount();

  int cWidth = 0;
  int cHeight = 0;
  MarginLayoutParams cParams = null;

  // 用于计算左边两个childView的高度
  int lHeight = 0;
  // 用于计算右边两个childView的高度,最终高度取二者之间大值
  int rHeight = 0;

  // 用于计算上边两个childView的宽度
  int tWidth = 0;
  // 用于计算下面两个childiew的宽度,最终宽度取二者之间大值
  int bWidth = 0;

  /**
   * 根据childView计算的出的宽和高,以及设置的margin计算容器的宽和高,主要用于容器是warp_content时
   */
  for (int i = 0; i < cCount; i++)
  {
   View childView = getChildAt(i);
   cWidth = childView.getMeasuredWidth();
   cHeight = childView.getMeasuredHeight();
   cParams = (MarginLayoutParams) childView.getLayoutParams();

   // 上面两个childView
   if (i == 0 || i == 1)
   {
    tWidth += cWidth + cParams.leftMargin + cParams.rightMargin;
   }

   if (i == 2 || i == 3)
   {
    bWidth += cWidth + cParams.leftMargin + cParams.rightMargin;
   }

   if (i == 0 || i == 2)
   {
    lHeight += cHeight + cParams.topMargin + cParams.bottomMargin;
   }

   if (i == 1 || i == 3)
   {
    rHeight += cHeight + cParams.topMargin + cParams.bottomMargin;
   }

  }

  width = Math.max(tWidth, bWidth);
  height = Math.max(lHeight, rHeight);

  /**
   * 如果是wrap_content设置为我们计算的值
   * 否则:直接设置为父容器计算的值
   */
  setMeasuredDimension((widthMode == MeasureSpec.EXACTLY) ? sizeWidth
    : width, (heightMode == MeasureSpec.EXACTLY) ? sizeHeight
    : height);
}10-14行,获取该ViewGroup父容器为其设置的计算模式和尺寸,大多情况下,只要不是wrap_content,父容器都能正确的计算其尺寸。所以我们自己需要计算如果设置为wrap_content时的宽和高,如何计算呢?那就是通过其childView的宽和高来进行计算。
17行,通过ViewGroup的measureChildren方法为其所有的孩子设置宽和高,此行执行完成后,childView的宽和高都已经正确的计算过了
43-71行,根据childView的宽和高,以及margin,计算ViewGroup在wrap_content时的宽和高。
80-82行,如果宽高属性值为wrap_content,则设置为43-71行中计算的值,否则为其父容器传入的宽和高。
3、onLayout对其所有childView进行定位(设置childView的绘制区域)
// abstract method in viewgroup
 @Override
 protected void onLayout(boolean changed, int l, int t, int r, int b)
 {
  int cCount = getChildCount();
  int cWidth = 0;
  int cHeight = 0;
  MarginLayoutParams cParams = null;
  /**
   * 遍历所有childView根据其宽和高,以及margin进行布局
   */
  for (int i = 0; i < cCount; i++)
  {
   View childView = getChildAt(i);
   cWidth = childView.getMeasuredWidth();
   cHeight = childView.getMeasuredHeight();
   cParams = (MarginLayoutParams) childView.getLayoutParams();

   int cl = 0, ct = 0, cr = 0, cb = 0;

   switch (i)
   {
   case 0:
    cl = cParams.leftMargin;
    ct = cParams.topMargin;
    break;
   case 1:
    cl = getWidth() - cWidth - cParams.leftMargin
      - cParams.rightMargin;
    ct = cParams.topMargin;

    break;
   case 2:
    cl = cParams.leftMargin;
    ct = getHeight() - cHeight - cParams.bottomMargin;
    break;
   case 3:
    cl = getWidth() - cWidth - cParams.leftMargin
      - cParams.rightMargin;
    ct = getHeight() - cHeight - cParams.bottomMargin;
    break;

   }
   cr = cl + cWidth;
   cb = cHeight + ct;
   childView.layout(cl, ct, cr, cb);
  }

}代码比较容易懂:遍历所有的childView,根据childView的宽和高以及margin,然后分别将0,1,2,3位置的childView依次设置到左上、右上、左下、右下的位置。
如果是第一个View(index=0) :则childView.layout(cl, ct, cr, cb); cl为childView的leftMargin , ct 为topMargin , cr 为cl+ cWidth , cb为 ct + cHeight
如果是第二个View(index=1) :则childView.layout(cl, ct, cr, cb);
cl为getWidth() - cWidth - cParams.leftMargin- cParams.rightMargin;
ct 为topMargin , cr 为cl+ cWidth , cb为 ct + cHeight
剩下两个类似~
这样就完成了,我们的ViewGroup代码的编写,下面我们进行测试,分别设置宽高为固定值,wrap_content,match_parent
4、测试结果
布局1:
<com.example.zhy_custom_viewgroup.CustomImgContainer xmlns:android="http://schemas.android.com/apk/res/android"
 xmlns:tools="http://schemas.android.com/tools"
 android:layout_width="200dp"
 android:layout_height="200dp"
 android:background="#AA333333" >

 <TextView
  android:layout_width="50dp"
  android:layout_height="50dp"
  android:background="#FF4444"
  android:gravity="center"
  android:text="0"
  android:textColor="#FFFFFF"
  android:textSize="22sp"
  android:textStyle="bold" />

 <TextView
  android:layout_width="50dp"
  android:layout_height="50dp"
  android:background="#00ff00"
  android:gravity="center"
  android:text="1"
  android:textColor="#FFFFFF"
  android:textSize="22sp"
  android:textStyle="bold" />

 <TextView
  android:layout_width="50dp"
  android:layout_height="50dp"
  android:background="#ff0000"
  android:gravity="center"
  android:text="2"
  android:textColor="#FFFFFF"
  android:textSize="22sp"
  android:textStyle="bold" />

 <TextView
  android:layout_width="50dp"
  android:layout_height="50dp"
  android:background="#0000ff"
  android:gravity="center"
  android:text="3"
  android:textColor="#FFFFFF"
  android:textSize="22sp"
  android:textStyle="bold" />

</com.example.zhy_custom_viewgroup.CustomImgContainer>
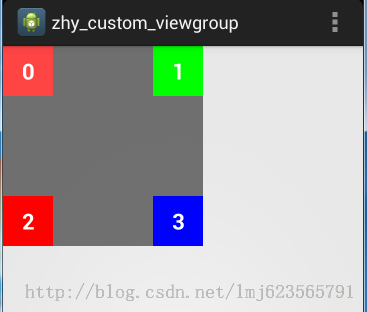
ViewGroup宽和高设置为固定值
效果图:

布局2:
<com.example.zhy_custom_viewgroup.CustomImgContainer xmlns:android="http://schemas.android.com/apk/res/android"
  xmlns:tools="http://schemas.android.com/tools"
  android:layout_width="wrap_content"
  android:layout_height="wrap_content"
  android:background="#AA333333" >

  <TextView
    android:layout_width="150dp"
    android:layout_height="150dp"
    android:background="#E5ED05"
    android:gravity="center"
    android:text="0"
    android:textColor="#FFFFFF"
    android:textSize="22sp"
    android:textStyle="bold" />

  <TextView
    android:layout_width="50dp"
    android:layout_height="50dp"
    android:background="#00ff00"
    android:gravity="center"
    android:text="1"
    android:textColor="#FFFFFF"
    android:textSize="22sp"
    android:textStyle="bold" />

  <TextView
    android:layout_width="50dp"
    android:layout_height="50dp"
    android:background="#ff0000"
    android:gravity="center"
    android:text="2"
    android:textColor="#FFFFFF"
    android:textSize="22sp"
    android:textStyle="bold" />

  <TextView
    android:layout_width="50dp"
    android:layout_height="50dp"
    android:background="#0000ff"
    android:gravity="center"
    android:text="3"
    android:textColor="#FFFFFF"
    android:textSize="22sp"
    android:textStyle="bold" />

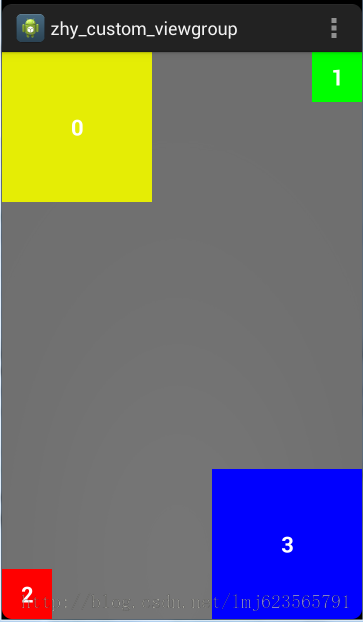
</com.example.zhy_custom_viewgroup.CustomImgContainer> ViewGroup的宽和高设置为wrap_content
<com.example.zhy_custom_viewgroup.CustomImgContainer xmlns:android="http://schemas.android.com/apk/res/android"
  xmlns:tools="http://schemas.android.com/tools"
  android:layout_width="match_parent"
  android:layout_height="match_parent"
  android:background="#AA333333" >

  <TextView
    android:layout_width="150dp"
    android:layout_height="150dp"
    android:background="#E5ED05"
    android:gravity="center"
    android:text="0"
    android:textColor="#FFFFFF"
    android:textSize="22sp"
    android:textStyle="bold" />

  <TextView
    android:layout_width="50dp"
    android:layout_height="50dp"
    android:background="#00ff00"
    android:gravity="center"
    android:text="1"
    android:textColor="#FFFFFF"
    android:textSize="22sp"
    android:textStyle="bold" />

  <TextView
    android:layout_width="50dp"
    android:layout_height="50dp"
    android:background="#ff0000"
    android:gravity="center"
    android:text="2"
    android:textColor="#FFFFFF"
    android:textSize="22sp"
    android:textStyle="bold" />

  <TextView
    android:layout_width="150dp"
    android:layout_height="150dp"
    android:background="#0000ff"
    android:gravity="center"
    android:text="3"
    android:textColor="#FFFFFF"
    android:textSize="22sp"
    android:textStyle="bold" />

</com.example.zhy_custom_viewgroup.CustomImgContainer>ViewGroup的宽和高设置为match_parent

可以看到无论ViewGroup的宽和高的值如何定义,我们的需求都实现了预期的效果~~
四、使用ViewDragHelper自定义ViewGroup
1、概述
在自定义ViewGroup中,很多效果都包含用户手指去拖动其内部的某个View(eg:侧滑菜单等),针对具体的需要去写好onInterceptTouchEvent和onTouchEvent这两个方法是一件很不容易的事,需要自己去处理:多手指的处理、加速度检测等等。
好在官方在v4的支持包中提供了ViewDragHelper这样一个类来帮助我们方便的编写自定义ViewGroup。简单看一下它的注释:
ViewDragHelper is a utility class for writing custom ViewGroups. It offers a number
of useful operations and state tracking for allowing a user to drag and reposition
views within their parent ViewGroup.
下面将重点介绍ViewDragHelper的使用,并且最终去实现一个类似DrawerLayout的一个自定义的ViewGroup。(ps:官方的DrawerLayout就是用此类实现)
2、入门小示例
首先我们通过一个简单的例子来看看其快捷的用法,分为以下几个步骤:
A、创建实例
B、触摸相关的方法的调用
C、ViewDragHelper.Callback实例的编写
(1) 自定义ViewGroup
package com.zhy.learn.view;

import android.content.Context;
import android.support.v4.widget.ViewDragHelper;
import android.util.AttributeSet;
import android.view.MotionEvent;
import android.view.View;
import android.widget.LinearLayout;

/**
 * Created by zhy on 15/6/3.
 */
public class VDHLayout extends LinearLayout
{
 private ViewDragHelper mDragger;

 public VDHLayout(Context context, AttributeSet attrs)
 {
  super(context, attrs);
  mDragger = ViewDragHelper.create(this, 1.0f, new ViewDragHelper.Callback()
  {
   @Override
   public boolean tryCaptureView(View child, int pointerId)
   {
    return true;
   }

   @Override
   public int clampViewPositionHorizontal(View child, int left, int dx)
   {
    return left;
   }

   @Override
   public int clampViewPositionVertical(View child, int top, int dy)
   {
    return top;
   }
  });
 }

 @Override
 public boolean onInterceptTouchEvent(MotionEvent event)
 {
  return mDragger.shouldInterceptTouchEvent(event);
 }

 @Override
 public boolean onTouchEvent(MotionEvent event)
 {
  mDragger.processTouchEvent(event);
  return true;
 }
}可以看到,上面整个自定义ViewGroup的代码非常简洁,遵循上述3个步骤:
A、创建实例
mDragger = ViewDragHelper.create(this, 1.0f, new ViewDragHelper.Callback()
  {
});创建实例需要3个参数,第一个就是当前的ViewGroup,第二个sensitivity,主要用于设置touchSlop:
helper.mTouchSlop = (int) (helper.mTouchSlop * (1 / sensitivity));
可见传入越大,mTouchSlop的值就会越小。第三个参数就是Callback,在用户的触摸过程中会回调相关方法,后面会细说。
B、触摸相关方法
@Override
public boolean onInterceptTouchEvent(MotionEvent event)
{
 return mDragger.shouldInterceptTouchEvent(event);
}

@Override
public boolean onTouchEvent(MotionEvent event)
{
 mDragger.processTouchEvent(event);
 return true;
}onInterceptTouchEvent中通过使用mDragger.shouldInterceptTouchEvent(event)来决定我们是否应该拦截当前的事件。onTouchEvent中通过mDragger.processTouchEvent(event)处理事件。
C、实现ViewDragHelper.CallCack相关方法
new ViewDragHelper.Callback()
  {
   @Override
   public boolean tryCaptureView(View child, int pointerId)
   {
    return true;
   }

   @Override
   public int clampViewPositionHorizontal(View child, int left, int dx)
   {
    return left;
   }

   @Override
   public int clampViewPositionVertical(View child, int top, int dy)
   {
    return top;
   }
}ViewDragHelper中拦截和处理事件时,需要会回调CallBack中的很多方法来决定一些事,比如:哪些子View可以移动、对个移动的View的边界的控制等等。
上面复写的3个方法:
tryCaptureView如何返回ture则表示可以捕获该view,你可以根据传入的第一个view参数决定哪些可以捕获
clampViewPositionHorizontal,clampViewPositionVertical可以在该方法中对child移动的边界进行控制,left , top 分别为即将移动到的位置,比如横向的情况下,我希望只在ViewGroup的内部移动,即:最小>=paddingleft,最大<=ViewGroup.getWidth()-paddingright-child.getWidth。就可以按照如下代码编写:
@Override
  public int clampViewPositionHorizontal(View child, int left, int dx)
  {
   final int leftBound = getPaddingLeft();
   final int rightBound = getWidth() - mDragView.getWidth() - leftBound;

   final int newLeft = Math.min(Math.max(left, leftBound), rightBound);

   return newLeft;
}经过上述3个步骤,我们就完成了一个简单的自定义ViewGroup,可以自由的拖动子View。
简单看一下布局文件
(2) 布局文件
<com.zhy.learn.view.VDHLayout xmlns:android="http://schemas.android.com/apk/res/android"
        xmlns:tools="http://schemas.android.com/tools"
        android:layout_width="match_parent"
        android:orientation="vertical"
        android:layout_height="match_parent"
 >

 <TextView
  android:layout_margin="10dp"
  android:gravity="center"
  android:layout_gravity="center"
  android:background="#44ff0000"
  android:text="I can be dragged !"
  android:layout_width="100dp"
  android:layout_height="100dp"/>

 <TextView
  android:layout_margin="10dp"
  android:layout_gravity="center"
  android:gravity="center"
  android:background="#44ff0000"
  android:text="I can be dragged !"
  android:layout_width="100dp"
  android:layout_height="100dp"/>

 <TextView
  android:layout_margin="10dp"
  android:layout_gravity="center"
  android:gravity="center"
  android:background="#44ff0000"
  android:text="I can be dragged !"
  android:layout_width="100dp"
  android:layout_height="100dp"/>

</com.zhy.learn.view.VDHLayout>
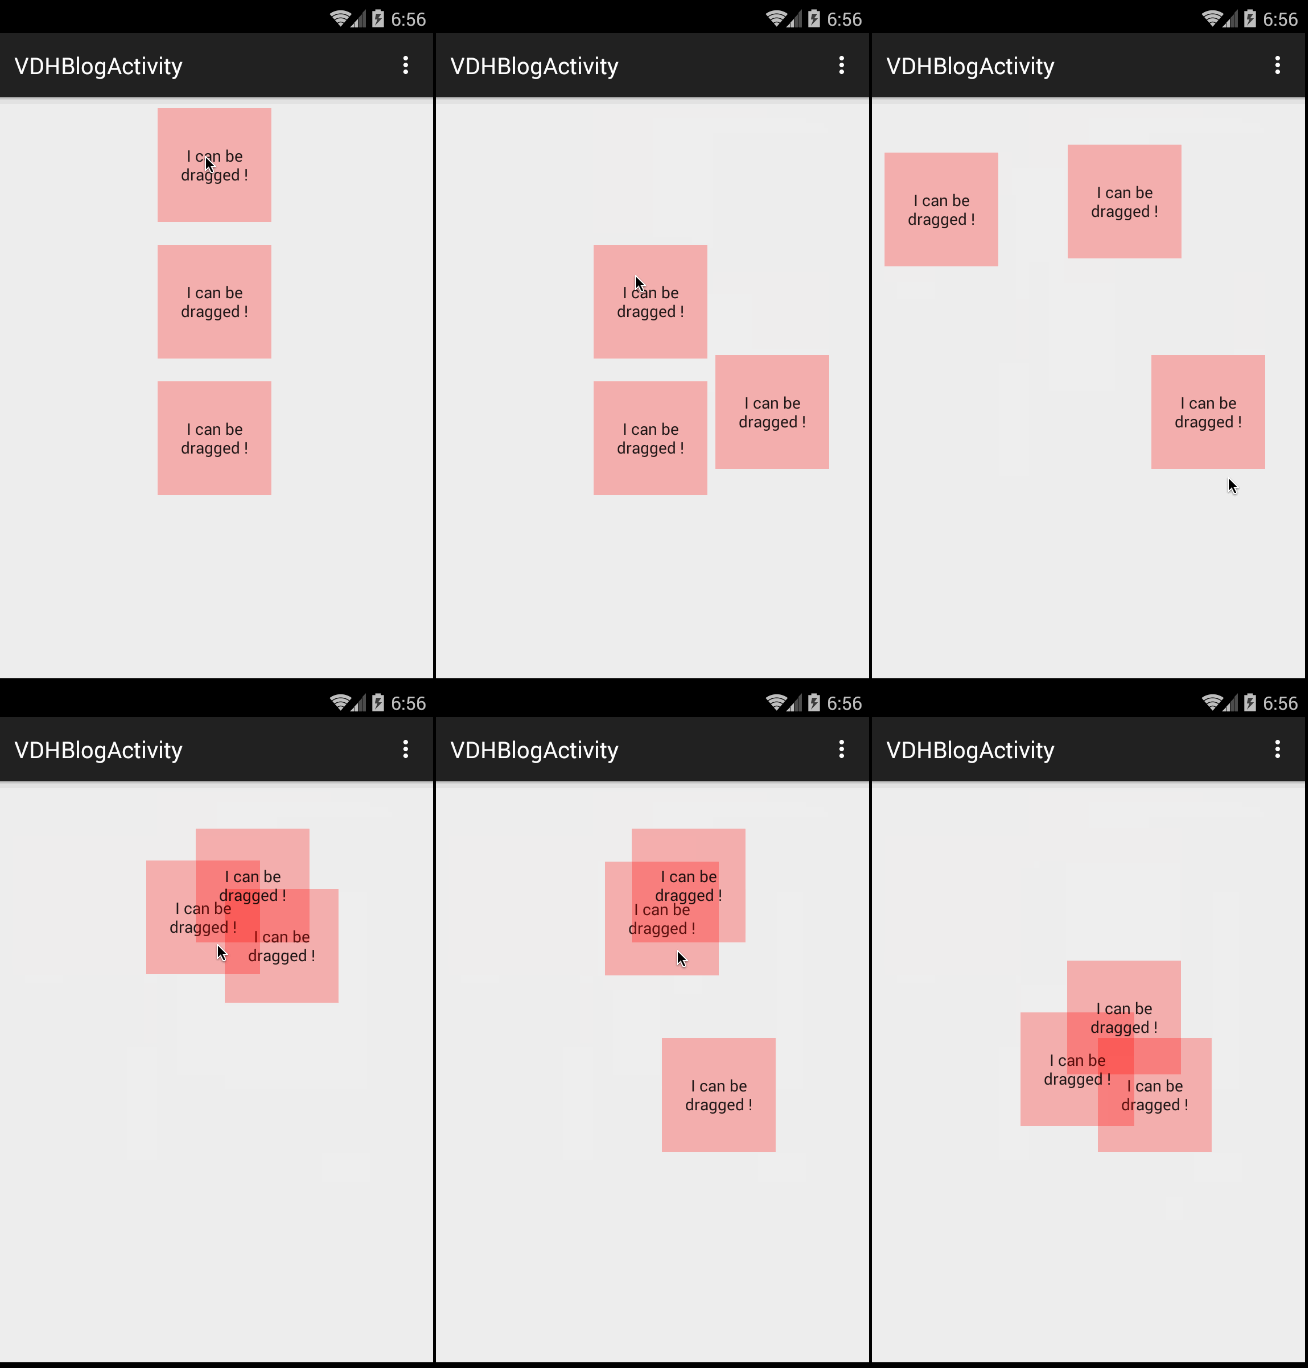
我们的自定义ViewGroup中有三个TextView。
当前效果:

可以看到短短数行代码就可以玩起来了~~~
有了直观的认识以后,我们还需要对ViewDragHelper.CallBack里面的方法做下深入的理解。首先我们需要考虑的是:我们的ViewDragHelper不仅仅说只能够去让子View去跟随我们手指移动,我们继续往下学习其他的功能。
3、功能展示
ViewDragHelper还能做以下的一些操作:
边界检测、加速度检测(eg:DrawerLayout边界触发拉出)
回调Drag Release(eg:DrawerLayout部分,手指抬起,自动展开/收缩)
移动到某个指定的位置(eg:点击Button,展开/关闭Drawerlayout)
那么我们接下来对我们最基本的例子进行改造,包含上述的几个操作。
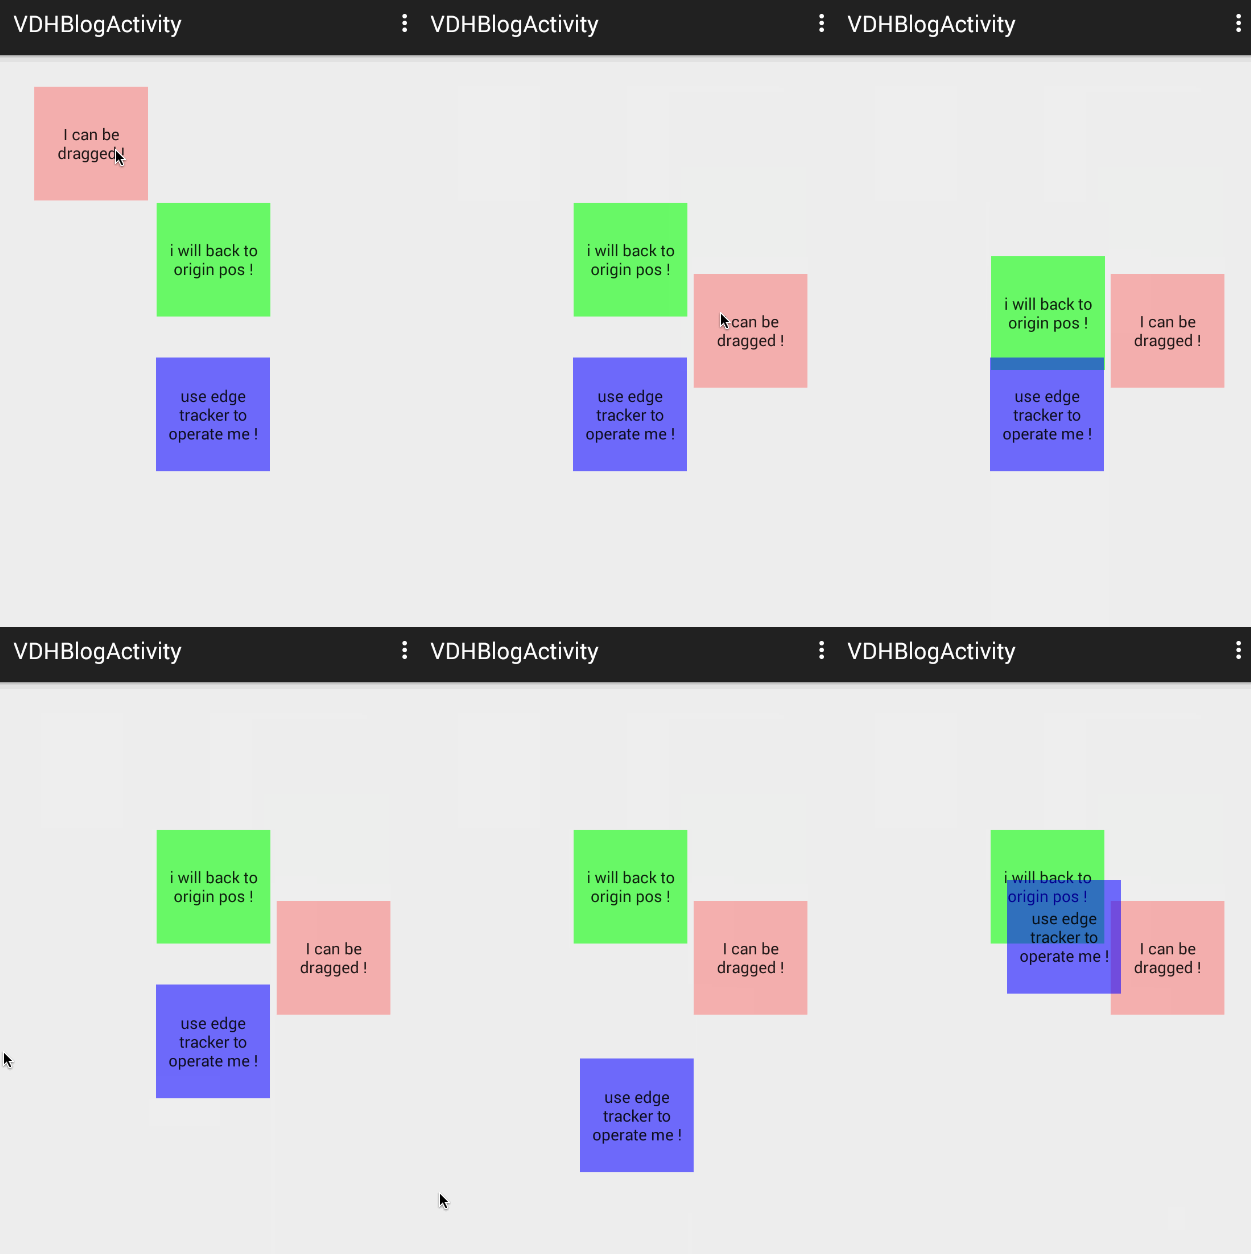
首先看一下我们修改后的效果:

简单的为每个子View添加了不同的操作:
第一个View,就是演示简单的移动
第二个View,演示除了移动后,松手自动返回到原本的位置。(注意你拖动的越快,返回的越快)
第三个View,边界移动时对View进行捕获。
好了,看完效果图,来看下代码的修改:
修改后的代码
package com.zhy.learn.view;

import android.content.Context;
import android.graphics.Point;
import android.support.v4.widget.ViewDragHelper;
import android.util.AttributeSet;
import android.view.MotionEvent;
import android.view.View;
import android.widget.LinearLayout;

/**
 * Created by zhy on 15/6/3.
 */
public class VDHLayout extends LinearLayout
{
 private ViewDragHelper mDragger;

 private View mDragView;
 private View mAutoBackView;
 private View mEdgeTrackerView;

 private Point mAutoBackOriginPos = new Point();

 public VDHLayout(Context context, AttributeSet attrs)
 {
  super(context, attrs);
  mDragger = ViewDragHelper.create(this, 1.0f, new ViewDragHelper.Callback()
  {
   @Override
   public boolean tryCaptureView(View child, int pointerId)
   {
    //mEdgeTrackerView禁止直接移动
    return child == mDragView || child == mAutoBackView;
   }

   @Override
   public int clampViewPositionHorizontal(View child, int left, int dx)
   {
    return left;
   }

   @Override
   public int clampViewPositionVertical(View child, int top, int dy)
   {
    return top;
   }


   //手指释放的时候回调
   @Override
   public void onViewReleased(View releasedChild, float xvel, float yvel)
   {
    //mAutoBackView手指释放时可以自动回去
    if (releasedChild == mAutoBackView)
    {
     mDragger.settleCapturedViewAt(mAutoBackOriginPos.x, mAutoBackOriginPos.y);
     invalidate();
    }
   }

   //在边界拖动时回调
   @Override
   public void onEdgeDragStarted(int edgeFlags, int pointerId)
   {
    mDragger.captureChildView(mEdgeTrackerView, pointerId);
   }
  });
  mDragger.setEdgeTrackingEnabled(ViewDragHelper.EDGE_LEFT);
 }


 @Override
 public boolean onInterceptTouchEvent(MotionEvent event)
 {
  return mDragger.shouldInterceptTouchEvent(event);
 }

 @Override
 public boolean onTouchEvent(MotionEvent event)
 {
  mDragger.processTouchEvent(event);
  return true;
 }

 @Override
 public void computeScroll()
 {
  if(mDragger.continueSettling(true))
  {
   invalidate();
  }
 }

 @Override
 protected void onLayout(boolean changed, int l, int t, int r, int b)
 {
  super.onLayout(changed, l, t, r, b);

  mAutoBackOriginPos.x = mAutoBackView.getLeft();
  mAutoBackOriginPos.y = mAutoBackView.getTop();
 }

 @Override
 protected void onFinishInflate()
 {
  super.onFinishInflate();

  mDragView = getChildAt(0);
  mAutoBackView = getChildAt(1);
  mEdgeTrackerView = getChildAt(2);
 }
}
布局文件我们仅仅是换了下文本和背景色就不重复贴了。
第一个View基本没做任何修改。
第二个View,我们在onLayout之后保存了最开启的位置信息,最主要还是重写了Callback中的onViewReleased,我们在onViewReleased中判断如果是mAutoBackView则调用settleCapturedViewAt回到初始的位置。大家可以看到紧随其后的代码是invalidate();因为其内部使用的是mScroller.startScroll,所以别忘了需要invalidate()以及结合computeScroll方法一起。
第三个View,我们在onEdgeDragStarted回调方法中,主动通过captureChildView对其进行捕获,该方法可以绕过tryCaptureView,所以我们的tryCaptureView虽然并为返回true,但却不影响。注意如果需要使用边界检测需要添加上mDragger.setEdgeTrackingEnabled(ViewDragHelper.EDGE_LEFT);。
到此,我们已经介绍了Callback中常用的回调方法了,当然还有一些方法没有介绍,接下来我们修改下我们的布局文件,我们把我们的TextView全部加上clickable=true,意思就是子View可以消耗事件。再次运行,你会发现本来可以拖动的View不动了,(如果有拿Button测试的兄弟应该已经发现这个问题了,我希望你看到这了,而不是已经提问了,哈~)。
原因是什么呢?主要是因为,如果子View不消耗事件,那么整个手势(DOWN-MOVE*-UP)都是直接进入onTouchEvent,在onTouchEvent的DOWN的时候就确定了captureView。如果消耗事件,那么就会先走onInterceptTouchEvent方法,判断是否可以捕获,而在判断的过程中会去判断另外两个回调的方法:getViewHorizontalDragRange和getViewVerticalDragRange,只有这两个方法返回大于0的值才能正常的捕获。
所以,如果你用Button测试,或者给TextView添加了clickable = true ,都记得重写下面这两个方法:
@Override
public int getViewHorizontalDragRange(View child)
{
  return getMeasuredWidth()-child.getMeasuredWidth();
}

@Override
public int getViewVerticalDragRange(View child)
{
  return getMeasuredHeight()-child.getMeasuredHeight();
}方法的返回值应当是该childView横向或者纵向的移动的范围,当前如果只需要一个方向移动,可以只复写一个。
到此,我们列一下所有的Callback方法,看看还有哪些没用过的:
onViewDragStateChanged
当ViewDragHelper状态发生变化时回调(IDLE,DRAGGING,SETTING[自动滚动时]):
onViewPositionChanged
当captureview的位置发生改变时回调:
onViewCaptured
当captureview被捕获时回调:
onViewReleased 已用
onEdgeTouched
当触摸到边界时回调:
onEdgeLock
true的时候会锁住当前的边界,false则unLock。
onEdgeDragStarted 已用
getOrderedChildIndex
改变同一个坐标(x,y)去寻找captureView位置的方法。(具体在:findTopChildUnder方法中)
getViewHorizontalDragRange 已用
getViewVerticalDragRange 已用
tryCaptureView 已用
clampViewPositionHorizontal 已用
clampViewPositionVertical 已用
ok,至此所有的回调方法都有了一定的认识。
总结下,方法的大致的回调顺序:
shouldInterceptTouchEvent:

DOWN:
 getOrderedChildIndex(findTopChildUnder)
 ->onEdgeTouched

MOVE:
 getOrderedChildIndex(findTopChildUnder)
 ->getViewHorizontalDragRange &
  getViewVerticalDragRange(checkTouchSlop)(MOVE中可能不止一次)
 ->clampViewPositionHorizontal&
  clampViewPositionVertical
 ->onEdgeDragStarted
 ->tryCaptureView
 ->onViewCaptured
 ->onViewDragStateChanged

processTouchEvent:

DOWN:
 getOrderedChildIndex(findTopChildUnder)
 ->tryCaptureView
 ->onViewCaptured
 ->onViewDragStateChanged
 ->onEdgeTouched
MOVE:
 ->STATE==DRAGGING:dragTo
 ->STATE!=DRAGGING:
  onEdgeDragStarted
  ->getOrderedChildIndex(findTopChildUnder)
  ->getViewHorizontalDragRange&
   getViewVerticalDragRange(checkTouchSlop)
  ->tryCaptureView
  ->onViewCaptured
  ->onViewDragStateChanged
ok,上述是正常情况下大致的流程,当然整个过程可能会存在很多判断不成立的情况。
从上面也可以解释,我们在之前TextView(clickable=false)的情况下,没有编写getViewHorizontalDragRange方法时,是可以移动的。因为直接进入processTouchEvent的DOWN,然后就onViewCaptured、onViewDragStateChanged(进入DRAGGING状态),接下来MOVE就直接dragTo了。
而当子View消耗事件的时候,就需要走shouldInterceptTouchEvent,MOVE的时候经过一系列的判断(getViewHorizontalDragRange,clampViewPositionVertical等),才能够去tryCaptureView。
ok,到此ViewDragHelper的入门用法我们就介绍结束了,下一篇,我们将使用ViewDragHelper去自己实现一个DrawerLayout。
有兴趣的也可以根据本文,以及DrawerLayout的源码去实现了~
更多Android应用开发中自定义ViewGroup视图容器的教程相关文章请关注PHP中文网!


