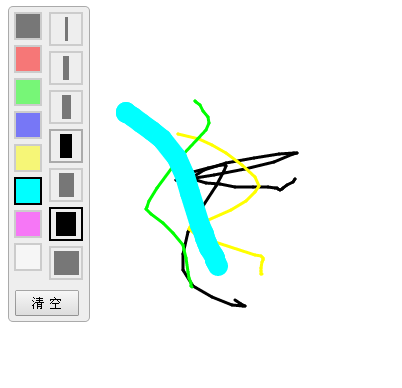
Contoh dalam artikel ini menerangkan kesan papan lukisan ringkas yang dilaksanakan oleh JS berdasarkan pemalam ocanvas. Kongsikan dengan semua orang untuk rujukan anda, butirannya adalah seperti berikut:
Menggunakan okanvas untuk mencipta papan lukisan dalam talian yang ringkas.
rujukan ocanvas: http://ocanvas.org/
Kesannya adalah seperti berikut:

Kod utama adalah seperti berikut:
<!DOCTYPE html>
<html>
<head>
  <meta charset="UTF-8" />
  <title>oCanvas Example</title>
  <meta name="robots" content="noindex, nofollow">
  <meta name="viewport" content="width=device-width, initial-scale=1.0, maximum-scale=1.0, user-scalable=no" />
  <meta name="apple-mobile-web-app-capable" content="yes" />
  <meta name="apple-mobile-web-app-status-bar-style" content="black" />
  <script src="http://libs.useso.com/js/zepto/1.1.3/zepto.min.js"></script>
  <script>
  var line_color = '#000';
  var line_size = 3;
  $(function(){
    $('.tool .color div').click(function(){
      $('.tool .color div').removeClass('active');
      $(this).addClass('active');
      line_color = $(this).data('color');
      mouseDot.fill = line_color;
    });
    $('.tool .size div').click(function(){
      $('.tool .size div').removeClass('active');
      $(this).addClass('active');
      line_size = $(this).data('size');
      mouseDot.radius = Math.max(line_size / 2, 3);
    });
  });
  </script>
  <style>
  body, html {padding:0; margin:0; overflow:hidden;}
  .tool{position:absolute; top:10px; left:10px; border:solid 1px #aaa; background-color:#eee; border-radius:5px; padding-right:5px;}
  .tool .color {float:left; margin:5px; width:30px;}
  .tool .color div{width:24px; height:24px; border:solid 2px #aaa; margin-bottom:5px; opacity:0.5;}
  .tool .color div:hover{opacity:1; cursor:pointer;}
  .tool .color .active{opacity:1; border:solid 2px #000;}
  .tool .size {float:left; margin:5px; width:30px; margin-left:0;}
  .tool .size div{width:30px; height:30px; border:solid 2px #aaa; margin-bottom:5px; opacity:0.5;}
  .tool .size div:hover{opacity:1; cursor:pointer;}
  .tool .size .active{opacity:1; border:solid 2px #000;}
  .tool .size span{display:block; margin:3px auto; height:24px; background-color:black;}
  .btn {clear:both; margin-bottom:5px; text-align:center;}
  .btn input {padding:3px 15px;}
  </style>
</head>
<body>
  <canvas id="canvas" width="200" height="100"></canvas>
  <div class="tool">
    <div class="color">
      <div style="background:#000;" data-color="#000" class="active"></div>
      <div style="background:#f00;" data-color="#f00"></div>
      <div style="background:#0f0;" data-color="#0f0"></div>
      <div style="background:#00f;" data-color="#00f"></div>
      <div style="background:#ff0;" data-color="#ff0"></div>
      <div style="background:#0ff;" data-color="#0ff"></div>
      <div style="background:#f0f;" data-color="#f0f"></div>
      <div style="background:#fff;" data-color="#fff"></div>
    </div>
    <div class="size">
      <div class="active" data-size="3" ><span style="width:3px;" ></span></div>
      <div data-size="6" ><span style="width:6px;" ></span></div>
      <div data-size="9" ><span style="width:9px;" ></span></div>
      <div data-size="12"><span style="width:12px;"></span></div>
      <div data-size="15"><span style="width:15px;"></span></div>
      <div data-size="20"><span style="width:20px;"></span></div>
      <div data-size="25"><span style="width:25px;"></span></div>
    </div>
    <div class="btn">
      <input type="button" value="清 空" onclick="clearAll();" />
    </div>
  </div>
  <script src="js/ocanvas-2.7.3.min.js"></script>
  <script>
  var c = document.querySelector("#canvas"),
  ctx = c.getContext("2d");
  c.width = window.innerWidth;
  c.height = window.innerHeight;
  c.addEventListener("touchmove", function (e) { e.preventDefault(); }, false);
  var cs = oCanvas.create({
    canvas: "#canvas",
    background: "#fff",
    fps: 30,
    disableScrolling: true
  });
  var isDraw = false;
  var xx = 0;
  var yy = 0;
  var mouseDot;
  clearAll();
  cs.bind('mousedown', function(){
    drawBegin(cs.mouse.x, cs.mouse.y);
  }).bind('touchstart tap', function(){
    drawBegin(cs.touch.x, cs.touch.y);
  }).bind('mouseup touchend', function(){
    isDraw = false;
  }).bind('mousemove', function(){
    drawMove(cs.mouse.x, cs.mouse.y);
  }).bind('touchmove', function(){
    drawMove(cs.touch.x, cs.touch.y);
  });
  /*
  cs.setLoop(function () {
    mouseDot.x = cs.mouse.x;
    mouseDot.y = cs.mouse.y;
  }).start();
  */
  function drawBegin(x, y)
  {
    isDraw = true;
    xx = x;
    yy = y;
    var dot = cs.display.arc({
      x: x,
      y: y,
      radius: line_size / 2,
      start: 0,
      end: 360,
      fill: line_color
    });
    cs.addChild(dot);
  }
  function drawMove(x, y)
  {
    if (isDraw)
    {
      var line = cs.display.line({
        start: { x: xx, y: yy },
        end: { x: x, y: y },
        stroke: '' + line_size + 'px ' + line_color,
        cap: "round"
      });
      cs.addChild(line);
      xx = x;
      yy = y;
    }
    else
    {
      mouseDot.moveTo(x, y);
      cs.addChild(mouseDot);
      cs.draw.redraw();
    }
  }
  function clearAll()
  {
    cs.reset();
    // 处理鼠标
    cs.mouse.hide();
    mouseDot = cs.display.arc({
      x: -100,
      y: -100,
      radius: Math.max(line_size / 2, 3),
      start: 0,
      end: 360,
      fill: line_color,
      shadow: '0 0 5px #333'
    });
    cs.addChild(mouseDot);
  }
  </script>
</body>
</html>
Pembaca yang berminat dengan lebih banyak kandungan berkaitan JavaScript boleh menyemak topik khas di tapak ini: "Ringkasan kesan dan teknik penukaran JavaScript", "Ringkasan teknik algoritma carian JavaScript", "Ringkasan kesan dan teknik khas animasi JavaScript", "Ringkasan ralat JavaScript dan kemahiran nyahpepijat", "Ringkasan struktur data JavaScript dan teknik algoritma", "Ringkasan traversal JavaScript bagi Algoritma dan Teknik" dan "Ringkasan Penggunaan Operasi Matematik JavaScript"
Klik di sini untuk kod contoh lengkapMuat turun dari tapak ini.
Saya harap artikel ini akan membantu semua orang dalam pengaturcaraan JavaScript.


