


Hai! Hari ini, saya akan membina sistem suria menggunakan Three.js. Tetapi sebelum kita bermula, anda harus tahu bahawa inspirasi untuk artikel ini datang daripada wakil pelanggan yang projeknya sedang saya kerjakan. Ya, itulah anda—orang yang percaya Bumi itu rata.
JavaScript/Node mempunyai ekosistem perpustakaan terbesar yang merangkumi sejumlah besar ciri yang memudahkan pembangunan anda, jadi saya sentiasa boleh memilih mana yang lebih baik untuk tujuan anda. Walau bagaimanapun, jika kita bercakap tentang grafik 3D, tidak ada banyak pilihan yang menarik dan three.js mungkin yang terbaik untuk mereka semua dan mempunyai komuniti terbesar.
Jadi mari kita menyelam dalam Three.js dan bina sistem Suria menggunakannya. Dalam artikel ini saya akan membincangkan:
Perkara pertama dahulu: untuk memulakan projek, saya menggunakan Vite dan memasang pergantungan Three.js. Sekarang, persoalannya ialah bagaimana untuk menyediakan Three.js. Untuk ini, anda memerlukan tiga perkara: pemandangan, kamera dan pemapar. Saya juga menggunakan addon terbina dalam, OrbitControls, yang membolehkan saya menavigasi dalam tempat kejadian. Selepas memulakan apl, skrin hitam akan muncul.
import { Scene, WebGLRenderer, PerspectiveCamera } from "three"; import { OrbitControls } from "three/addons/controls/OrbitControls.js"; const w = window.innerWidth; const h = window.innerHeight; const scene = new Scene(); const camera = new PerspectiveCamera(75, w / h, 0.1, 100); const renderer = new WebGLRenderer(); const controls = new OrbitControls(camera, renderer.domElement); controls.minDistance = 10; controls.maxDistance = 60; camera.position.set(30 * Math.cos(Math.PI / 6), 30 * Math.sin(Math.PI / 6), 40); renderer.setSize(w, h); document.body.appendChild(renderer.domElement); renderer.render(scene, camera); window.addEventListener("resize", () => { const w = window.innerWidth; const h = window.innerHeight; renderer.setSize(w, h); camera.aspect = w / h; camera.updateProjectionMatrix(); }); const animate = () => { requestAnimationFrame(animate); controls.update(); renderer.render(scene, camera); }; animate();
Anda mungkin perasan bahawa saya mengehadkan zum melalui kawalan dan juga menukar sudut lalai kamera. Ini akan membantu untuk memaparkan pemandangan dengan betul dalam langkah seterusnya.
Kini tiba masanya untuk menambah medan bintang yang ringkas kerana sistem suria kita sepatutnya dikelilingi oleh bintang. Untuk memudahkan penjelasan, bayangkan anda mempunyai sfera, dan anda memilih 1,000 mata rawak pada sfera ini. Kemudian, anda mencipta bintang daripada titik ini dengan memetakan tekstur bintang padanya. Akhir sekali, saya menambah animasi untuk membuat semua titik ini berputar di sekeliling paksi-y. Dengan ini, medan bintang sedia untuk ditambah ke tempat kejadian.
import { Group, Color, Points, Vector3, TextureLoader, PointsMaterial, BufferGeometry, AdditiveBlending, Float32BufferAttribute, } from "three"; export class Starfield { group; loader; animate; constructor({ numStars = 1000 } = {}) { this.numStars = numStars; this.group = new Group(); this.loader = new TextureLoader(); this.createStarfield(); this.animate = this.createAnimateFunction(); this.animate(); } createStarfield() { let col; const verts = []; const colors = []; const positions = []; for (let i = 0; i < this.numStars; i += 1) { let p = this.getRandomSpherePoint(); const { pos, hue } = p; positions.push(p); col = new Color().setHSL(hue, 0.2, Math.random()); verts.push(pos.x, pos.y, pos.z); colors.push(col.r, col.g, col.b); } const geo = new BufferGeometry(); geo.setAttribute("position", new Float32BufferAttribute(verts, 3)); geo.setAttribute("color", new Float32BufferAttribute(colors, 3)); const mat = new PointsMaterial({ size: 0.2, alphaTest: 0.5, transparent: true, vertexColors: true, blending: AdditiveBlending, map: this.loader.load("/solar-system-threejs/assets/circle.png"), }); const points = new Points(geo, mat); this.group.add(points); } getRandomSpherePoint() { const radius = Math.random() * 25 + 25; const u = Math.random(); const v = Math.random(); const theta = 2 * Math.PI * u; const phi = Math.acos(2 * v - 1); let x = radius * Math.sin(phi) * Math.cos(theta); let y = radius * Math.sin(phi) * Math.sin(theta); let z = radius * Math.cos(phi); return { pos: new Vector3(x, y, z), hue: 0.6, minDist: radius, }; } createAnimateFunction() { return () => { requestAnimationFrame(this.animate); this.group.rotation.y += 0.00005; }; } getStarfield() { return this.group; } }
Menambah medan bintang adalah mudah, hanya dengan menggunakan kaedah tambah dalam kelas adegan
const starfield = new Starfield().getStarfield(); scene.add(starfield);
Bagi tekstur, anda boleh menemui semua tekstur yang digunakan dalam projek ini di dalam repositori, yang dipautkan pada penghujung artikel. Kebanyakan tekstur diambil dari tapak ini, dengan pengecualian adalah tekstur cincin bintang dan planet.
Untuk matahari, saya menggunakan geometri Icosahedron dan memetakan tekstur padanya. Menggunakan Bunyi Yang Diperbaiki, saya mencapai kesan apabila matahari berdenyut, meniru cara bintang sebenar memancarkan aliran tenaga ke angkasa. Matahari bukan sekadar figura dengan tekstur yang dipetakan; ia juga perlu menjadi sumber cahaya dalam tempat kejadian, jadi saya menggunakan PointLight untuk mensimulasikan perkara ini.
import { Mesh, Group, Color, Vector3, BackSide, PointLight, TextureLoader, ShaderMaterial, AdditiveBlending, DynamicDrawUsage, MeshBasicMaterial, IcosahedronGeometry, } from "three"; import { ImprovedNoise } from "three/addons/math/ImprovedNoise.js"; export class Sun { group; loader; animate; corona; sunRim; glow; constructor() { this.sunTexture = "/solar-system-threejs/assets/sun-map.jpg"; this.group = new Group(); this.loader = new TextureLoader(); this.createCorona(); this.createRim(); this.addLighting(); this.createGlow(); this.createSun(); this.animate = this.createAnimateFunction(); this.animate(); } createSun() { const map = this.loader.load(this.sunTexture); const sunGeometry = new IcosahedronGeometry(5, 12); const sunMaterial = new MeshBasicMaterial({ map, emissive: new Color(0xffff99), emissiveIntensity: 1.5, }); const sunMesh = new Mesh(sunGeometry, sunMaterial); this.group.add(sunMesh); this.group.add(this.sunRim); this.group.add(this.corona); this.group.add(this.glow); this.group.userData.update = (t) => { this.group.rotation.y = -t / 5; this.corona.userData.update(t); }; } createCorona() { const coronaGeometry = new IcosahedronGeometry(4.9, 12); const coronaMaterial = new MeshBasicMaterial({ color: 0xff0000, side: BackSide, }); const coronaMesh = new Mesh(coronaGeometry, coronaMaterial); const coronaNoise = new ImprovedNoise(); let v3 = new Vector3(); let p = new Vector3(); let pos = coronaGeometry.attributes.position; pos.usage = DynamicDrawUsage; const len = pos.count; const update = (t) => { for (let i = 0; i < len; i += 1) { p.fromBufferAttribute(pos, i).normalize(); v3.copy(p).multiplyScalar(5); let ns = coronaNoise.noise( v3.x + Math.cos(t), v3.y + Math.sin(t), v3.z + t ); v3.copy(p) .setLength(5) .addScaledVector(p, ns * 0.4); pos.setXYZ(i, v3.x, v3.y, v3.z); } pos.needsUpdate = true; }; coronaMesh.userData.update = update; this.corona = coronaMesh; } createGlow() { const uniforms = { color1: { value: new Color(0x000000) }, color2: { value: new Color(0xff0000) }, fresnelBias: { value: 0.2 }, fresnelScale: { value: 1.5 }, fresnelPower: { value: 4.0 }, }; const vertexShader = ` uniform float fresnelBias; uniform float fresnelScale; uniform float fresnelPower; varying float vReflectionFactor; void main() { vec4 mvPosition = modelViewMatrix * vec4( position, 1.0 ); vec4 worldPosition = modelMatrix * vec4( position, 1.0 ); vec3 worldNormal = normalize( mat3( modelMatrix[0].xyz, modelMatrix[1].xyz, modelMatrix[2].xyz ) * normal ); vec3 I = worldPosition.xyz - cameraPosition; vReflectionFactor = fresnelBias + fresnelScale * pow( 1.0 + dot( normalize( I ), worldNormal ), fresnelPower ); gl_Position = projectionMatrix * mvPosition; } `; const fragmentShader = ` uniform vec3 color1; uniform vec3 color2; varying float vReflectionFactor; void main() { float f = clamp( vReflectionFactor, 0.0, 1.0 ); gl_FragColor = vec4(mix(color2, color1, vec3(f)), f); } `; const sunGlowMaterial = new ShaderMaterial({ uniforms, vertexShader, fragmentShader, transparent: true, blending: AdditiveBlending, }); const sunGlowGeometry = new IcosahedronGeometry(5, 12); const sunGlowMesh = new Mesh(sunGlowGeometry, sunGlowMaterial); sunGlowMesh.scale.setScalar(1.1); this.glow = sunGlowMesh; } createRim() { const uniforms = { color1: { value: new Color(0xffff99) }, color2: { value: new Color(0x000000) }, fresnelBias: { value: 0.2 }, fresnelScale: { value: 1.5 }, fresnelPower: { value: 4.0 }, }; const vertexShader = ` uniform float fresnelBias; uniform float fresnelScale; uniform float fresnelPower; varying float vReflectionFactor; void main() { vec4 mvPosition = modelViewMatrix * vec4( position, 1.0 ); vec4 worldPosition = modelMatrix * vec4( position, 1.0 ); vec3 worldNormal = normalize( mat3( modelMatrix[0].xyz, modelMatrix[1].xyz, modelMatrix[2].xyz ) * normal ); vec3 I = worldPosition.xyz - cameraPosition; vReflectionFactor = fresnelBias + fresnelScale * pow( 1.0 + dot( normalize( I ), worldNormal ), fresnelPower ); gl_Position = projectionMatrix * mvPosition; } `; const fragmentShader = ` uniform vec3 color1; uniform vec3 color2; varying float vReflectionFactor; void main() { float f = clamp( vReflectionFactor, 0.0, 1.0 ); gl_FragColor = vec4(mix(color2, color1, vec3(f)), f); } `; const sunRimMaterial = new ShaderMaterial({ uniforms, vertexShader, fragmentShader, transparent: true, blending: AdditiveBlending, }); const sunRimGeometry = new IcosahedronGeometry(5, 12); const sunRimMesh = new Mesh(sunRimGeometry, sunRimMaterial); sunRimMesh.scale.setScalar(1.01); this.sunRim = sunRimMesh; } addLighting() { const sunLight = new PointLight(0xffff99, 1000); sunLight.position.set(0, 0, 0); this.group.add(sunLight); } createAnimateFunction() { return (t = 0) => { const time = t * 0.00051; requestAnimationFrame(this.animate); this.group.userData.update(time); }; } getSun() { return this.group; } }
Semua planet dibina menggunakan logik yang serupa: setiap planet memerlukan orbit, tekstur, kelajuan orbit dan kelajuan putaran. Untuk planet yang memerlukannya, cincin juga perlu ditambah.
import { Mesh, Color, Group, DoubleSide, RingGeometry, TorusGeometry, TextureLoader, ShaderMaterial, SRGBColorSpace, AdditiveBlending, MeshPhongMaterial, MeshBasicMaterial, IcosahedronGeometry, } from "three"; export class Planet { group; loader; animate; planetGroup; planetGeometry; constructor({ orbitSpeed = 1, orbitRadius = 1, orbitRotationDirection = "clockwise", planetSize = 1, planetAngle = 0, planetRotationSpeed = 1, planetRotationDirection = "clockwise", planetTexture = "/solar-system-threejs/assets/mercury-map.jpg", rimHex = 0x0088ff, facingHex = 0x000000, rings = null, } = {}) { this.orbitSpeed = orbitSpeed; this.orbitRadius = orbitRadius; this.orbitRotationDirection = orbitRotationDirection; this.planetSize = planetSize; this.planetAngle = planetAngle; this.planetTexture = planetTexture; this.planetRotationSpeed = planetRotationSpeed; this.planetRotationDirection = planetRotationDirection; this.rings = rings; this.group = new Group(); this.planetGroup = new Group(); this.loader = new TextureLoader(); this.planetGeometry = new IcosahedronGeometry(this.planetSize, 12); this.createOrbit(); this.createRings(); this.createPlanet(); this.createGlow(rimHex, facingHex); this.animate = this.createAnimateFunction(); this.animate(); } createOrbit() { const orbitGeometry = new TorusGeometry(this.orbitRadius, 0.01, 100); const orbitMaterial = new MeshBasicMaterial({ color: 0xadd8e6, side: DoubleSide, }); const orbitMesh = new Mesh(orbitGeometry, orbitMaterial); orbitMesh.rotation.x = Math.PI / 2; this.group.add(orbitMesh); } createPlanet() { const map = this.loader.load(this.planetTexture); const planetMaterial = new MeshPhongMaterial({ map }); planetMaterial.map.colorSpace = SRGBColorSpace; const planetMesh = new Mesh(this.planetGeometry, planetMaterial); this.planetGroup.add(planetMesh); this.planetGroup.position.x = this.orbitRadius - this.planetSize / 9; this.planetGroup.rotation.z = this.planetAngle; this.group.add(this.planetGroup); } createGlow(rimHex, facingHex) { const uniforms = { color1: { value: new Color(rimHex) }, color2: { value: new Color(facingHex) }, fresnelBias: { value: 0.2 }, fresnelScale: { value: 1.5 }, fresnelPower: { value: 4.0 }, }; const vertexShader = ` uniform float fresnelBias; uniform float fresnelScale; uniform float fresnelPower; varying float vReflectionFactor; void main() { vec4 mvPosition = modelViewMatrix * vec4( position, 1.0 ); vec4 worldPosition = modelMatrix * vec4( position, 1.0 ); vec3 worldNormal = normalize( mat3( modelMatrix[0].xyz, modelMatrix[1].xyz, modelMatrix[2].xyz ) * normal ); vec3 I = worldPosition.xyz - cameraPosition; vReflectionFactor = fresnelBias + fresnelScale * pow( 1.0 + dot( normalize( I ), worldNormal ), fresnelPower ); gl_Position = projectionMatrix * mvPosition; } `; const fragmentShader = ` uniform vec3 color1; uniform vec3 color2; varying float vReflectionFactor; void main() { float f = clamp( vReflectionFactor, 0.0, 1.0 ); gl_FragColor = vec4(mix(color2, color1, vec3(f)), f); } `; const planetGlowMaterial = new ShaderMaterial({ uniforms, vertexShader, fragmentShader, transparent: true, blending: AdditiveBlending, }); const planetGlowMesh = new Mesh(this.planetGeometry, planetGlowMaterial); planetGlowMesh.scale.setScalar(1.1); this.planetGroup.add(planetGlowMesh); } createRings() { if (!this.rings) return; const innerRadius = this.planetSize + 0.1; const outerRadius = innerRadius + this.rings.ringsSize; const ringsGeometry = new RingGeometry(innerRadius, outerRadius, 32); const ringsMaterial = new MeshBasicMaterial({ side: DoubleSide, transparent: true, map: this.loader.load(this.rings.ringsTexture), }); const ringMeshs = new Mesh(ringsGeometry, ringsMaterial); ringMeshs.rotation.x = Math.PI / 2; this.planetGroup.add(ringMeshs); } createAnimateFunction() { return () => { requestAnimationFrame(this.animate); this.updateOrbitRotation(); this.updatePlanetRotation(); }; } updateOrbitRotation() { if (this.orbitRotationDirection === "clockwise") { this.group.rotation.y -= this.orbitSpeed; } else if (this.orbitRotationDirection === "counterclockwise") { this.group.rotation.y += this.orbitSpeed; } } updatePlanetRotation() { if (this.planetRotationDirection === "clockwise") { this.planetGroup.rotation.y -= this.planetRotationSpeed; } else if (this.planetRotationDirection === "counterclockwise") { this.planetGroup.rotation.y += this.planetRotationSpeed; } } getPlanet() { return this.group; } }
Untuk Bumi, saya melanjutkan kelas Planet untuk menambah tekstur tambahan, seperti awan dan tekstur malam untuk bahagian malam planet.
import { Mesh, AdditiveBlending, MeshBasicMaterial, MeshStandardMaterial, } from "three"; import { Planet } from "./planet"; export class Earth extends Planet { constructor(props) { super(props); this.createPlanetLights(); this.createPlanetClouds(); } createPlanetLights() { const planetLightsMaterial = new MeshBasicMaterial({ map: this.loader.load("/solar-system-threejs/assets/earth-map-2.jpg"), blending: AdditiveBlending, }); const planetLightsMesh = new Mesh( this.planetGeometry, planetLightsMaterial ); this.planetGroup.add(planetLightsMesh); this.group.add(this.planetGroup); } createPlanetClouds() { const planetCloudsMaterial = new MeshStandardMaterial({ map: this.loader.load("/solar-system-threejs/assets/earth-map-3.jpg"), transparent: true, opacity: 0.8, blending: AdditiveBlending, alphaMap: this.loader.load( "/solar-system-threejs/assets/earth-map-4.jpg" ), }); const planetCloudsMesh = new Mesh( this.planetGeometry, planetCloudsMaterial ); planetCloudsMesh.scale.setScalar(1.003); this.planetGroup.add(planetCloudsMesh); this.group.add(this.planetGroup); } }
Dengan mencari di Google selama kira-kira lima minit, anda akan menjumpai jadual dengan semua nilai yang diperlukan untuk menambahkan planet ke tempat kejadian.
| Planet | Saiz (diameter) | Kelajuan putaran | Arah putaran | Kelajuan orbit |
|---|---|---|---|---|
| Merkuri | 4,880 km | 10.83 km/j | lawan arah jam | 47.87 km/s |
| Venus | 12,104 km | 6.52 km/j | Mengikut arah jam | 35.02 km/s |
| Bumi | 12,742 km | 1674.4 km/j | lawan arah jam | 29.78 km/s |
| Marikh | 6,779 km | 866.5 km/j | lawan arah jam | 24.07 km/s |
| Musytari | 142,984 km | 45,300 km/j | lawan arah jam | 13.07 km/s |
| Saturn | 120,536 km | 35,500 km/j | lawan arah jam | 9.69 km/s |
| Uranus | 51,118 km | 9,320 km/j | Mengikut arah jam | 6.81 km/s |
| Neptun | 49,528 km | 9,720 km/j | lawan arah jam | 5.43 km/s |
Now, all the planets and the sun can be added to the scene.
const planets = [ { orbitSpeed: 0.00048, orbitRadius: 10, orbitRotationDirection: "clockwise", planetSize: 0.2, planetRotationSpeed: 0.005, planetRotationDirection: "counterclockwise", planetTexture: "/solar-system-threejs/assets/mercury-map.jpg", rimHex: 0xf9cf9f, }, { orbitSpeed: 0.00035, orbitRadius: 13, orbitRotationDirection: "clockwise", planetSize: 0.5, planetRotationSpeed: 0.0005, planetRotationDirection: "clockwise", planetTexture: "/solar-system-threejs/assets/venus-map.jpg", rimHex: 0xb66f1f, }, { orbitSpeed: 0.00024, orbitRadius: 19, orbitRotationDirection: "clockwise", planetSize: 0.3, planetRotationSpeed: 0.01, planetRotationDirection: "counterclockwise", planetTexture: "/solar-system-threejs/assets/mars-map.jpg", rimHex: 0xbc6434, }, { orbitSpeed: 0.00013, orbitRadius: 22, orbitRotationDirection: "clockwise", planetSize: 1, planetRotationSpeed: 0.06, planetRotationDirection: "counterclockwise", planetTexture: "/solar-system-threejs/assets/jupiter-map.jpg", rimHex: 0xf3d6b6, }, { orbitSpeed: 0.0001, orbitRadius: 25, orbitRotationDirection: "clockwise", planetSize: 0.8, planetRotationSpeed: 0.05, planetRotationDirection: "counterclockwise", planetTexture: "/solar-system-threejs/assets/saturn-map.jpg", rimHex: 0xd6b892, rings: { ringsSize: 0.5, ringsTexture: "/solar-system-threejs/assets/saturn-rings.jpg", }, }, { orbitSpeed: 0.00007, orbitRadius: 28, orbitRotationDirection: "clockwise", planetSize: 0.5, planetRotationSpeed: 0.02, planetRotationDirection: "clockwise", planetTexture: "/solar-system-threejs/assets/uranus-map.jpg", rimHex: 0x9ab6c2, rings: { ringsSize: 0.4, ringsTexture: "/solar-system-threejs/assets/uranus-rings.jpg", }, }, { orbitSpeed: 0.000054, orbitRadius: 31, orbitRotationDirection: "clockwise", planetSize: 0.5, planetRotationSpeed: 0.02, planetRotationDirection: "counterclockwise", planetTexture: "/solar-system-threejs/assets/neptune-map.jpg", rimHex: 0x5c7ed7, }, ]; planets.forEach((item) => { const planet = new Planet(item).getPlanet(); scene.add(planet); }); const earth = new Earth({ orbitSpeed: 0.00029, orbitRadius: 16, orbitRotationDirection: "clockwise", planetSize: 0.5, planetAngle: (-23.4 * Math.PI) / 180, planetRotationSpeed: 0.01, planetRotationDirection: "counterclockwise", planetTexture: "/solar-system-threejs/assets/earth-map-1.jpg", }).getPlanet(); scene.add(earth);
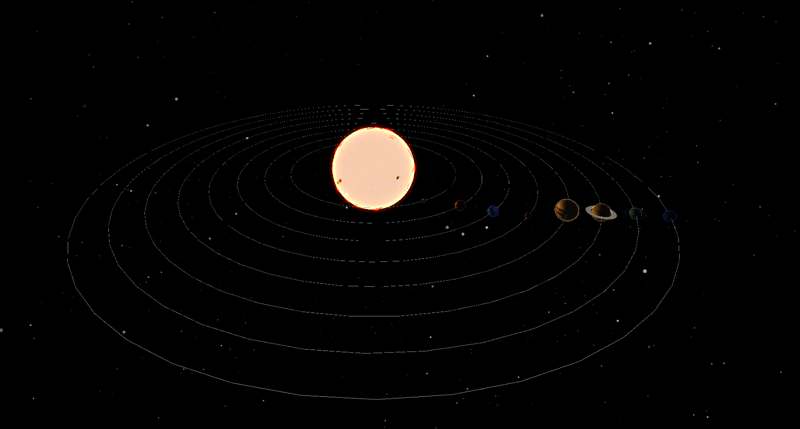
In result all solar system will look sth like:
For deploying to set the correct base in vite.config.js.
If you are deploying to https://
If you are deploying to https://
Go to your GitHub Pages configuration in the repository settings page and choose the source of deployment as "GitHub Actions", this will lead you to create a workflow that builds and deploys your project, a sample workflow that installs dependencies and builds using npm is provided:
# Simple workflow for deploying static content to GitHub Pages name: Deploy static content to Pages on: # Runs on pushes targeting the default branch push: branches: ['main'] # Allows you to run this workflow manually from the Actions tab workflow_dispatch: # Sets the GITHUB_TOKEN permissions to allow deployment to GitHub Pages permissions: contents: read pages: write id-token: write # Allow one concurrent deployment concurrency: group: 'pages' cancel-in-progress: true jobs: # Single deploy job since we're just deploying deploy: environment: name: github-pages url: ${{ steps.deployment.outputs.page_url }} runs-on: ubuntu-latest steps: - name: Checkout uses: actions/checkout@v4 - name: Set up Node uses: actions/setup-node@v4 with: node-version: 20 cache: 'npm' - name: Install dependencies run: npm ci - name: Build run: npm run build - name: Setup Pages uses: actions/configure-pages@v4 - name: Upload artifact uses: actions/upload-pages-artifact@v3 with: # Upload dist folder path: './dist' - name: Deploy to GitHub Pages id: deployment uses: actions/deploy-pages@v4
That is it. If your deployment has not started automatically you can always start it manually in Actions tab in your repo. Link with deployed project can be found below.
That’s it for today! You can find the link to the entire project below. I hope you found this entertaining and don’t still believe the Earth is flat.
See ya!
Repository link
Deployment link
Atas ialah kandungan terperinci Sistem suria dengan Three.js. Untuk maklumat lanjut, sila ikut artikel berkaitan lain di laman web China PHP!


![[Web front-end] Permulaan pantas Node.js](https://img.php.cn/upload/course/000/000/067/662b5d34ba7c0227.png)


