Vite專案怎麼進行螢幕適配?以下這篇文章跟大家分享Vite專案畫面適配的兩種方案,超詳細呦,快來收藏學習吧!

最近專案組小美同學似乎遇到了一個棘手的問題,總是一副悶悶不樂的樣子。
本著都是一個專案群組,應該互相幫助、共用解決問題的用意,我向小美發出了訊息。
我:「看你最近一直不怎麼開心,遇到什麼問題了嗎?」
小美:「最近一直在查閱vue3專案畫面適配的資料,發現網路資料都是vue2 webpack有關的,不知道如何適配vite項目?o(╥﹏╥)o」。 【相關推薦:vuejs影片教學】
我:「OK,交給哥哥了,我來幫你擺平!」
小美:「❤( ´ ・ᴗ・` )❤」
覺得文章不錯、或對自己開發有幫助,歡迎點讚收藏! ❤❤❤
rem是指相對於根元素的字體大小的單位,在日常開發過程中我們通常把根元素(html/body)的字體設定為10px,方便於我們計算(此時子元素的1rem就相當於10px)。
不固定寬高比的網路應用,適用於絕大部分業務場景
1、安裝依賴
npm i postcss-pxtorem autoprefixer amfe-flexible --save-dev
postcss-pxtorem 是PostCSS的插件,用於將像素單元產生rem單位
autoprefixer 瀏覽器前綴處理外掛程式
amfe-flexible 可伸縮佈局方案取代了原先的lib-flexible選用了目前眾多瀏覽器相容的viewport
#2、專案根目錄建立postcss.config.js 檔案
module.exports = {
	plugins: {
		autoprefixer: {
			overrideBrowserslist: [
				"Android 4.1",
				"iOS 7.1",
				"Chrome > 31",
				"ff > 31",
				"ie >= 8",
				"last 10 versions", // 所有主流浏览器最近10版本用
			],
			grid: true,
		},
		"postcss-pxtorem": {
			rootValue: 192, // 设计稿宽度的1/ 10 例如设计稿按照 1920设计 此处就为192
			propList: ["*", "!border"], // 除 border 外所有px 转 rem
			selectorBlackList: [".el-"], // 过滤掉.el-开头的class,不进行rem转换
		},
	},
};
3、main.ts/js 檔案中導入依賴
import "amfe-flexible/index.js";
4、專案重啟
在CSS3中,我們可以使用transform屬性的scale()方法來實現元素的縮放效果。縮放,指的是“縮小”和“放大”的意思。
固定寬高比的Web應用,如大螢幕或者固定視窗業務應用
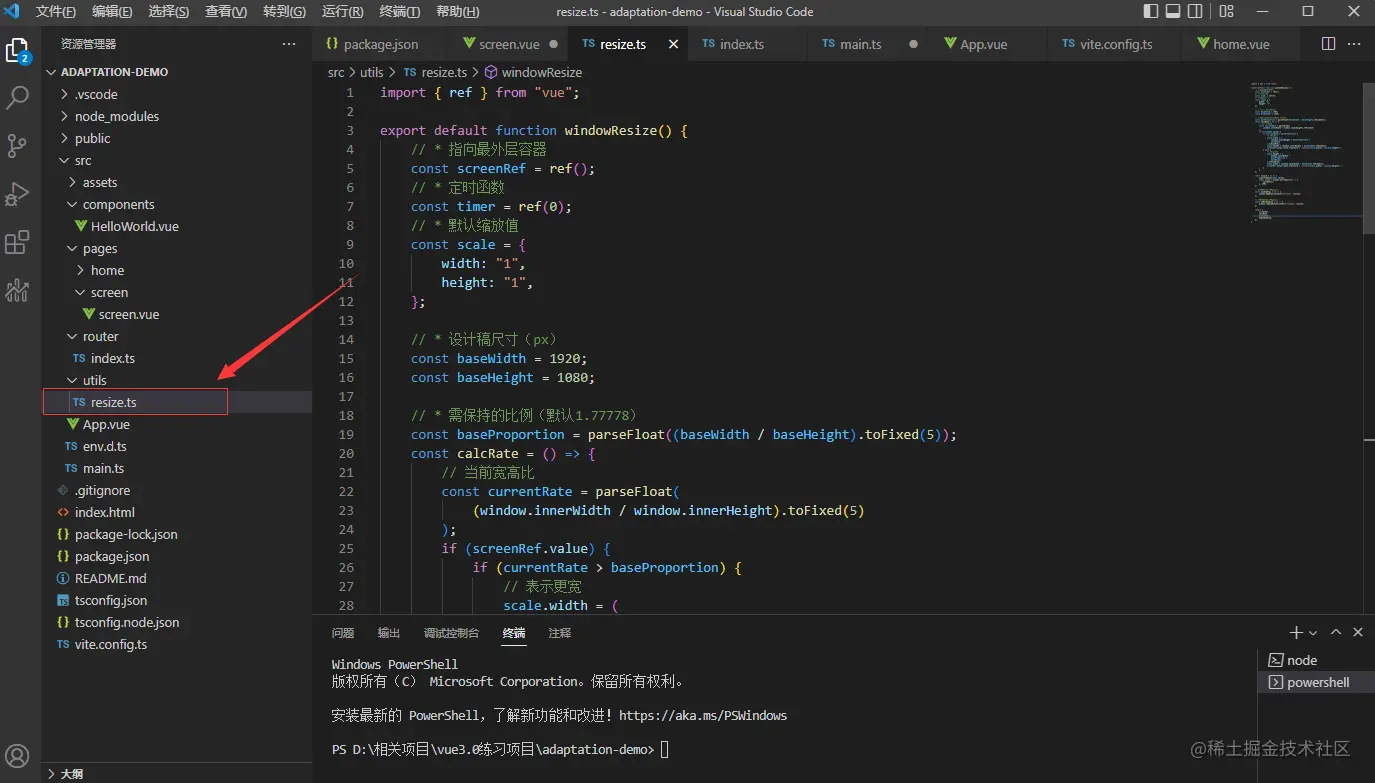
#1、新建resize.ts/js檔案

import { ref } from "vue";

export default function windowResize() {
	// * 指向最外层容器
	const screenRef = ref();
	// * 定时函数
	const timer = ref(0);
	// * 默认缩放值
	const scale = {
		width: "1",
		height: "1",
	};

	// * 设计稿尺寸(px)
	const baseWidth = 1920;
	const baseHeight = 1080;

	// * 需保持的比例(默认1.77778)
	const baseProportion = parseFloat((baseWidth / baseHeight).toFixed(5));
	const calcRate = () => {
		// 当前宽高比
		const currentRate = parseFloat(
			(window.innerWidth / window.innerHeight).toFixed(5)
		);
		if (screenRef.value) {
			if (currentRate > baseProportion) {
				// 表示更宽
				scale.width = (
					(window.innerHeight * baseProportion) /
					baseWidth
				).toFixed(5);
				scale.height = (window.innerHeight / baseHeight).toFixed(5);
				screenRef.value.style.transform = `scale(${scale.width}, ${scale.height})`;
			} else {
				// 表示更高
				scale.height = (
					window.innerWidth /
					baseProportion /
					baseHeight
				).toFixed(5);
				scale.width = (window.innerWidth / baseWidth).toFixed(5);
				screenRef.value.style.transform = `scale(${scale.width}, ${scale.height})`;
			}
		}
	};

	const resize = () => {
		clearTimeout(timer.value);
		timer.value = window.setTimeout(() => {
			calcRate();
		}, 200);
	};

	// 改变窗口大小重新绘制
	const windowDraw = () => {
		window.addEventListener("resize", resize);
	};

	// 改变窗口大小重新绘制
	const unWindowDraw = () => {
		window.removeEventListener("resize", resize);
	};

	return {
		screenRef,
		calcRate,
		windowDraw,
		unWindowDraw,
	};
}
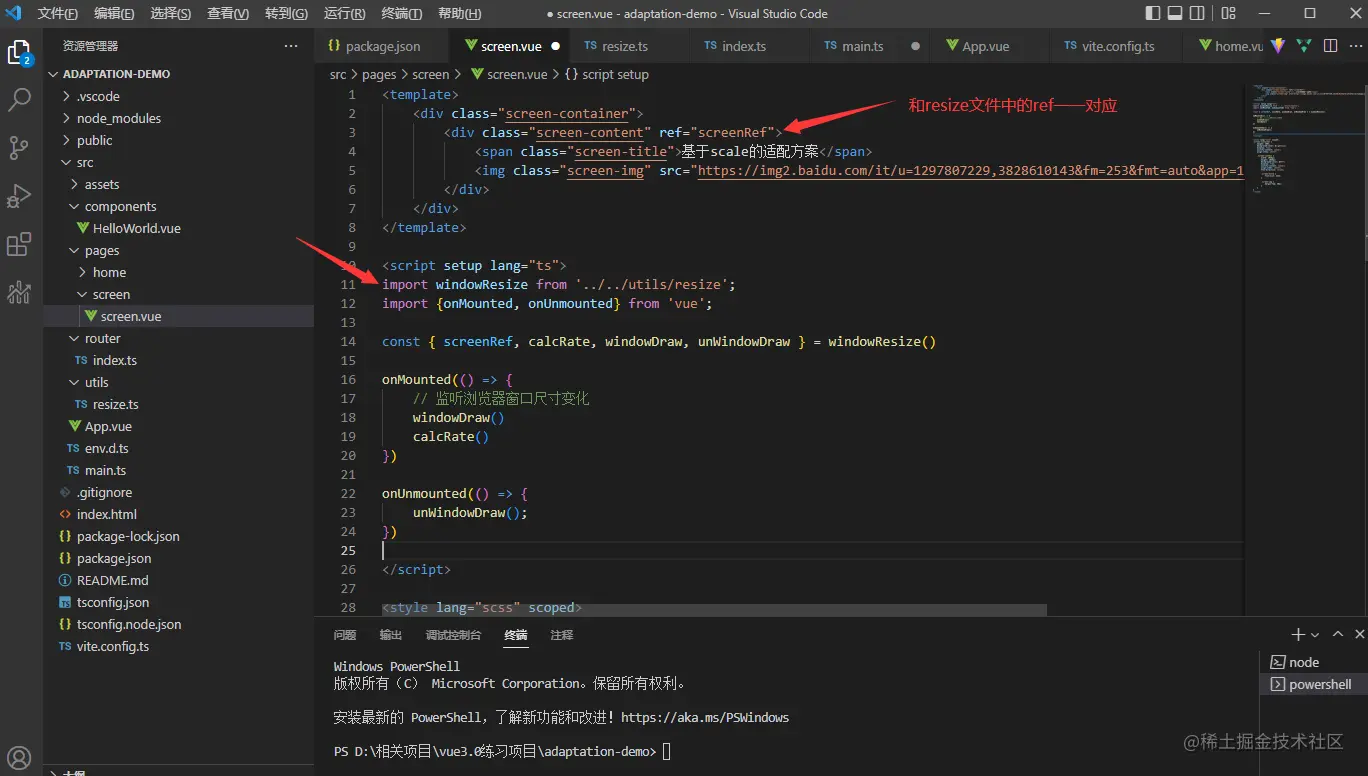
2、相關介面引入resize.ts/js

<template>
<div>
<div>
<span>基于scale的适配方案</span>
<img alt="Vite專案怎麼進行螢幕適配?兩種方案分享" >
</div>
</div>
</template>
<script>
import windowResize from '../../utils/resize';
import {onMounted, onUnmounted} from 'vue';
const { screenRef, calcRate, windowDraw, unWindowDraw } = windowResize()
onMounted(() => {
// 监听浏览器窗口尺寸变化
windowDraw()
calcRate()
})
onUnmounted(() => {
unWindowDraw();
})
</script>
<style>
.screen-container {
height: 100%;
background-color: lightcyan;
display: flex;
justify-content: center;
align-items: center;
.screen-content {
width: 1920px;
height: 1080px;
background-color: #fff;
display: flex;
justify-content: center;
align-items: center;
flex-direction: column;
.screen-title {
font-size: 32px;
}
.screen-img {
margin-top: 20px;
}
}
}
</style>
推薦兩個作者參與的開源項目,如果專案有幫助到你,歡迎star!
一個簡單的基於Vue3、TS、Vite、qiankun技術棧的後台管理項目:www.xkxk.tech
以上是Vite專案怎麼進行螢幕適配?兩種方案分享的詳細內容。更多資訊請關注PHP中文網其他相關文章!