本文主要跟大家分享React元件生命週期,React元件的生命週期有一堆相關的函數,其實就是一推的鉤子函數。在React組件所建立的各個階段觸發特定的鉤子函數。希望能幫助大家。
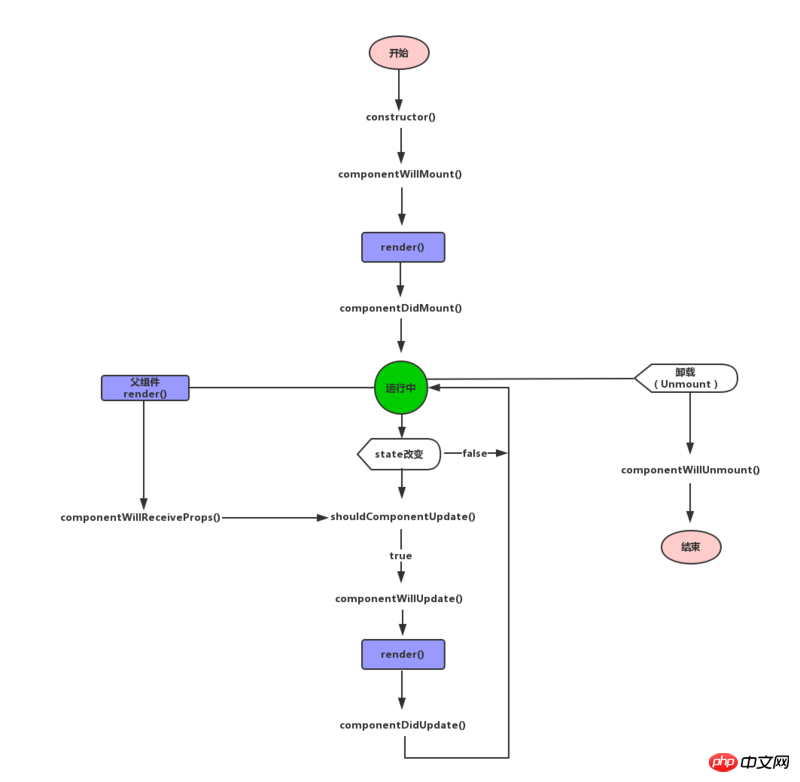
可以先大概看一下下面這張圖:
#constructor
#建構函數,在建立元件的時候呼叫一次。
constructor(props, context)
componentWillMount
#在元件掛載之前呼叫一次。如果在這個函數裡面呼叫setState,render()知道state會發生變化,並且只渲染一次。
void componentWillMount()
render
render是一個React元件所不可或缺的核心函數。不要在render裡面修改state。也不要去讀寫DOM或與伺服器交互,保持render()方法的純淨。
ReactElement render()
componentDidMount
#在元件掛載之後呼叫一次。這時候,子元件也都掛載好了,可以在這裡使用refs。
void componentDidMount()
shouldComponentUpdate
#這個方法在初始化render時不會執行,當props或state發生變化時執行。函數預設回傳true,需要重新render。返回false,就不會重新render了。 componentWillUpdate和componentDidUpdate方法也不會被呼叫。在比較複雜的應用程式裡,有一些資料的改變並不影響介面展示,可以在這裡做判斷,優化渲染效率。
boolean shouldComponentUpdate(
    object nextProps, object nextState
)
componentWillUpdate
#shouldComponentUpdate傳回true之後,componentWillUpdate會被呼叫。要特別注意的是,在這個函數裡面,不要用this.setState來修改狀態。不然這個函數會無限循環執行。這個函數呼叫之後,就會把nextProps和nextState分別設定在this.props和this.state。緊接著這個函數,就會呼叫render()來更新介面了。
void componentWillUpdate(
  object nextProps, object nextState
)
componentDidUpdate
#除了首次render之後呼叫componentDidMount,其它render結束之後都是呼叫componentDidUpdate。
void componentDidUpdate()
componentWillReceiveProps
#props是父元件傳遞給子元件的。父元件發生render的時候子元件就會呼叫componentWillReceiveProps(不管props有沒有更新,也不管父子元件之間有沒有資料交換)。在這個回呼函數裡面,你可以根據屬性的變化,透過呼叫this.setState()來更新你的元件狀態,舊的屬性還是可以透過this.props來取得,這裡呼叫更新狀態是安全的,並不會觸發額外的render調用。
void componentWillReceiveProps(nextProps) {
    this.setState({...});
}
componentWillUnmount
#當元件要被從介面移除的時候,就會呼叫componentWillUnmount(),在這個函數中,可以做一些組件相關的清理工作,例如取消計時器、網路請求等。
void componentWillUnmount()
var React = require('react');
var ReactDOM = require('react-dom');
class Parent extends React.Component {
constructor(){
super()
console.log("%cparent -- constructor","color:green");
this.state = {
name : 'Lucy'
}
}
componentWillMount(){
console.log("%cparent -- componentWillMount","color:green");
}
componentDidMount(){
console.log("%cparent -- componentDidMount","color:green");
}
componentWillReceiveProps(){
console.log("%cparent -- componentWillReceiveProps","color:green");
}
shouldComponentUpdate(){
console.log("%cparent -- shouldComponentUpdate","color:green");
return true;
}
componentWillUpdate(){
console.log("%cparent -- componentWillUpdate","color:green");
}
componentDidUpdate(){
console.log("%cparent -- componentDidUpdate","color:green");
}
componentWillUnmount(){
console.log("%cparent -- componentWillUnmount","color:green");
}
changeName(){
this.setState({name : 'Jone'})
}
unmountComponent(){
ReactDOM.unmountComponentAtNode(document.getElementById("app"));
}
render(){
console.log("%cparent -- render","color:green");
return(
<p style={{border:'1px solid #000',color:'green'}}>
<h2>Parent:</h2>
<h3>hello {this.state.name}</h3>
<button onClick={this.changeName.bind(this)}>state改变</button>
<button onClick={this.unmountComponent.bind(this)}>卸载组件</button>
<Child props1="haha"></Child>
</p>
)
}
}
class Child extends React.Component {
constructor(){
super()
console.log(" %cchild -- constructor","color:blue");
this.state = {
}
}
componentWillMount(){
console.log(" %cchild -- componentWillMount","color:blue");
}
componentDidMount(){
console.log(" %cchild -- componentDidMount","color:blue");
}
componentWillReceiveProps(){
console.log(" %cchild -- componentWillReceiveProps","color:blue");
}
shouldComponentUpdate(){
console.log(" %cchild -- shouldComponentUpdate","color:blue");
return true;
}
componentWillUpdate(){
console.log(" %cchild -- componentWillUpdate","color:blue");
}
componentDidUpdate(){
console.log(" %cchild -- componentDidUpdate","color:blue");
}
componentWillUnmount(){
console.log(" %cchild -- componentWillUnmount","color:blue");
}
changeName(){
this.setState({name : 'Jone'})
}
render(){
console.log(" %cchild -- render","color:blue");
return(
<p style={{border:'1px solid #000',margin:'10px',color:'blue'}}>
<h2>Child:</h2>
</p>
)
}
}
ReactDOM.render(
<Parent></Parent>,
document.getElementById('app')
);

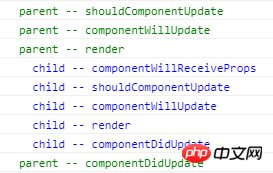
改變父元件的state:
#卸載元件後:
#相關推薦:
以上是React組件生命週期實例分析的詳細內容。更多資訊請關注PHP中文網其他相關文章!