
Home > Article > WeChat Applet > Code implementation of adding, deleting, modifying, and checking operations of WeChat mini programs

This article mainly introduces the relevant information on the detailed operation examples of adding, deleting, modifying and checking the WeChat applet. Here is the example code. Friends in need can refer to it
WeChat applet Detailed explanation of adding, deleting, modifying and checking operation examples
1. Take the adding, deleting, modifying and checking of the delivery address as an example
2.File directory

js file is a logical control, mainly it sends requests and receives data.
json is used for local configuration of this page and covers the global app .json configuration,
wxss is used for page style setting,
wxml is the page, equivalent to html
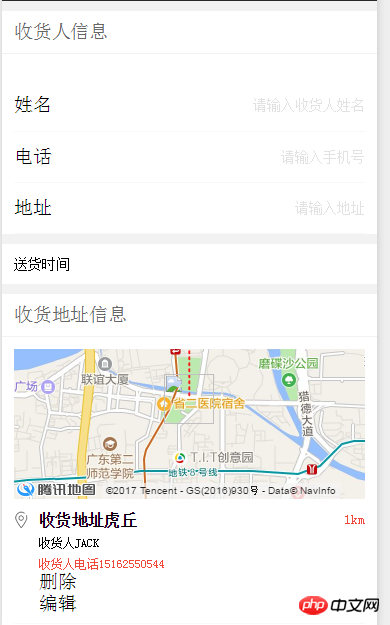
The front-end page mainly displays a form and existing consignee information
1. Several key points need to be understood
a.Form form needs to bind a submit event. In the applet, the attribute is bindsubmit,
bindsubmit=”formSubmit” The attribute value here is formSubmit, and the naming can be consistent with Any value of the specification is equivalent to onsubmit="formSubmit()" in previous HTML. is a function name. The formSubmit function event is triggered when submitted. This function is written in js.
b. Other attributes are similar to the previous HTML. Note that the form must have name="value", and the back-end processing is the same as before. For example, name="username" PHP can use $_POST[ 'username'] to receive.
c. Since the mini program does not have an input submit button, there must be a submit button in each form,
3993c6f6226c20b67508b2f5faca1f97Register120d611986108da972f06c8ab0c8bab5, this button is used to open the submission event.
As for the loop, take it apart and solve it
d. The applet gives us an encapsulated method onLoad: function(). When the page is loaded, this method is called.
var app = getApp()

Page({

data:{},

 onLoad: function() {

  var that = this;

  //收货地址首页

  wx.request({

   //缺少用户唯一标识,现在的在服务器的控制器里有一个假id = 2

   url: 'https://shop.yunapply.com/home/shipping/index',

   method: 'GET',

   data: {},

   header: {

     'Accept': 'application/json'

   },

   success: function(res) {

    that.setData({

      "addressInfo": res.data.info,

    })

    console.log(res.data.info);

   },

   fail:function(){

       wx.showToast({

        title: '服务器网络错误!',

        icon: 'loading',

        duration: 1500

       })

      }

  })

 }

})
Check
Home page of shipping address, used to pull the current user’s existing shipping address
var that = this;
I don’t know why I want to do this. It may be to avoid this conflict or unclear semantics, and assign the current object to the variable that
wx.request({}) initiates https request
url: 'https://shop.com/home/shipping/index', the URL interface that needs to be requested
method: 'GET', the request method, the default is GET. When POST, you must declare
data: {}, the requested data sent
header: {}, the header information sent ,
The header information of GET method is: 'Accept': 'application/json'
The header information of POST method is: "Content-Type": "application/x-www-form" -urlencoded"
success:function() The method to be called if the request is successful
Fail:function() The method to be called if the request is failed
success: function(res) {

    that.setData({

      "addressInfo": res.data.info,

    })

   },
res is the data returned by the server after the call is successful.
that.setData({"addressInfo": res.data.info,}) adds data to the data object of the current page, with the key name addressInfo, the key value is the returned data. What I need is all the information of the info object of the res data object
fail:function(){

       wx.showToast({

        title: '服务器网络错误!',

        icon: 'loading',

        duration: 1500

       })

      }
Method called when the network request fails
showToast is similar to the alert in JS. The pop-up box, title is the information displayed in the pop-up box, and icon is the icon state of the pop-up box. Currently, there are only two states: loading and success. Duration is the time the popup box is displayed on the screen.
a.url is the URL you requested. For example, in the front-end, action='index.php' was used in the POST form. Index.php here is a relative path, and the URL requested by the mini program must be network absolute. path.
b.'https://shop.yunapply.com/home/shipping/index', use GET method to request the index method under Shipping control under the HOME module
c. Add the obtained value to data
See the index method under the Shipping control under the HOME module
public function index()
{
  //$id 为用户名id 等以后可以通过token获取或者session(id)什么的
  $use_id = 2;
  $res = D('Shipping')->getAddress($use_id);
  if ($res == false){
    $this->error('暂无收货地址','',true);
  }else{
    $this->success($res,'',true);
  }

}
View Shipping The getAddress() method in the model
/**
 * 获取收货地址信息
 * @param $id 当前用户id
 * @return 属于用户的所有地址
 */
public function getAddress($id)
{
  $address_list = $this->where(array('user_id'=>$id))->select();
  if ($address_list == false){
    return false;
  }
  return $address_list;
}
In this way, the corresponding JSON data is returned based on whether the user has an address
The JSON data of this example Yes
{"info":[{"id":"4","user_id":"2","name":"addTest","mobile":"15162550544","province":"",
"city":"","district":"","address":"44563","createtime":"2017-01-10 18:45:27"
,"modifytime":"2017-01-10 18:45:27","default":"0"}],"status":1,"url":""}
After the request is successful, add JSON to data{} and set the key value to addressInfo
Then the next step is to This information is displayed on the front-end page
收货地址{{item.address}} 1km 收货人{{item.name}} 收货人电话{{item.mobile}} 删除 编辑
Control attribute wx:for binds an array, which is the addressInfo array in JS. The current item of the default array The subscript variable name defaults to index, and the variable name of the current item in the array defaults to item. The address, consignee, phone number and information of the current data can be obtained based on {{item.address}}, {{item.name}}, {{item.mobile}}, {{item.id}} id
After looping, all address information can be displayed according to the format, which is equivalent to foreach
delete
in the TP template.在前台模板的循环数据里可以看到这样一条标签
event.currentTarget.dataset.deleteid;表示事件对象的目标的data-*的值
bindtap属性是微信在模板页中绑定点击事件,deleteClick为触发时间的方法名
在index.js中,删除代码如下:
//删除地址

 deleteClick:function(event){

  var id = event.currentTarget.dataset.deleteid;

  wx.request({

   url: 'https://shop.yunapply.com/home/shipping/delAddress?id='+id,

   data: {},

   method: 'GET',

   success: function(res){

    if(res.data.status == 0){

     wx.showToast({

      title: res.data.info,

      icon: 'loading',

      duration: 1500

     })

    }else{

     wx.showToast({

      title: res.data.info,

      icon: 'success',

      duration: 1000

     })

     //删除之后应该有一个刷新页面的效果,等和其他页面刷新跳转一起做

    }

   },

   fail:function(){

       wx.showToast({

        title: '服务器网络错误!',

        icon: 'loading',

        duration: 1500

       })

      }

  })

 }
点击前端删除按钮的时候,触发deleteClick事件,可以传入一个参数,代表事件对象。
event.currentTarget.dataset.deleteid;表示事件对象的目标的data-*的值
然后通过GET方式传入url,在服务器端删除功能如下
public function delAddress($id)
{
  $res = D('Shipping')->where(array('id'=>$id))->delete();
  if ($res){
    $this->success('删除成功','',true);
  }else{
    $this->error('删除失败','',true);
  }
}
根据返回的JSON值就可以提示删除成功与否
增、改
之前觉得增加和修改会和表单提交一样简单,但是做了一些还是觉得不一样,好好在写一遍。
首先查看前台表单
a.Form表单,需要绑定一个submit事件,在小程序中,属性为bindsubmit,
bindsubmit=”formSubmit” 这里的属性值formSubmit,命名可以为符合规范的任意值,相当于以前html中的 onsubmit=”formSubmit()”,是一个函数名,当提交的时候触发formSubmit这个函数事件,这个函数写在js中。
b.其他的属性和之前的HTML差不多,注意的是,表单一定要有name=“value”,后端处理和以前一样,比如name=”username” PHP可以用 $_POST[‘username']来接收。
c.由于小程序没有input submit这个按钮,所以在每个form表单中都要有一个提交按钮,
cbc47cc7c46af5112c7354a7ad9ae6ad注册65281c5ac262bf6d81768915a4a77ac0,这个按钮就是用来开启提交事件的。
d.由于添加地址和编辑地址都是在一个页面的,所以我需要在每个表单中,加一个默认值变量,当点击修改的时候,默认值就显示在输入框中。
e.表单中有一个编辑,绑定了事件editClick,当点击这个按钮的时候,就会进入编辑模式
添加和修改的放在一个函数里面,但是修改数据的显示是另外一个函数
先说修改,点点击编辑的时候,触发editClick事件
JS如下:
editClick:function(event){

  var that = this;

  var id = event.currentTarget.dataset.editid;

  wx.request({

   url: 'https://shop.yunapply.com/home/shipping/edit?id='+id,

   data: {},

   method: 'GET',

   success: function(res){

    if(res.data.status == 0){

     wx.showToast({

      title: res.data.info,

      icon: 'loading',

      duration: 1500

     })

    }else{

     that.setData({

       "addressEdit": res.data.info,

     })

    }

   },

   fail:function(){

       wx.showToast({

        title: '服务器网络错误!',

        icon: 'loading',

        duration: 1500

       })

      }

  })

 },
为了更好理解,贴个图
最下面有一个保存按钮,当点击编辑的时候,触发editClick:function(event),这个event是当前触发事件的对象,
var id = event.currentTarget.dataset.editid; 就是获取当前事件对象的dataset中的editid的值,这里id是当前地址的id
url: 'https://shop.com/home/shipping/edit?id='+id
Wx.request 的url,将id值放在url上,作为GET参数,传递到服务器。
data: {},是需要额外传递的数据
method: 'GET', 是数据传递方式 默认是“GET”,保持大写
data:{mobile:e.detail.value.mobile,password:e.detail.value.password},
这里的data就是POST给服务器端的数据 以{name:value}的形式传送
success:function()是请求状态成功触发是事件,也就是200的时候,注意,请求成功不是操作成功,请求只是这个程序到服务器端这条线的通的。
fail:function()就是网络请求不成功,触发的事件。
这里的一段代码是和PHP后端程序有关系的,具体流程是这样的,
1.GET通过数据到https://shop.com/home/Shipping/edit这个接口,用过THINKPHP的就会知道是HOME模块下的Shipping控制下的edit方法
2.后端PHP代码如下:
控制器 ShippingController.class.php
public function edit($id)
{
  $res = D('Shipping')->find($id);
  $this->success($res,'',true);
}
也就是说将这条数据取出来,没什么好说的。
 that.setData({

       "addressEdit": res.data.info,

     })

    }
这里请求成功以后,调用小程序 setData方法,将服务器端返回的信息放到addressEdit[]中,然后在前端页面调用{{addressEdit.id}}、{addressEdit.name}}、{addressEdit.mobile}}、{addressEdit.address}}将数据展示出来,这就是修改时候的操作。
接下来是提交表单的操作
Js代码如下
addSubmit:function(e){

  if(e.detail.value.mobile.length==0||e.detail.value.name.length==0 ||e.detail.value.address.length==0){

   wx.showToast({

    title: '收货人所有信息不得为空!',

    icon: 'loading',

    duration: 1500

   })

  }else if(e.detail.value.mobile.length != 11){

    wx.showToast({

    title: '请输入11位手机号码!',

    icon: 'loading',

    duration: 1500

   })

  }else{

   wx.request({

      url: 'https://shop.yunapply.com/home/shipping/save',

      header: {

       "Content-Type": "application/x-www-form-urlencoded"

      },

      method: "POST",

      data:{id:e.detail.value.id,mobile:e.detail.value.mobile,name:e.detail.value.name,address:e.detail.value.address},

      success: function(res) {

       if(res.data.status == 0){

         wx.showToast({

          title: res.data.info,

          icon: 'loading',

          duration: 1500

         })

       }else{

         wx.showToast({

          title: res.data.info,

          icon: 'success',

          duration: 1000

         })

         setTimeout(function(){

          wx.navigateTo({

           url:'../address/index'

          })

         },1000)

       }

      },

      fail:function(){

       wx.showToast({

        title: '服务器网络错误!',

        icon: 'loading',

        duration: 1500

       })

      }

     })

  }

 }
在前端的FORM表单中,当点击formtype=“submit”这个按钮的时候,触发addSubmit事件,前面的if都是JS验证,防止用户不填写信息。
1.其他的request请求差不多,找几个不一样的
url: 'https://shop.yunapply.com/home/shipping/save',
调用服务器端的save方法
  header: {

    "Content-Type": "application/x-www-form-urlencoded"

   },
由于POST和GET传送数据的方式不一样,POST的header必须是
"Content-Type": "application/x-www-form-urlencoded"
GET的header可以是 'Accept': 'application/json'
data:{id:e.detail.value.id,mobile:e.detail.value.mobile,name:e.detail.value.name,address:e.detail.value.address},
这里是需要POST到服务器端的数据
Save方法代码
public function save()
{
  //$user_id
  $user_id = 2;
  if (IS_POST){
    $shipping = D('Shipping');
    if (!$shipping->create()){
      $this->error($shipping->getError(),'',true);
    }else{
      if (is_numeric($_POST['id'])){
        if ($shipping->editAddress($_POST['id'])){
          $this->success('地址修改成功','',true);
        }else{
          $this->error('地址修改失败','',true);
        }
      }else{
        if ($shipping->addAddress($user_id)){
          $this->success('添加地址成功','',true);
        }else{
          $this->error('添加地址失败','',true);
        }
      }
    }
  }
}
以上就是本文的全部内容,希望对大家的学习有所帮助,更多相关内容请关注PHP中文网!
相关推荐:
The above is the detailed content of Code implementation of adding, deleting, modifying, and checking operations of WeChat mini programs. For more information, please follow other related articles on the PHP Chinese website!