
Home > Article > Backend Development > How Python builds a blockchain

Blockchain is a ledger (distributed database) that shares data between nodes in a computer network. As a database, blockchain stores information in an electronic format. The innovation of blockchain is that it guarantees the security, authenticity and credibility of data records (without the need for a trusted third party).
The difference between blockchain and typical databases is the data structure. Blockchain collects information in a block way.
block is a data structure that can permanently record cryptocurrency transaction data (or other purposes). Similar to a linked list. A block records all the latest transactions that have not yet been verified. After verifying the data, the block will be closed and a new block will be created to enter and verify new transactions. Therefore, once written, it cannot be changed or deleted permanently.
block is where information is stored and encrypted in the blockchain
block By A long numeric identifier that includes the encrypted transaction information of the previously encrypted block and the new transaction information
Before it is created, the block and the information within it must be verified by the network
The following is a simple example:
block = {
    'index': 1,
    'timestamp': 1506057125.900785,
    'transactions': [
        {
            'sender': "8527147fe1f5426f9dd545de4b27ee00",
            'recipient': "a77f5cdfa2934df3954a5c7c7da5df1f",
            'amount': 5,
        }
    ],
    'proof': 324984774000,
    'previous_hash': "2cf24dba5fb0a30e26e83b2ac5b9e29e1b161e5c1fa7425e73043362938b9824"
}The goal of blockchain is to allow digital information to be recorded and distributed, but not edited. In this way, blockchain becomes the basis for an immutable ledger, or record of transactions that cannot be changed, deleted, and destroyed.
Imagine a company with 10,000 servers maintaining a database containing all customer information. All of the company's servers are in one warehouse, with full control over each server. This provides a single point of failure. What if the power goes out in that place? What if his internet connection is cut off? In any case, data may be lost or corrupted.
We will create a BlockChain class, the constructor creates an empty list to store the blockchain, and then create An empty list to store transactions. Create block_chain.py
# block_chain.py
class Blockchain:
    def __init__(self) -> None:
        self.chain = []
        self.current_transactions = []
    def new_block(self):
        # Creates a new Block and adds it to the chain
        pass
    def new_transaction(self):
        # Adds a new transaction to the list of transactions
        pass
    @staticmethod
    def hash(block):
        # Hashes a Block
        pass
    @property
    def last_block(self):
        # Returns the last Block in the chain
passWe need a way to add transactions to the block. new_transaction is responsible for this
class Blockchain(object):
    ...
    def new_transaction(self, sender, recipient, amount) -> int:
        self.current_transactions.append({
            'sender': sender,
            'recipient': recipient,
            'amount': amount,
        })
        return self.last_block['index'] + 1
After new_transaction adds a transaction to the list, it returns the index of the block the transaction will be added to - the next one to be mined of blocks. This will be useful later to the user who submitted the transaction.
When our blockchain is instantiated, we need to seed it with a genesis block—a block with no predecessors. We also need to add a "proof" to our genesis block, which is the result of mining (or proof of work). In addition to creating the genesis block in our constructor, we will also flesh out the new_block(), new_transaction(), and hash() methods:
import hashlib
import json
from time import time
class Blockchain:
    def __init__(self) -> None:
        self.chain = []
        self.current_transactions = []
        # Create the genesis block
        self.new_block(previous_hash=1, proof=100)
    def new_block(self, proof, previous_hash=None) -> dict:
        block = {
            'index': len(self.chain) + 1,
            'timestamp': time(),
            'transactions': self.current_transactions,
            'proof': proof,
            'previous_hash': previous_hash or self.hash(self.chain[-1]),
        }
        self.current_transactions = []
        self.chain.append(block)
        return block
    def new_transaction(self, sender, recipient, amount) -> int:
        self.current_transactions.append(
            {
                'sender': sender,
                'recipient': recipient,
                'amount': amount,
            }
        )
        return self.last_block['index'] + 1
    @property
    def last_block(self) -> dict:
        # Returns the last Block in the chain
        return self.chain[-1]
    @staticmethod
    def hash(block) -> str:
        block_string = json.dumps(block, sort_keys=True).encode()
        return hashlib.sha256(block_string).hexdigest()
At this point, we are almost done representing our area Blockchain. But at this point, you must be wondering how new blocks are created, forged or mined.
Proof of Work (PoW) is a way of creating or mining new blocks on a blockchain with the goal of discovering a number that solves a problem. This number must be difficult to find but easily verified by anyone on the web. PoW is widely used in cryptocurrency mining for validating transactions and mining new coins. Thanks to PoW, Bitcoin and other cryptocurrency transactions can be processed peer-to-peer in a secure manner without the need for a trusted third party.
Let's implement a similar algorithm:
class Blockchain(object):
    def proof_of_work(self, last_proof) -> int:
        proof = 0
        while self.valid_proof(last_proof, proof) is False:
            proof += 1
        return proof
    @staticmethod
    def valid_proof(last_proof, proof) -> bool:
        guess = f'{last_proof}{proof}'.encode()
        guess_hash = hashlib.sha256(guess).hexdigest()
return guess_hash[:4] == '0000'In order for the blockchain to interact, we need a web server to host it. Here we are using the Flask framework.
If it is not installed, you need to install itflask
pip install flask
Our server will be in our blockchain To form a single node in the network, create an app.py:
from uuid import uuid4
from time import time
from textwrap import dedent
from flask import Flask, jsonify, request
from block_chain import Blockchain
# 实例化应用
app = Flask(__name__)
# 创建随机节点名称
node_identifier = str(uuid4()).replace('_', '')
# 实例化block_chain类
block_chain = Blockchain()
# 创建/mine端点
@app.route('/mine', methods=['GET'])
def mine():
    block_chain.new_transaction(
        sender="0",
        recipient=node_identifier,
        amount=1,
    )
    last_block = block_chain.last_block
    last_proof = last_block['proof']
    proof = block_chain.proof_of_work(last_proof)
    previous_hash = block_chain.hash(last_block)
    block = block_chain.new_block(proof, previous_hash)
    response = {
        'message': "New Block Forged",
        'index': block['index'],
        'transactions': block['transactions'],
        'proof': block['proof'],
        'previous_hash': block['previous_hash'],
    }
    return jsonify(response), 200
@app.route('/transactions/new', methods=['POST'])
def new_transaction():
    return "We'll add a new transaction"
@app.route('/chain', methods=['GET'])
def full_chain():
    response = {
        'chain': block_chain.chain,
        'length': len(block_chain.chain),
    }
    return jsonify(response), 200
# 修改端口号
if __name__ == '__main__':
    app.run(host='0.0.0.0', port=5000)
in the same directory and then run
flask run
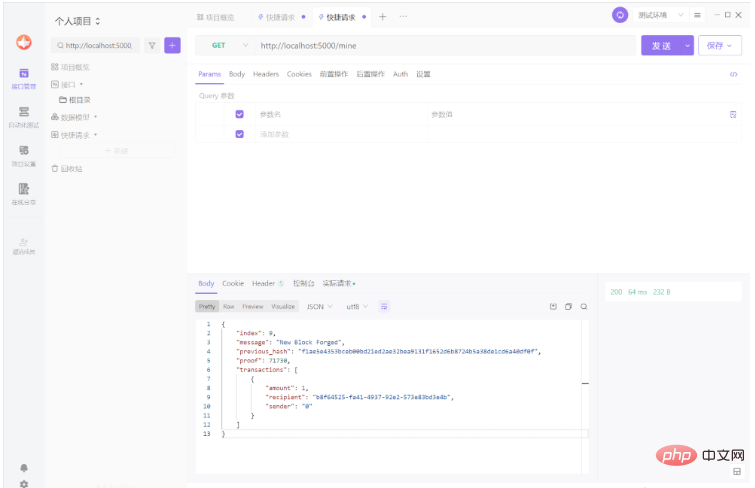
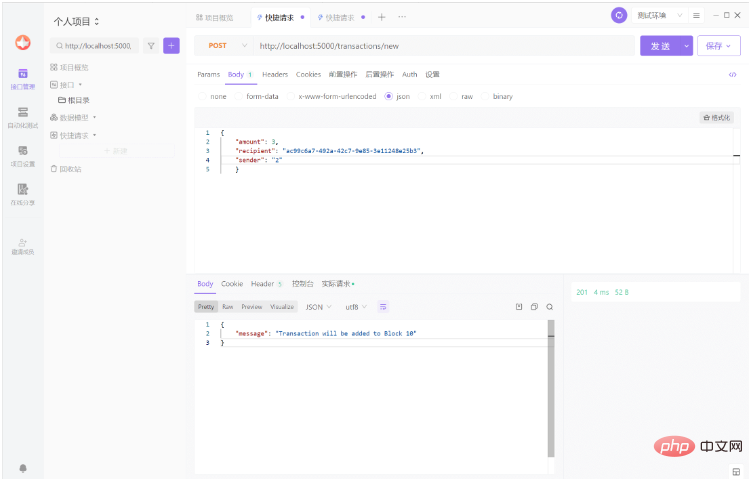
Send a request through the api software (this time using api fox):
...
from urllib.parse import urlparse
...
class Blockchain:
    def __init__(self) -> None:
        ...
        self.nodes = set()
        ...
    def register_node(self, address) -> None:
        parsed_url = urlparse(address)
        self.nodes.add(parsed_url.netloc)
Conflict
...
import requests
class Blockchain:
    ...
    def valid_chain(self, chain):
        last_block = chain[0]
        current_index = 1
        while current_index < len(chain):
            block = chain[current_index]
            print(f'{last_block}')
            print(f'{block}')
            print("\n-----------\n")
            # Check that the hash of the block is correct
            if block['previous_hash'] != self.hash(last_block):
                return False
            # Check that the Proof of Work is correct
            if not self.valid_proof(last_block['proof'], block['proof']):
                return False
            last_block = block
            current_index += 1
        return True
    def resolve_conflicts(self):
        """
        This is our Consensus Algorithm, it resolves conflicts
        by replacing our chain with the longest one in the network.
        :return:  True if our chain was replaced, False if not
        """
        neighbours = self.nodes
        new_chain = None
        # We're only looking for chains longer than ours
        max_length = len(self.chain)
        # Grab and verify the chains from all the nodes in our network
        for node in neighbours:
            response = requests.get(f'http://{node}/chain')
            if response.status_code == 200:
                length = response.json()['length']
                chain = response.json()['chain']
                # Check if the length is longer and the chain is valid
                if length > max_length and self.valid_chain(chain):
                    max_length = length
                    new_chain = chain
        # Replace our chain if we discovered a new, valid chain longer than ours
        if new_chain:
            self.chain = new_chain
            return True
        return False
第一个方法 valid_chain() 负责通过遍历每个块并验证哈希和证明来检查链是否有效。resolve_conflicts() 是一种循环遍历我们所有相邻节点、下载它们的链并使用上述方法验证它们的方法。如果找到一个有效的链,其长度大于我们的,我们将替换我们的。
让我们将两个端点注册到我们的 API,一个用于添加相邻节点,另一个用于解决冲突:
@app.route('/nodes/register', methods=['POST'])
def register_nodes():
    values = request.get_json()
    nodes = values.get('nodes')
    if nodes is None:
        return "Error: Please supply a valid list of nodes", 400
    for node in nodes:
        blockchain.register_node(node)
    response = {
        'message': 'New nodes have been added',
        'total_nodes': list(blockchain.nodes),
    }
    return jsonify(response), 201
@app.route('/nodes/resolve', methods=['GET'])
def consensus():
    replaced = blockchain.resolve_conflicts()
    if replaced:
        response = {
            'message': 'Our chain was replaced',
            'new_chain': blockchain.chain
        }
    else:
        response = {
            'message': 'Our chain is authoritative',
            'chain': blockchain.chain
        }
    return jsonify(response), 200
在这一点上,如果你愿意,你可以拿一台不同的机器,并在你的网络上启动不同的节点。或者在同一台机器上使用不同的端口启动进程。比如创建两个端口5000和6000来进行尝试。
The above is the detailed content of How Python builds a blockchain. For more information, please follow other related articles on the PHP Chinese website!