
Home > Article > Backend Development > How to use Python GUI layout tool Tkinter

Graphical User Interface (GUI) is nothing but a desktop application that helps us interact with the computer
GUI applications like text editors can create, read, update and delete different types of files
Sudoku, Chess and Applications such as Solitaire are game versions of GUI programs
There are also GUI applications such as Google Chrome, Firefox and Microsoft Edge that are used to browse the Internet
These are some different types of GUI applications that we use daily on computers. In fact, we can also build simple similar applications through Tkinter.
Today we are an introduction to GUI, A very simple and beautiful GUI application will be created
Python has a large number of third-party libraries. For GUI libraries, there are mainly the following:
Kivy
Python QT
wxPython
Tkinter
Among them, Tkinter is the first choice for many learners and developers because it is easy to use and comes with Python installation
The picture below shows how the application is actually executed in Tkinter

We first import the Tkinter model, then, we create the main window, in this window, we We are going to perform operations and display all visual effects, next we add Widgets, and finally we enter the Main Event Loop
There are 2 important keywords here
Widgets
Main Event Loop
The event loop basically tells the code to continue displaying the window until we manually close it, running in an infinite loop in the background
For Widgets, we will study it separately later
The following code example will give you a deeper understanding
import tkinter
window = tkinter.Tk()
# to rename the title of the window window.title("GUI")
# pack is used to show the object in the window
label = tkinter.Label(window, text = "Hello World!").pack()
window.mainloop()
We import the Tkinter package and define a window, and then we can modify a window title, Whenever the application is opened, this title will be displayed on the title tab
Finally, we have also defined a label, the label is nothing but the output that needs to be displayed on the window, in the example hello world

So what are Widgets?
Widgets are similar to elements in HTML. We can find different types of Widgets in Tkinter. Different Types of Widgets for Type Elements
Let’s see a brief introduction of all these Widgets in Tkinter
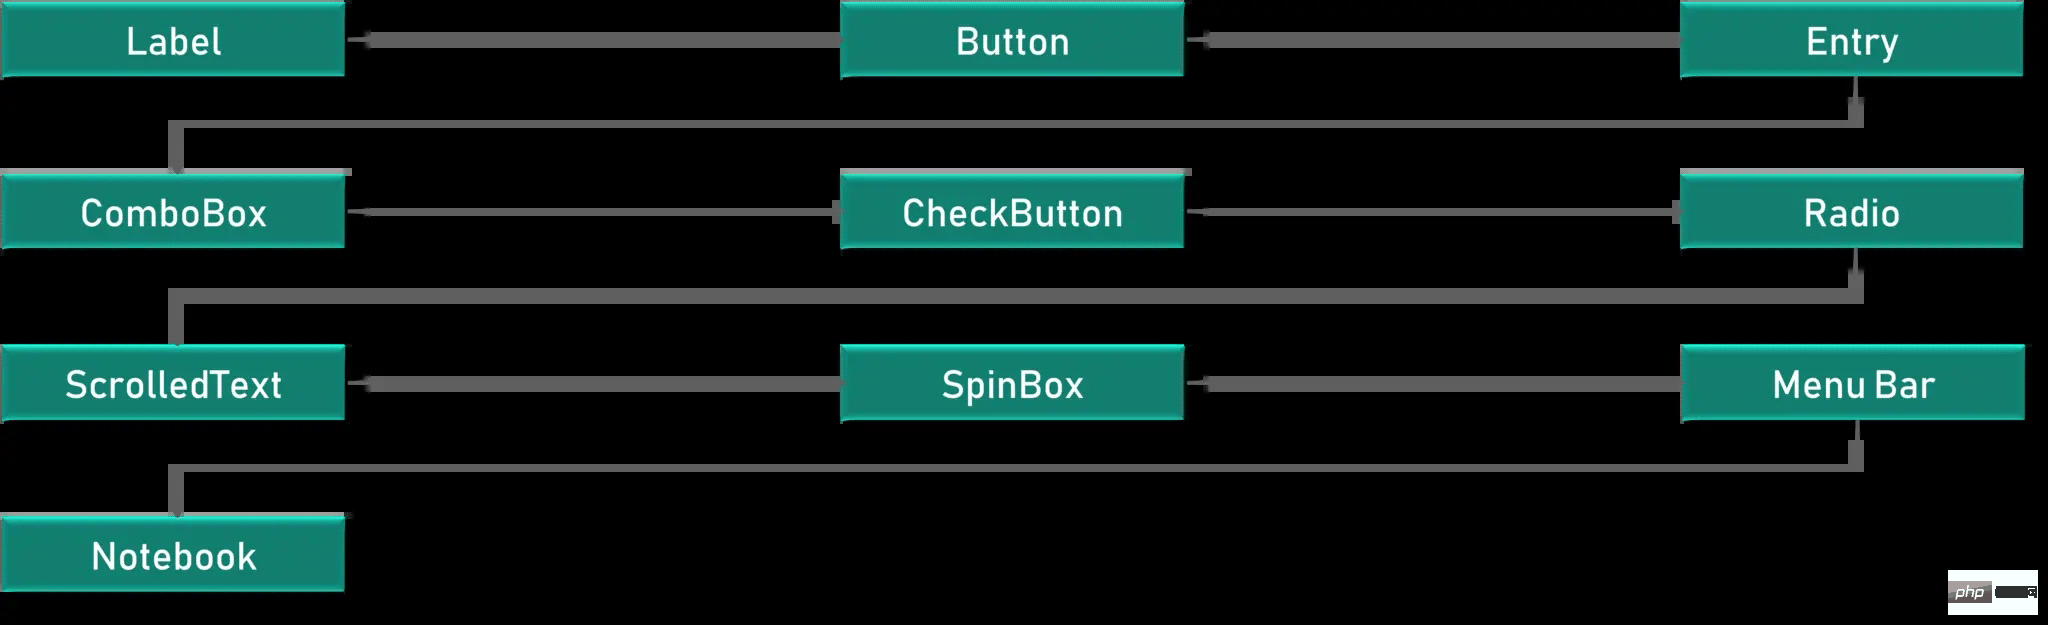
Canvas - Used with Canvas Used for drawing shapes in GUI
Button – Button used for placing buttons in Tkinter
Checkbutton – Checkbutton used for placing buttons in applications Create check buttons in
Entry - Entry is used to create input fields in GUI
Frame – Frame is used as a container in Tkinter
Label - Label is used to create single-line Widgets, such as text, images, etc.
Menu - Menu is used to create menus in GUI
Let’s take a look at the usage of each Widgets one by one
Label is used to create text and images and all related, and pay attention to Yes, it can only be a single line definition
l1 = Label(window, text="萝卜大杂烩!", font=("ArialBold", 50))
l1.grid(column=0, row=0)
There is also a function geometry which is basically used to change the window size and set it as per our requirement
l1 = Label(window, text="萝卜大杂烩!", font=("ArialBold", 50))
window.geometry('350x200')
In this case we set it to 350 pixels wide and 200 pixels tall
Next is the button
Buttons are very similar to labels, we Create a variable and use Widgets syntax to define what the button wants to express
window.geometry('350x200')
bt = Button(window, text="Enter")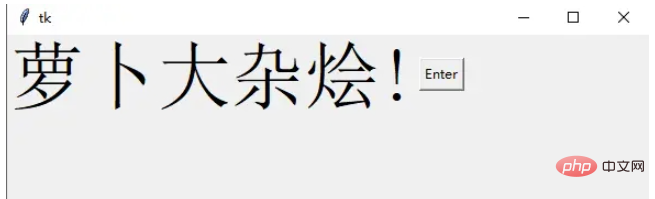
We can also change the foreground color of the button or any other Widget using the parameters shown in the code FG. Similarly, you can also use the BG attribute to change the background color
bt = Button(window, text="Enter", bg="orange", fg="red")
bt.grid(column=1, row=0)
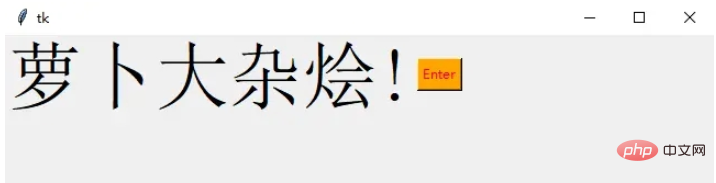
Our foreground is text defined as red, and the background is orange
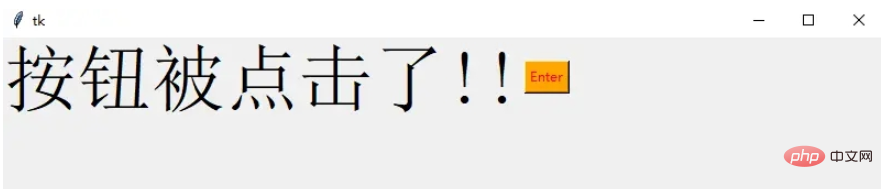
Let’s take a look at the click The operation of the button
def clicked():
    l1.configure(text="按钮被点击了!!")
bt = Button(window, text="Enter", bg="orange", fg="red", command=clicked)
We call this a click event, we need to write the function about what should happen when the button is clicked or the click event is triggered
We define a called clicked Function can display a text message. We add a parameter named command in the button definition to call the click event
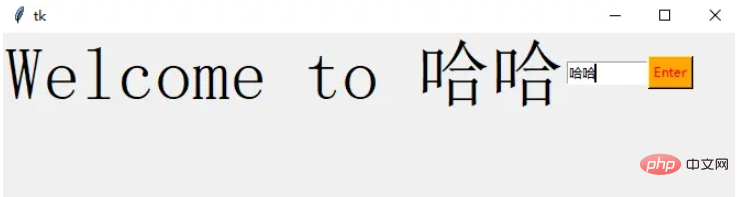
它用于在 GUI 中创建输入字段以接收文本输入
txt = Entry(window, width=10)
txt.grid(column=1, row=0)
def clicked():
    res = "Welcome to " + txt.get()
    l1.configure(text=res)
bt = Button(window, text="Enter", bg="orange", fg="red", command=clicked)
在这里,我们使用 Tkinter Entry 类创建一个文本框,grid 定义我们希望窗口小部件位于何处
同时 clicked 函数接收 Entry 的文本信息
这是一个带有某些选项的下拉菜单
from tkinter.ttk import *
combo = Combobox(window)
combo['values']= (1, 2, 3, 4, 5, "Text")
combo.current(3)
combo.grid(column=0, row=0)

这样一个下拉菜单就完成了
复选按钮是非常常用的组件
chk_state = BooleanVar()
chk_state.set (True)
chk = Checkbutton(window, text="Select", var=chk_state)
chk.grid(column=4, row=0)
我们首先创建一个 booleanvar 类型的变量,这是一个 Tkinter 变量
默认情况下,我们将设置状态保持为 true,这代表按钮已经被选中 接下来,我们将 chk_state 传递给 checkbutton 类来为我们设置检查状态

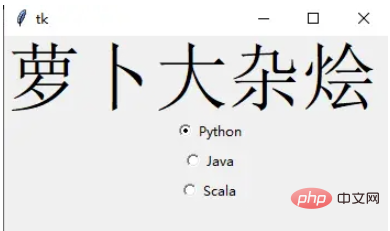
单选按钮也是非常常用的
rad1 = Radiobutton(window, text=Python', value=1)
rad2 = Radiobutton(window, text=Java', value=2)
rad3 = Radiobutton(window, text=Scala', value=3)
rad1.grid(column=0, row=0)
rad2.grid(column=1, row=0)
rad3.grid(column=2, row=0)
在这里,我们使用了不同的参数值,1,2和3,如果它们相同,则会导致冲突并出现错误
它们的文本数据是可以相同,在这里,我们使用了 Python、Java 和 Scala
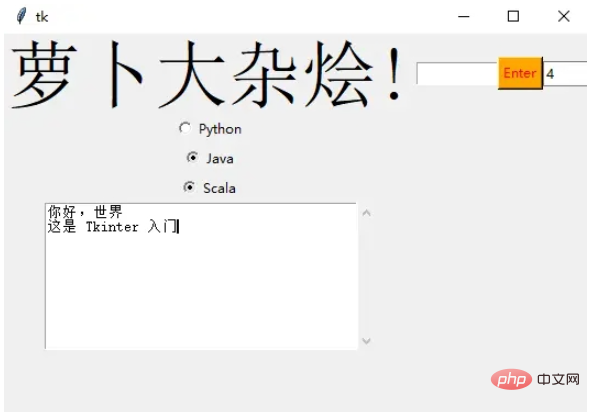
滚动文本组件
scro_txt = scrolledtext.ScrolledText(window, width=40,height=10)
scro_txt.grid(column=0, row=4)
我们指定了窗口的高和宽,否则默认会填充整个 Windiws 窗口
消息组件可以方便的弹出提醒消息
def clicked():
    messagebox.showinfo('Message title', 'Message content')
btn = Button(window,text=‘ENTER', command=clicked)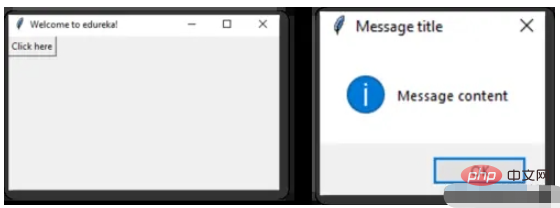
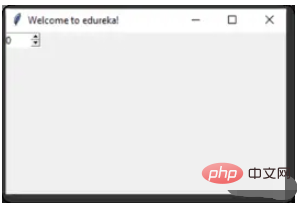
Spinbox 也是一个常见的组件,有两个选项卡,存在向上和向下滚动选项卡
pin = Spinbox(window, from_=0, to=100, width=5)
有 3 个参数——from、to 和 width
From – 告诉我们范围的开始和默认值
to – 给我们范围的上限阈值
width 基本上是将 widget 的大小设置为5个字符的空格
Tkinter 中的所有 Widgets 都会有一些位置信息,这些度量使得我们可以组织 Widgets 及其父框架、窗口等
Tkinter 具有以下三个布局方式
pack():- 它在块中组织 Widgets,这意味着它占据了整个可用宽度,这是在窗口中显示 Widgets 的标准方法
grid():- 它以类似表格的结构组织 Widgets
place():- 它将 Widgets 放置在我们想要的特定位置
为了在窗口中安排布局,我们将使用 Frame 类
Frame -- 在窗口中创建分区,我们可以根据需要使用 pack() 方法的侧面参数对齐框架
Button -- 在窗口中创建一个按钮,需要传递几个参数,如文本(按钮的值)、fg(文本的颜色)、bg(背景颜色)
在下面的代码中,我们使用 window、top_frame、bottom_frame 来布局
import tkinter
window = tkinter.Tk()
window.title("GUI")
# creating 2 frames TOP and BOTTOM
top_frame = tkinter.Frame(window).pack()
bottom_frame = tkinter.Frame(window).pack(side = "bottom")
# now, create some widgets in the top_frame and bottom_frame
btn1 = tkinter.Button(top_frame, text = "Button1", fg = "red").pack()# 'fg - foreground' is used to color the contents
btn2 = tkinter.Button(top_frame, text = "Button2", fg = "green").pack()# 'text' is used to write the text on the Button
btn3 = tkinter.Button(bottom_frame, text = "Button2", fg = "purple").pack(side = "left")# 'side' is used to align the widgets
btn4 = tkinter.Button(bottom_frame, text = "Button2", fg = "orange").pack(side = "left")
window.mainloop()
再来看一个登录的小栗子
import tkinter
window = tkinter.Tk()
window.title("GUI")
# creating 2 text labels and input labels
tkinter.Label(window, text = "Username").grid(row = 0) # this is placed in 0 0
# 'Entry' is used to display the input-field
tkinter.Entry(window).grid(row = 0, column = 1) # this is placed in 0 1
tkinter.Label(window, text = "Password").grid(row = 1) # this is placed in 1 0
tkinter.Entry(window).grid(row = 1, column = 1) # this is placed in 1 1
# 'Checkbutton' is used to create the check buttons
tkinter.Checkbutton(window, text = "Keep Me Logged In").grid(columnspan = 2) # 'columnspan' tells to take the width of 2 columns
# you can also use 'rowspan' in the similar manner
window.mainloop()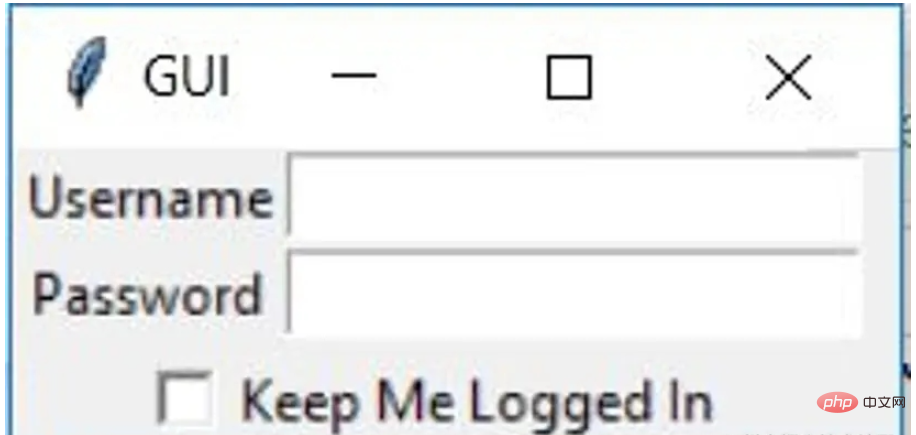
下面我们来了解 binding 函数
每当事件发生时调用函数就是绑定函数
在下面的示例中,当单击按钮时,它会调用一个名为 say_hi 的函数。 函数 say_hi 会创建一个带有文本 Hi 的新标签
import tkinter
window = tkinter.Tk()
window.title("GUI")
# creating a function called say_hi()
def say_hi():
    tkinter.Label(window, text = "Hi").pack()
tkinter.Button(window, text = "Click Me!", command = say_hi).pack() # 'command' is executed when you click the button
# in this above case we're calling the function 'say_hi'.
window.mainloop()
另一种绑定函数的方法是使用事件,事件类似于鼠标移动、鼠标悬停、单击和滚动等等
import tkinter
window = tkinter.Tk()
window.title("GUI")
# creating a function with an arguments 'event'
def say_hi(event): # you can rename 'event' to anything you want
    tkinter.Label(window, text = "Hi").pack()
btn = tkinter.Button(window, text = "Click Me!")
btn.bind("Button-1", say_hi) # 'bind' takes 2 parameters 1st is 'event' 2nd is 'function'
btn.pack()
window.mainloop()
单击事件有 3 种不同的类型,分别是 leftClick、middleClick 和 rightClick
下面的代码将使用对于的文本创建一个新标签
import tkinter
window = tkinter.Tk()
window.title("GUI")
#creating 3 different functions for 3 events
def left_click(event):
    tkinter.Label(window, text = "Left Click!").pack()
def middle_click(event):
    tkinter.Label(window, text = "Middle Click!").pack()
def right_click(event):
    tkinter.Label(window, text = "Right Click!").pack()
window.bind("Button-1", left_click)
window.bind("Button-2", middle_click)
window.bind("Button-3", right_click)
window.mainloop()
我们可以使用 PhotoImage 方法添加图像和图标
import tkinter
window = tkinter.Tk()
window.title("GUI")
# taking image from the directory and storing the source in a variable
icon = tkinter.PhotoImage(file = "4.PNG")
# displaying the picture using a 'Label' by passing the 'picture' variriable to 'image' parameter
label = tkinter.Label(window, image = icon)
label.pack()
window.mainloop()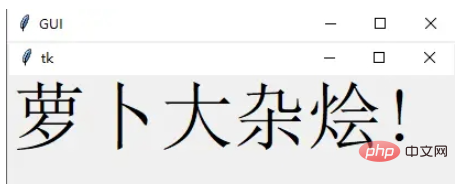
好了,进步的 Tkinter 知识我们都梳理完毕了,下面就完成一个简单的实战项目吧
首先初始化页面
window = Tk()
window.geometry("350x380")
window.resizable(0, 0)  # this prevents from resizing the window
window.title("小小计算器")
接下来定义输入数字框
input_text = StringVar()
input_frame = Frame(window, width=312, height=50, bd=0, highlightbackground="black", highlightcolor="black",
                    highlightthickness=1)
input_frame.pack(side=TOP)
input_field = Entry(input_frame, font=('arial', 18, 'bold'), textvariable=input_text, width=50, bg="#eee", bd=0,
                    justify=RIGHT)
input_field.grid(row=0, column=0)
input_field.pack(ipady=10)
然后定义按钮方法,我们以清除按钮和除法按钮为例
clear = Button(btns_frame, text="C", fg="black", width=32, height=3, bd=0, bg="#eee", cursor="hand2",
               command=lambda: btn_clear()).grid(row=0, column=0, columnspan=3, padx=1, pady=1)
divide = Button(btns_frame, text="/", fg="black", width=10, height=3, bd=0, bg="#eee", cursor="hand2",
                command=lambda: btn_click("/")).grid(row=0, column=3, padx=1, pady=1)
最后就是计算equal逻辑
equals = Button(btns_frame, text="=", fg="black", width=10, height=3, bd=0, bg="#eee", cursor="hand2",
               command=lambda: btn_equal()).grid(row=4, column=3, padx=1, pady=1)
def btn_equal():
   global expression
   result = str(eval(expression))
   input_text.set(result)
   expression = ""
The above is the detailed content of How to use Python GUI layout tool Tkinter. For more information, please follow other related articles on the PHP Chinese website!