
Home > Article > Backend Development > How to implement the decorator of Python virtual machine bytecode

This instruction is used to load a constant onto the stack. Constants can be objects such as numbers, strings, tuples, lists, dictionaries, etc. For example:
>>> dis.dis(lambda: 42)
  1           0 LOAD_CONST               1 (42)
2 RETURN_VALUEThis instruction is used to load a variable into the stack. For example:
>>> dis.dis(lambda: x)
  1           0 LOAD_GLOBAL              0 (x)
              2 RETURN_VALUE
>>>This instruction is used to store the value at the top of the stack into a variable. For example:
>>> dis.dis("x=42")
  1           0 LOAD_CONST               0 (42)
              2 STORE_NAME               0 (x)
              4 LOAD_CONST               1 (None)
6 RETURN_VALUEThis instruction is used to add the two values on the top of the stack and push the result to the stack.
>>> dis.dis(lambda: x + y)
  1           0 LOAD_GLOBAL              0 (x)
              2 LOAD_GLOBAL              1 (y)
              4 BINARY_ADD
6 RETURN_VALUEThis instruction is used to subtract the two values on the top of the stack and push the result to the stack.
>>> dis.dis(lambda: x - y)
  1           0 LOAD_GLOBAL              0 (x)
              2 LOAD_GLOBAL              1 (y)
              4 BINARY_SUBTRACT
              6 RETURN_VALUE
The same bytecode for addition, subtraction, multiplication and division to obtain the remainder is as follows:
>>> dis.dis(lambda: x + y)
  1           0 LOAD_GLOBAL              0 (x)
              2 LOAD_GLOBAL              1 (y)
              4 BINARY_ADD
              6 RETURN_VALUE
>>> dis.dis(lambda: x - y)
  1           0 LOAD_GLOBAL              0 (x)
              2 LOAD_GLOBAL              1 (y)
              4 BINARY_SUBTRACT
              6 RETURN_VALUE
>>> dis.dis(lambda: x * y)
  1           0 LOAD_GLOBAL              0 (x)
              2 LOAD_GLOBAL              1 (y)
              4 BINARY_MULTIPLY
              6 RETURN_VALUE
>>> dis.dis(lambda: x / y)
  1           0 LOAD_GLOBAL              0 (x)
              2 LOAD_GLOBAL              1 (y)
              4 BINARY_TRUE_DIVIDE
              6 RETURN_VALUE
>>> dis.dis(lambda: x // y)
  1           0 LOAD_GLOBAL              0 (x)
              2 LOAD_GLOBAL              1 (y)
              4 BINARY_FLOOR_DIVIDE
              6 RETURN_VALUE
>>> dis.dis(lambda: x % y)
  1           0 LOAD_GLOBAL              0 (x)
              2 LOAD_GLOBAL              1 (y)
              4 BINARY_MODULO
6 RETURN_VALUEThis instruction is used to compare the two values on the top of the stack, and The result of the comparison is pushed onto the stack. The parameter of the next byte after this bytecode represents the comparison symbol of less than, greater than, not equal to, etc. For example:
>>> dis.dis(lambda: x - y)
  1           0 LOAD_GLOBAL              0 (x)
              2 LOAD_GLOBAL              1 (y)
              4 BINARY_SUBTRACT
              6 RETURN_VALUE
>>> dis.dis(lambda: x > y)
  1           0 LOAD_GLOBAL              0 (x)
              2 LOAD_GLOBAL              1 (y)
              4 COMPARE_OP               4 (>)
              6 RETURN_VALUE
>>> dis.dis(lambda: x < y)
  1           0 LOAD_GLOBAL              0 (x)
              2 LOAD_GLOBAL              1 (y)
              4 COMPARE_OP               0 (<)
              6 RETURN_VALUE
>>> dis.dis(lambda: x != y)
  1           0 LOAD_GLOBAL              0 (x)
              2 LOAD_GLOBAL              1 (y)
              4 COMPARE_OP               3 (!=)
              6 RETURN_VALUE
>>> dis.dis(lambda: x <= y)
  1           0 LOAD_GLOBAL              0 (x)
              2 LOAD_GLOBAL              1 (y)
              4 COMPARE_OP               1 (<=)
              6 RETURN_VALUE
>>> dis.dis(lambda: x >= y)
  1           0 LOAD_GLOBAL              0 (x)
              2 LOAD_GLOBAL              1 (y)
              4 COMPARE_OP               5 (>=)
              6 RETURN_VALUE
>>> dis.dis(lambda: x == y)
  1           0 LOAD_GLOBAL              0 (x)
              2 LOAD_GLOBAL              1 (y)
              4 COMPARE_OP               2 (==)
6 RETURN_VALUEPop the top element of the stack as the return value.
This command is used to create a list. For example:
>>> dis.dis(lambda: [a, b, c, e])
  1           0 LOAD_GLOBAL              0 (a)
              2 LOAD_GLOBAL              1 (b)
              4 LOAD_GLOBAL              2 (c)
              6 LOAD_GLOBAL              3 (e)
              8 BUILD_LIST               4
             10 RETURN_VALUE
This bytecode instruction has a parameter indicating the number of list elements in the stack space. In the above example, this parameter is 4.
This directive is used to create a tuple. For example:
>>> dis.dis(lambda: (a, b, c))
  1           0 LOAD_GLOBAL              0 (a)
              2 LOAD_GLOBAL              1 (b)
              4 LOAD_GLOBAL              2 (c)
              6 BUILD_TUPLE              3
              8 RETURN_VALUE
The same bytecode also has a parameter indicating the number of elements to create a tuple.
This command is used to create a dictionary. For example:
Like list and tuple, this instruction is used to create a collection object. The same instruction also has a parameter indicating the number of elements used to create the collection. .
>>> dis.dis(lambda: {a, b, c, d})
  1           0 LOAD_GLOBAL              0 (a)
              2 LOAD_GLOBAL              1 (b)
              4 LOAD_GLOBAL              2 (c)
              6 LOAD_GLOBAL              3 (d)
              8 BUILD_SET                4
10 RETURN_VALUEThis instruction is used to create a dictionary object. The same instruction also has a parameter indicating the number of elements in the dictionary.
>>> dis.dis(lambda: {1:2, 3:4})
  1           0 LOAD_CONST               1 (2)
              2 LOAD_CONST               2 (4)
              4 LOAD_CONST               3 ((1, 3))
              6 BUILD_CONST_KEY_MAP      2
8 RETURN_VALUEIf you are a pythoner, then you must have heard of decorators more or less. This is a syntactic sugar for python that we can Use it to do many interesting things, such as adding some functions to functions without modifying the source code, such as calculating time.
import time

def eval_time(func):

    def cal_time(*args, **kwargs):
        start = time.time()
        r = func(*args, **kwargs)
        end = time.time()
        return r, end - start
    return cal_time


@eval_time
def fib(n):
    a = 0
    b = 1
    while n > 0:
        n -= 1
        a, b = b, a + b
    return a
In the above code, we implemented a function to calculate the Fibonacci sequence. In addition, we also wrote an eval_time function to calculate the function execution time. Now call the function fib(10) , the output of the program is as follows:
>>>fib(10)
(55, 5.9604644775390625e-06)
You can see Achieved the effect we wanted.
Now we use a simpler example to simulate the above code structure, so that we can analyze the execution process of the above function:
s = """
def decorator(func):
    print("Hello")
    return func

@decorator
def fib(n):
    pass
"""
dis.dis(s)
The output of the above dis function corresponds to the bytes of the code The code is as follows:
2 0 LOAD_CONST 0 (
", line 2>)
2 LOAD_CONST 1 ('decorator')
4 MAKE_FUNCTION 0
6 STORE_NAME 0 (decorator)
6 8 LOAD_NAME 0 (decorator)
7 10 LOAD_CONST 2 (", line 6>)
12 LOAD_CONST 3 ('fib')
14 MAKE_FUNCTION 0
16 CALL_FUNCTION 1
18 STORE_NAME 1 (fib)
20 LOAD_CONST 4 (None)
22 RETURN_VALUE
Disassembly of", line 2>:
3 0 LOAD_GLOBAL 0 (print)
2 LOAD_CONST 1 ('Hello')
4 CALL_FUNCTION 1
6 POP_TOP
4 8 LOAD_FAST 0 (func)
10 RETURN_VALUE
Disassembly of", line 6>:
8 0 LOAD_CONST 0 (None)
2 RETURN_VALUE
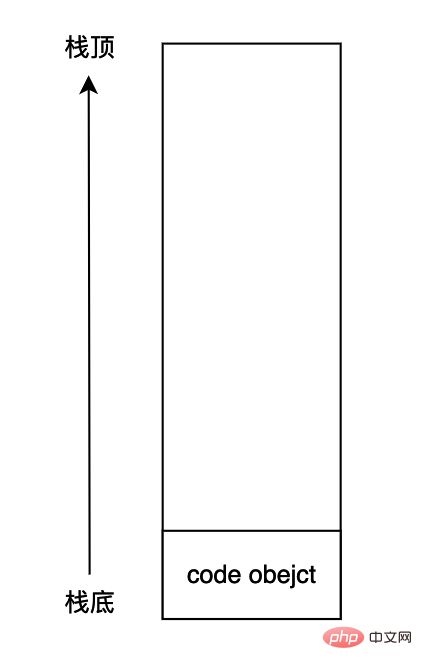
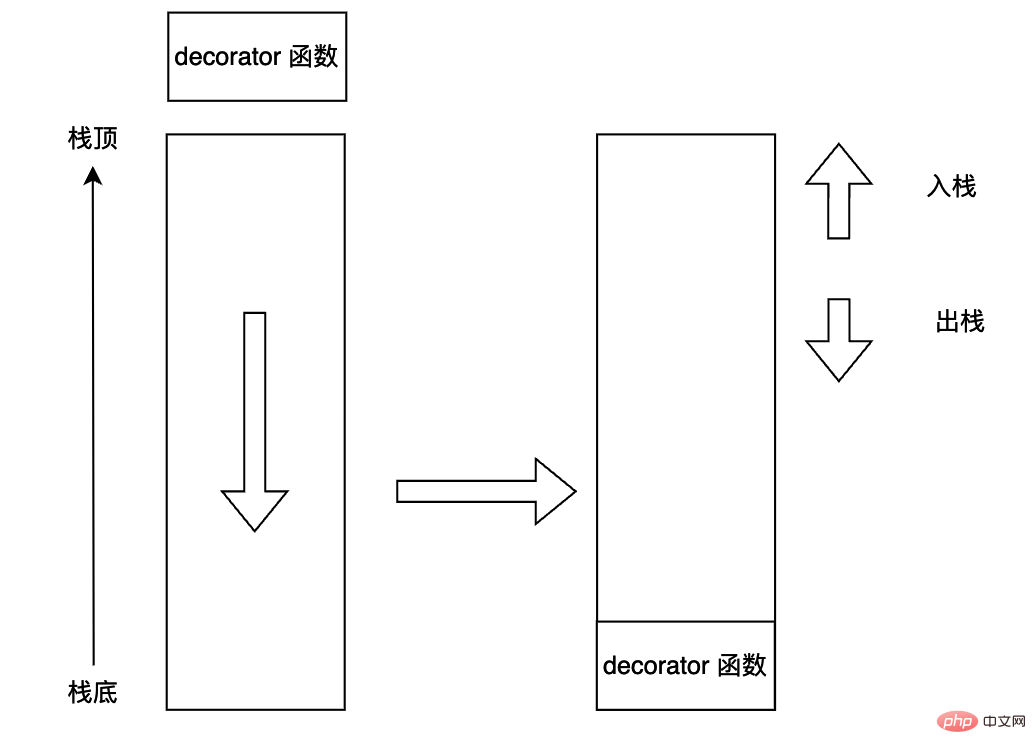
执行第一条指令 LOAD_CONST,这条指令主要是加载一个 code object 对象,这个对象里面主要是包含函数 decorator 的字节码,主要是上面字节码的第二块内容。在执行完这条字节码之后栈空间如下所示:
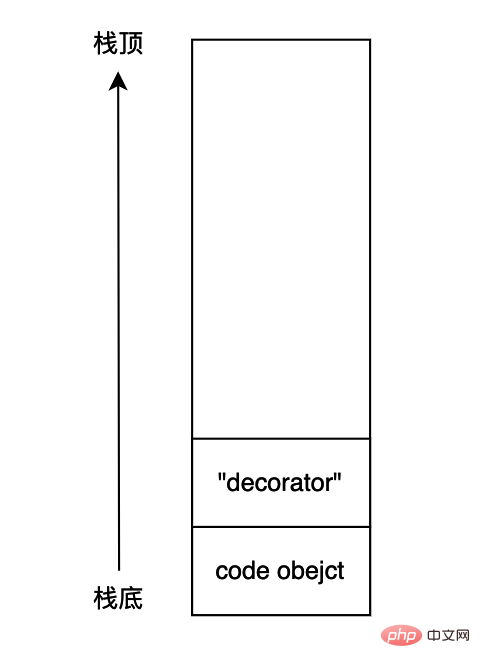
执行完第二条指令 LOAD_CONST 之后,会将字符串 decorator 加载进入栈空间当中。
执行第三条指令 MAKE_FUNCTION,这条字节码的作用是在虚拟机内部创建一个函数,函数的名称为 decorator,函数对应的字节码则是在先前压入栈空间当中的 code object 对象,这条指令还会将创建好的函数对象压入栈中。
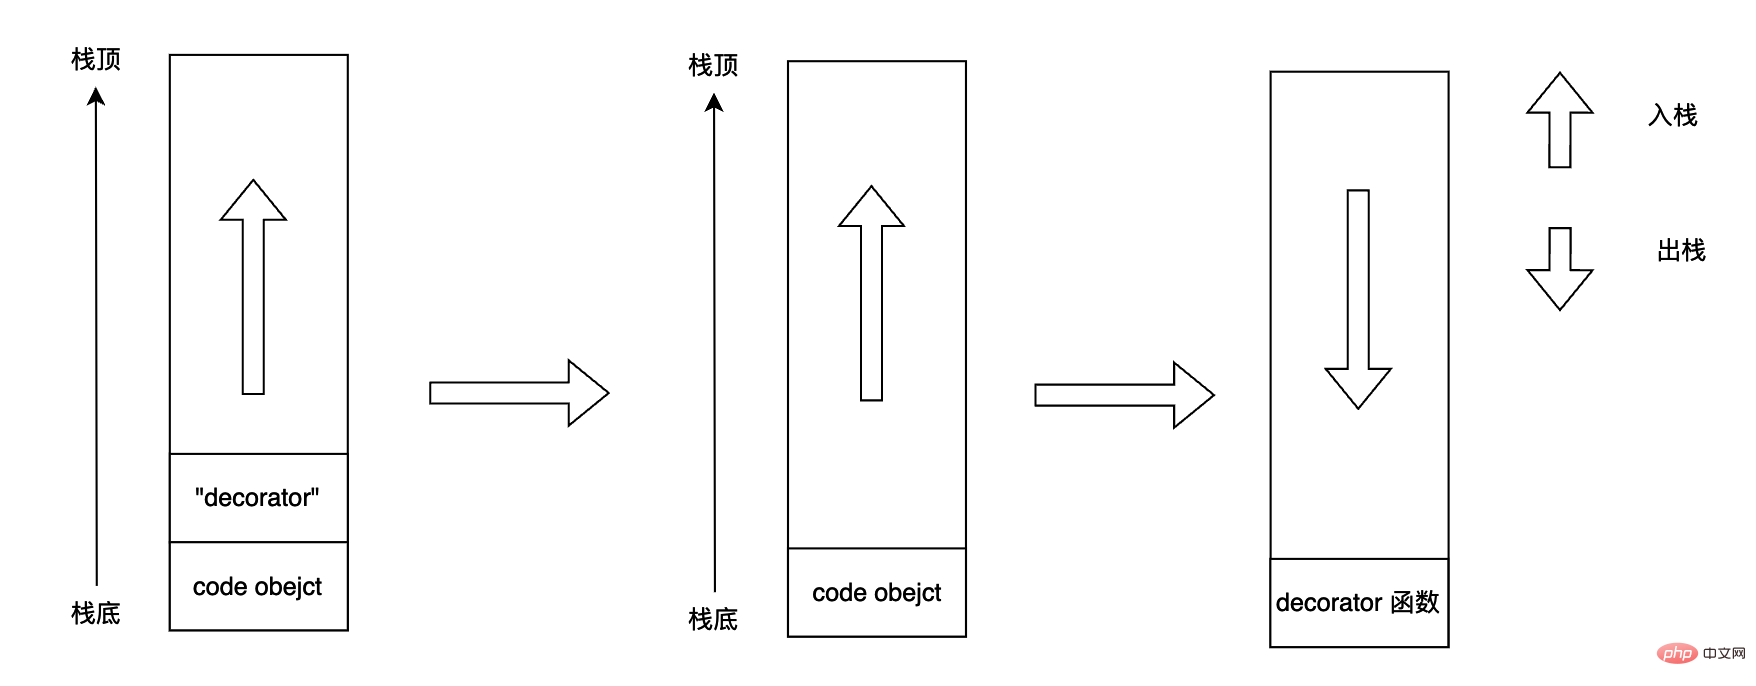
STORE_NAME,条字节码会将栈顶的元素弹出,并且将 co_names[oparg] 指向这个对象,在上面的字节码当中 co_names[oparg] 就是 decorator 。
LOAD_NAME,这条字节码就是将 co_names[oparg] 对应的名字指向的对象重新加载进入栈空间当中,也就是上面的 decorator 函数加入进行栈空间当中。
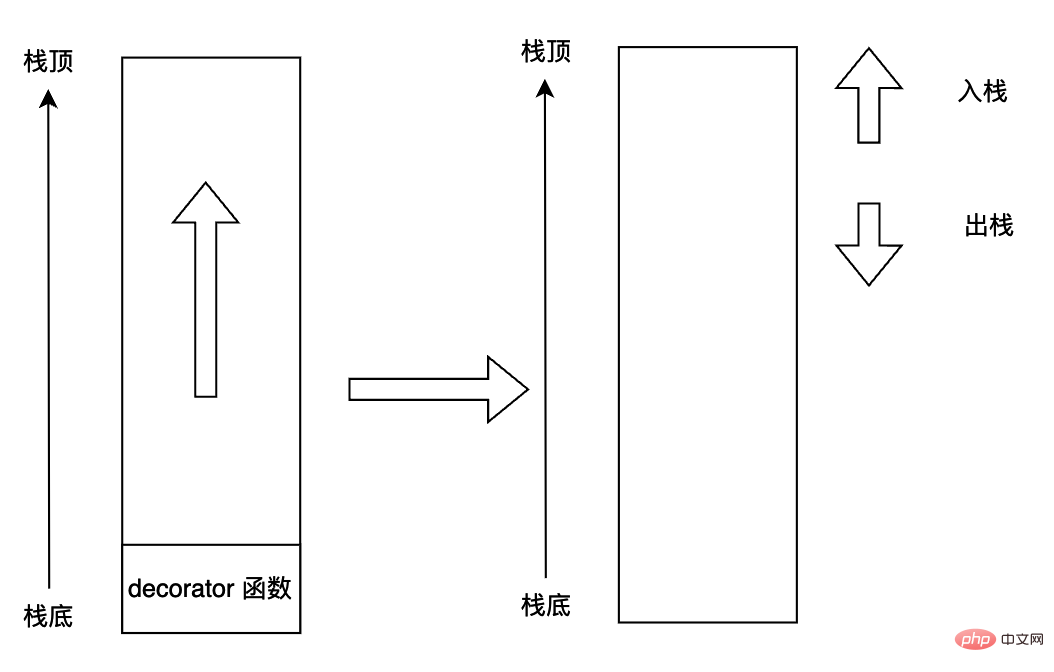
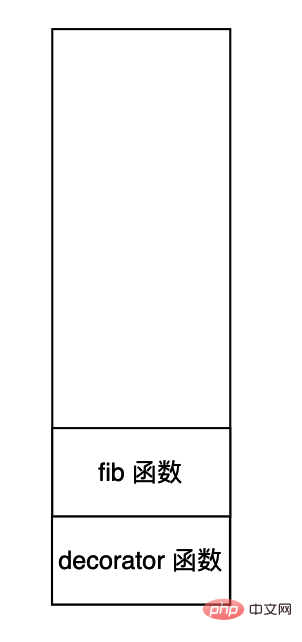
接下来的三条字节码 LOAD_CONST,LOAD_CONST 和 MAKE_FUNCTION,在执行这三条字节码之后,栈空间如下所示:
接下来的一条指令非常重要,这条指令便是装饰器的核心原理,CALL_FUNCTION 这条指令有一个参数 i,在上面的字节码当中为 1,也就是说从栈顶开始的前 i 个元素都是函数参数,调用的函数在栈空间的位置为 i + 1 (从栈顶往下数),那么在上面的情况下就是说调用 decorator 函数,并且将 fib 函数作为 decorator 函数的参数,decorator 函数的返回值再压入栈顶。在上面的代码当中 decorator 函数返回值也是一个函数,也就是 decorator 函数的参数,即 fib 函数。
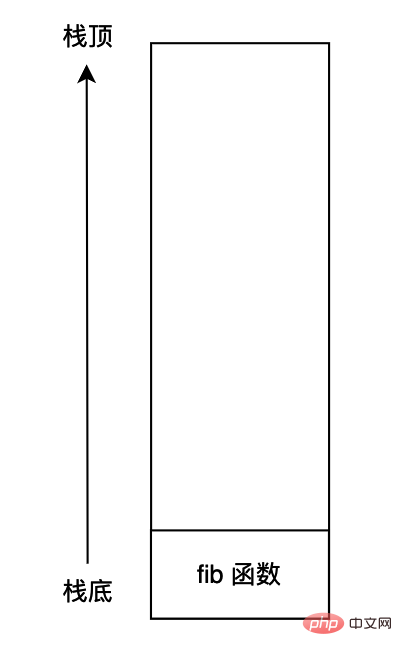
接下来便是 STORE_NAME 字节码,这条字节码的含义我们在前面已经说过了,就是将栈顶元素弹出,保存到 co_names[oparg] 指向的对象当中,在上面的代码当中也就是将栈顶的对象保存到 fib 当中。栈顶元素 fib 函数是调用函数 decorator 的返回值。
看到这里就能够理解了原来装饰器的最根本的原理不就是函数调用嘛,比如我们最前面的用于计算函数执行时间的装饰器的原理就是:
fib = eval_time(fib)
将 fib 函数作为 eval_time 函数的参数,再将这个函数的返回值保存到 fib 当中,当然这个对象必须是可调用的,不然后面使用 fib() 就会保存,我们可以使用下面的代码来验证这个效果。
def decorator(func):
    return func()


@decorator
def demo():
    return "function demo return string : Demo"

print(demo)
执行上面的程序结果为:
function demo return string : Demo
可以看到 demo 已经变成了一个字符串对象而不再是一个函数了,因为 demo = decorator(demo),而在函数 decorator 当中返回值是 demo 函数自己的返回值,因此才打印了字符串。
The above is the detailed content of How to implement the decorator of Python virtual machine bytecode. For more information, please follow other related articles on the PHP Chinese website!