
Home > Article > Backend Development > How to configure python virtual environment with conda

First select the file to configure the environment
as follows:
Enter cmd here and press Enter
Here I create an environment named hands3dtext, the environment version is the initial environment of 3.7.2
conda create -n hands3dtext python==3.7.2

The creation is successful as follows:
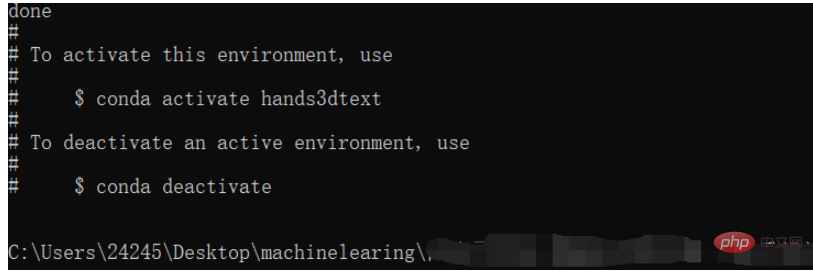
First activate the just created virtual environment
conda activate hands3dtext

As shown above, the parentheses in front of it indicate successful activation, and you are in the virtual environment at this time.
You can then install all the required packages and libraries
Be sure to confirm whether to install the cpu or gpu version before installation.
Here I need to install mediapipe
Note: To install mediapipe, first install opencv, and execute the terminal
conda install opencv-contrib-python
The previous article may be wrong, you can use the following domestic Tsinghua mirror source
pip install opencv-python -i https://pypi.tuna.tsinghua.edu.cn/simple
Then Install mediapipe, execute the terminal
conda install mediapipe
I also need to install the tqdm module (according to personal needs)
conda install tqdm
If you feel that the installation is too slow, you can switch to the domestic mirror source for installation and execute the following command
conda config --remove-key channels
conda config --add channels https://mirrors.ustc.edu.cn/anaconda/pkgs/main/
conda config --add channels https://mirrors.ustc.edu.cn/anaconda/pkgs/free/
conda config --add channels https://mirrors.bfsu.edu.cn/anaconda/cloud/pytorch/
conda config --set show_channel_urls yes
pip config set global.index-url https://mirrors.ustc.edu.cn/pypi/web/simple
For specific steps of GPU version installation, please refer to this article: Installing the GPU version of Tensorflow and Pytorch under Windows in 2021_dejahu's blog-CSDN blog
You need to pay attention to the following points:
1. Be sure to update your graphics card driver before installation. Go to the official website to download the driver installation of the corresponding model.
2. 30 series graphics cards can only be used. cuda11 version
3. Be sure to create a virtual environment so that there is no conflict between the deep learning frameworks
conda install pytorch==1.8.0 torchvision torchaudio cudatoolkit=10.2
# 注意这条命令指定Pytorch的版本和cuda的版本
conda install pytorch==1.8.0 torchvision==0.9.0 torchaudio==0.8.0 cpuonly
# CPU的小伙伴直接执行这条命令即可
Installation of pycocotools
pip install pycocotools-windows
Installation of other packages
pip install -r requirements.txt
pip install pyqt5
pip install labelme
First open the corresponding project and follow the icon guidance to find the newly created virtual environment
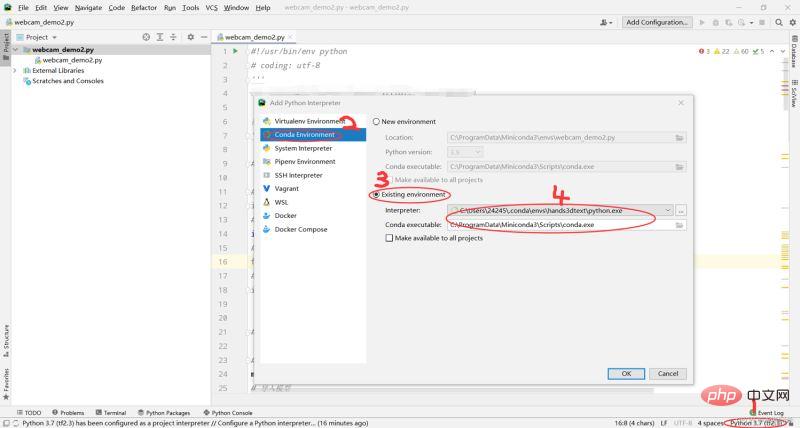
Click OK. Wait for the configuration to be completed
The above is the detailed content of How to configure python virtual environment with conda. For more information, please follow other related articles on the PHP Chinese website!