
Home > Article > Backend Development > Super complete! Python graphical interface framework PyQt5 usage guide!


Personal thoughts: There is too much to learn, so learn PyQt5 first, because there is a lot of information, and then learn pyside6 if you have enough energy. Finally, take a look at PySimpleGUI to see if you can solve some simple problems.
PyQt is a Python language implementation of the Qt framework. It was developed by Riverbank Computing and is one of the most powerful GUI libraries. PyQt provides a well-designed collection of window controls. Each PyQt control corresponds to a Qt control, so PyQt's API interface is very close to Qt's API interface, but PyQt no longer uses the QMake system and the Q_OBJECT macro.
PyQt5 provides GPL version and commercial version certificates. Free developers can use the free GPL license. If you need to use PyQt for commercial applications, you must purchase a commercial license.
PyQt5 features are as follows:
Since fbs will be used for packaging later, fbs may have compatibility issues with Python 3.7 and later versions, so I chose Python 3.6 .8 The entire environment was built. The main content is: Python PyCharm PyQt5
pip install pyqt5
pip install pyqt5-tools
Among them, pyqt5-tools is the Qt Designer drag-and-drop interface design tool. The following error may be reported during the installation process:
qt5-tools 5.15.2.1.2 has requirement click~=7.0, but you'll have click 8.0.1 which is incompatible.
Solution:
pip install click~=7.0
Qt Designer is configured by dragging Place controls by dragging them, and view the control effects in real time for quick UI design.
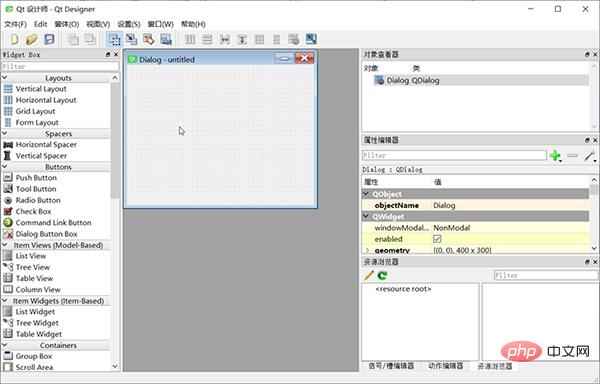
The composition of the entire screen:
Finally generate a .ui file (essentially a file in XML format), which can be used directly or converted into a .py file through the pyuic5 tool.
In Pycharm, open File – Settings – Tools – External Tools, click Create Tool, the configuration is as follows:
Name: QtDisigner
Program : D:Program FilesPython36Libsite-packagesqt5_applicationsQtbindesigner.exe # 请根据实际修改
Working directory: $FileDir$
PyUIC mainly replaces the .ui file generated by Qt Designer with a .py file.
In Pycharm, open File – Settings – Tools – External Tools, click Create Tool, and configure it as follows:
Name: PyUIC
Program : D:Program FilesPython36python.exe # 当前Python目录,请根据实际修改
Arguments: -m PyQt5.uic.pyuic $FileName$ -o $FileNameWithoutExtension$.py
Working directory: $FileDir$
PyRCC The main thing is to replace the written .qrc resource file with a .py file. In Pycharm, open File – Settings – Tools – External Tools, click Create Tool, and configure it as follows:
Name: PyRCC
Program: D:Program FilesPython36pyrcc5.exe # 当前rcc工具目录,请根据实际修改
Arguments: $FileName$ -o $FileNameWithoutExtension$_rc.py
Working directory: $FileDir$
Create a blank interface:
import sys
from PyQt5.QtWidgets import QApplication, QMainWindow, QLabel
app = QApplication(sys.argv)
win = QMainWindow()
win.setGeometry(400, 400, 400, 300)
win.setWindowTitle("Pyqt5 Tutorial")
win.show()
sys.exit(app.exec_())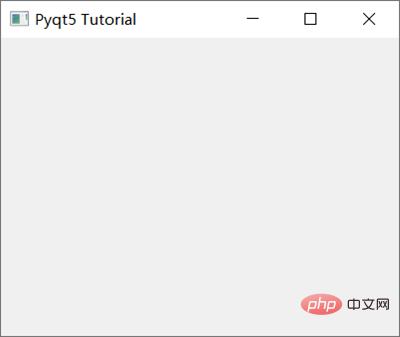
where:
PyQt5支持的常见Widgets有:
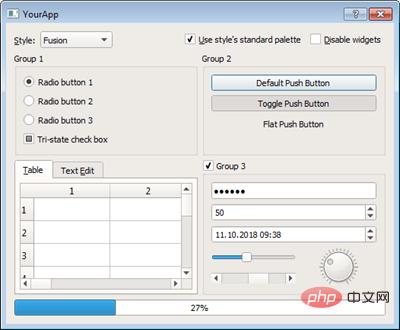
从上到下,从左到右依次为:Qlabel、QcomboBox、QcheckBox、QradioButton、QpushButton、QtableWidget、QlineEdit、Qslider、QProgressBar
对于使用Pyqt5设置文本内容,我们使用Qlabel:
import sys
from PyQt5.QtWidgets import QApplication, QMainWindow, QLabel
app = QApplication(sys.argv)
win = QMainWindow()
win.setGeometry(400, 400, 400, 300)
win.setWindowTitle("Pyqt5 Tutorial")
# Label Text
label = QLabel(win)
label.resize(200, 100)
label.setText("Hi this is Pyqt5")
label.move(100, 100)
win.show()
sys.exit(app.exec_())
按钮与事件:
import sys
from PyQt5.QtWidgets import QApplication, QMainWindow, QPushButton
def click():
 print("Hy Button is clicked!")
app = QApplication(sys.argv)
win = QMainWindow()
win.setGeometry(400, 400, 400, 300)
win.setWindowTitle("Pyqt5 Tutorial")
# Button
button = QPushButton(win)
button.resize(200, 100)
button.setText("Hi! Click Me")
button.move(100, 100)
button.clicked.connect(click)
win.show()
sys.exit(app.exec_())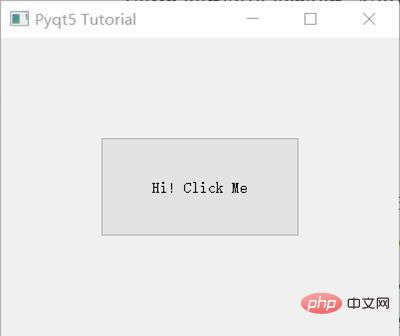
button.clicked.connect() 在按钮点击后执行特定的事件。
实战项目:简易的天气查询软件
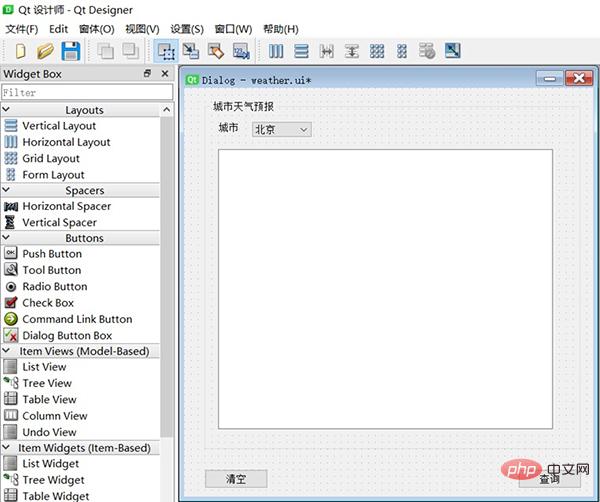
用到的控件有Button, GroupBox, Label,ComboBox,TextEdit,同时定义了两个按钮queryBtn及clearBtn,分别用来查询及清空天气数据。我们需要绑定槽函数,方法如下:
以上完成后保存为Weather.ui文件。
PyQt5支持直接使用.ui文件:
import sys
from PyQt5 import QtWidgets, uic
app = QtWidgets.QApplication(sys.argv)
window = uic.loadUi("mainwindow.ui")
window.show()
app.exec()
但是为了更好的自定义及修改上面的槽函数,可以使用External Tools – PyUIC,即可生成Weather.py,实际运行命令如下:
D:Program FilesPython36python.exe -m PyQt5.uic.pyuic Weather.ui -o Weather.py
其中,我们需要把两个按钮绑定的槽函数:
# self.queryBtn.clicked.connect(Dialog.accept)
# self.clearBtn.clicked.connect(Dialog.accept)
# 修改为:
self.queryBtn.clicked.connect(Dialog.queryWeather)
self.clearBtn.clicked.connect(Dialog.clearText)
最终的Weather.py内容如下:
# -*- coding: utf-8 -*-
# Form implementation generated from reading ui file 'Weather.ui'
#
# Created by: PyQt5 UI code generator 5.15.4
#
# WARNING: Any manual changes made to this file will be lost when pyuic5 is
# run again.Do not edit this file unless you know what you are doing.
from PyQt5 import QtCore, QtGui, QtWidgets
class Ui_Dialog(object):
 def setupUi(self, Dialog):
 Dialog.setObjectName("Dialog")
 Dialog.resize(600, 600)
 self.groupBox = QtWidgets.QGroupBox(Dialog)
 self.groupBox.setGeometry(QtCore.QRect(30, 20, 551, 511))
 self.groupBox.setObjectName("groupBox")
 self.label_2 = QtWidgets.QLabel(self.groupBox)
 self.label_2.setGeometry(QtCore.QRect(20, 30, 31, 16))
 self.label_2.setObjectName("label_2")
 self.comboBox = QtWidgets.QComboBox(self.groupBox)
 self.comboBox.setGeometry(QtCore.QRect(70, 30, 87, 22))
 self.comboBox.setObjectName("comboBox")
 self.comboBox.addItem("")
 self.comboBox.addItem("")
 self.comboBox.addItem("")
 self.textEdit = QtWidgets.QTextEdit(self.groupBox)
 self.textEdit.setGeometry(QtCore.QRect(20, 70, 491, 411))
 self.textEdit.setObjectName("textEdit")
 self.queryBtn = QtWidgets.QPushButton(Dialog)
 self.queryBtn.setGeometry(QtCore.QRect(490, 560, 93, 28))
 self.queryBtn.setObjectName("queryBtn")
 self.clearBtn = QtWidgets.QPushButton(Dialog)
 self.clearBtn.setGeometry(QtCore.QRect(30, 560, 93, 28))
 self.clearBtn.setObjectName("clearBtn")
 self.retranslateUi(Dialog)
 self.clearBtn.clicked.connect(Dialog.clearText)
 self.queryBtn.clicked.connect(Dialog.queryWeather)
 QtCore.QMetaObject.connectSlotsByName(Dialog)
 def retranslateUi(self, Dialog):
 _translate = QtCore.QCoreApplication.translate
 Dialog.setWindowTitle(_translate("Dialog", "Dialog"))
 self.groupBox.setTitle(_translate("Dialog", "城市天气预报"))
 self.label_2.setText(_translate("Dialog", "城市"))
 self.comboBox.setItemText(0, _translate("Dialog", "北京"))
 self.comboBox.setItemText(1, _translate("Dialog", "苏州"))
 self.comboBox.setItemText(2, _translate("Dialog", "上海"))
 self.queryBtn.setText(_translate("Dialog", "查询"))
self.clearBtn.setText(_translate("Dialog", "清空"))在MainDialog中调用界面类Ui_Dialog,然后在其中中添加查询天气的业务逻辑代码,这样就做到了界面显示和业务逻辑的分离。新增demo.py文件, 在MainDialog类中定义了两个槽函数queryWeather()和clearText(),以便在界面文件Weather.ui中定义的两个按钮(queryBtn 和clearBtn) 触发clicked 信号与这两个槽函数进行绑定。
完整代码如下:
import sys
import Weather
from PyQt5.QtWidgets import QApplication, QDialog
import requests
class MainDialog(QDialog):
def __init__(self, parent=None):
super(QDialog, self).__init__(parent)
self.ui = Weather.Ui_Dialog()
self.ui.setupUi(self)
def queryWeather(self):
cityName = self.ui.comboBox.currentText()
cityCode = self.getCode(cityName)
r = requests.get(
"https://restapi.amap.com/v3/weather/weatherInfo?key=f4fd5b287b6d7d51a3c60fee24e42002&city={}".format(
cityCode))
if r.status_code == 200:
data = r.json()['lives'][0]
weatherMsg = '城市:{}n天气:{}n温度:{}n风向:{}n风力:{}n湿度:{}n发布时间:{}n'.format(
data['city'],
data['weather'],
data['temperature'],
data['winddirection'],
data['windpower'],
data['humidity'],
data['reporttime'],
)
else:
weatherMsg = '天气查询失败,请稍后再试!'
self.ui.textEdit.setText(weatherMsg)
def getCode(self, cityName):
cityDict = {"北京": "110000",
"苏州": "320500",
"上海": "310000"}
**return** cityDict.get(cityName, '101010100')
def clearText(self):
self.ui.textEdit.clear()
if __name__ == '__main__':
myapp = QApplication(sys.argv)
myDlg = MainDialog()
myDlg.show()
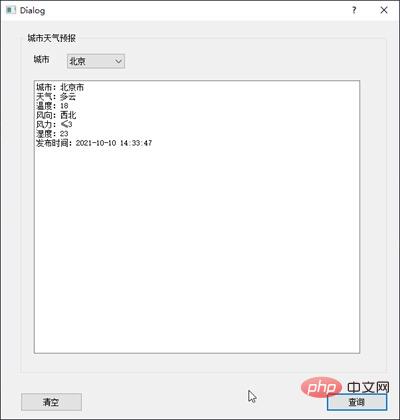
sys.exit(myapp.exec_())运行demo.py并执行查询后的效果:
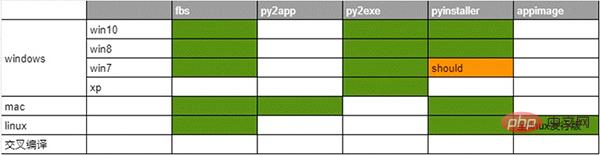
将.py文件打包成可执行的exe在Python中称为freezing,常用的工具有:PyInstaller, py2exe, cx_Freeze, bbfreze, py2app等。功能对比:
这里选择了fbs来打包。fbs的安装方法:
pip install fbs
使用方法,在命令行中输入:
fbs startproject
执行完成后需要输入一些APP的名称等。完成后会生成如下目录:

将刚才编写的PyQt5的代码(demo.py和Weather.py)拖到src/main/python文件夹下,删除原有的main.py,并将demo.py修改为main.py。然后打开 main.py,在文件头部添加如下代码:
from fbs_runtime.application_context.PyQt5 import ApplicationContext
```
完成后执行:
```
fbs freeze
```
即可实现打包。生成的exe可执行文件在targetMyApp文件下。
The above is the detailed content of Super complete! Python graphical interface framework PyQt5 usage guide!. For more information, please follow other related articles on the PHP Chinese website!