Home >Backend Development >Python Tutorial >Detailed explanation of the steps of Python variable assignment
This time I will bring you a detailed explanation of the steps for Pythonvariableassignment, what are the notes for Python variable assignment, the following is a practical case, one Get up and take a look.
>>> x = 12
>>> y= 13
>>> id(x)
>>> id(y)
>>> x = y
>>> id(x)
>>> id(y)
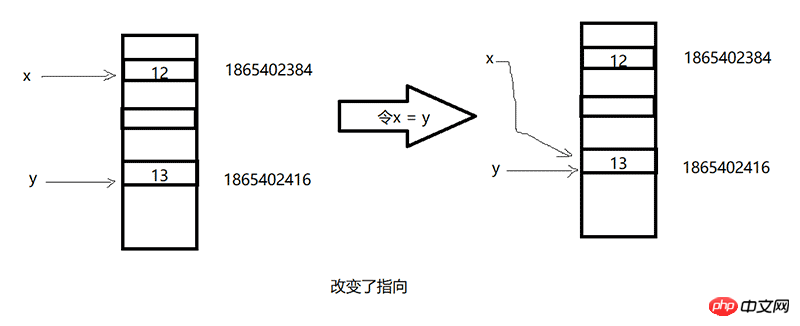
First assign the value of 12 to the x variable and 13 to the y variable. We use id (variable) to view the locations of x and y in the memory respectively. The above display is 1865402384 and 1865402416 respectively. Then after we set x = y, we checked their locations in memory and found that both x and y pointed to 1865402416. It can be seen that in python, the way we assign values is different from C language. C language directly changes the value in the memory of x, while Python directly changes the pointer of x. This reminds me of pointer.

Let’s try it next and continue to enter the following code here
>>> y = 12
>>> id(y)
1865402384
I believe you have mastered the method after reading the case in this article. Please pay attention for more exciting things. Other related articles on php Chinese website!
Recommended reading:
How to use OpenCV with Python interface
Detailed explanation of python configuration and use of OpenCV
The above is the detailed content of Detailed explanation of the steps of Python variable assignment. For more information, please follow other related articles on the PHP Chinese website!