
Home > Article > Backend Development > Detailed explanation of Java programming configuration ideas-JavaEE tutorial

This article mainly shares with you a detailed explanation of Java programming configuration ideas. I hope it will be helpful to friends who learn Java.
Although SpringBoot provides a lot Excellent starters help us develop quickly, but due to the particularity of the actual production environment, we still need to customize the default integration configuration to improve the controllability of the program, although your configuration may not be better than the official starter. Last week, due to work and decoration matters, the blog was not updated normally. I was afraid that stopping the update would make people lazy, so I squeezed in a little time and wrote a relatively simple article. Later, I will talk about my experience from being a novice in decoration to getting started.
Technology: Configuration, ComponentScan, PropertySource, EnableTransactionManagement, Bean, Value
Note: Only the configuration code is posted in the article, the complete test code is on github superior.
Source code:https://github.com/ITDragonBl...
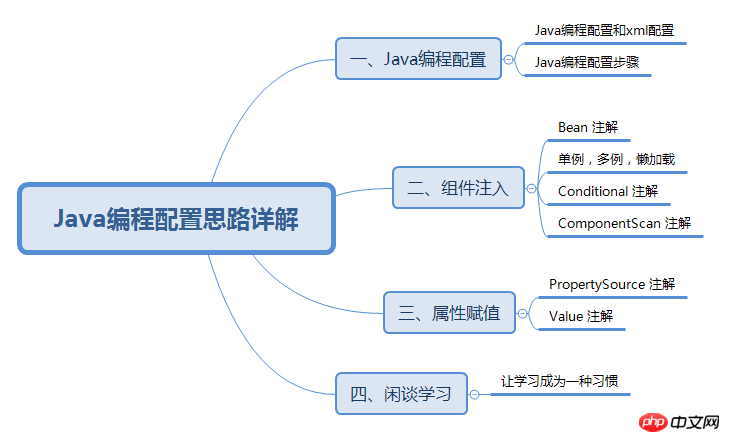
Article directory structure:
Before Spring 4.x, xml configuration was generally used in the basic configuration of the application, and annotations were recommended in business logic. But after Spring 4.x, officials began to recommend using Java programming configuration instead of xml configuration. Why is this? What are the advantages and disadvantages of these two configurations?
Xml configuration advantages: For us older generation programmers (┬_┬), xml is very friendly, simple to use, easy to expand and modify Application configuration parameters do not require recompilation.
Xml configuration disadvantages: Reading and parsing configuration files takes time, and xml configuration files with too much content will appear bloated and inconvenient to manage.
Advantages of Java programming configuration: Compared with xml configuration, its structure is clearer and more readable, and it also saves time on parsing xml.
Disadvantages of Java programming configuration: Modifying application configuration parameters requires recompiling. In fact, it is not a big problem. In the actual production environment, after the application configuration is completed, generally people will not and dare not modify it at will.
Both have their own merits. Considering that both Spring4.x and SpringBoot recommend using Java programming configuration, we should also follow the trend of the times. You don’t have to use it, but you should understand it!
The first step: Create a configuration class, add the annotation Configuration to the class name, inform Spring that this is a configuration class, its function is similar to an xml file
Step 2: Load the external configuration file, add the annotation PropertySource to the class name, and specify the reading path of the properties file
Step 3: Get the application configuration property value, add the annotation Value to the property variable, and pass The ${} expression obtains the parameters in the configuration file
Step 4: Dependency injection, add Bean annotations to the method, you can also use FactoryBean
The syntax of the first and fourth steps, The second part of the article will introduce it in detail. The syntax of the second and third steps will be introduced in detail in the third part of the article.
import javax.sql.DataSource;
import org.springframework.beans.factory.annotation.Value;
import org.springframework.context.annotation.Bean;
import org.springframework.context.annotation.ComponentScan;
import org.springframework.context.annotation.Configuration;
import org.springframework.context.annotation.PropertySource;
import org.springframework.jdbc.core.JdbcTemplate;
import org.springframework.jdbc.datasource.DataSourceTransactionManager;
import org.springframework.transaction.PlatformTransactionManager;
import org.springframework.transaction.annotation.EnableTransactionManagement;
import com.mchange.v2.c3p0.ComboPooledDataSource;

/**
 * Spring 配置类
 * 配置数据源,事务管理,bean,自动扫描包
 * @author itdragon
 */
@Configuration    // 声明该类为配置类
@PropertySource({"classpath:propertySource.properties"})    // 引入外部文件
@ComponentScan("com.itdragon")    // 配置自动扫描包的路径
@EnableTransactionManagement    // 开启基于注解的事务管理功能
public class ApplicationContextConfig {

    @Value("${DATA_USER}")
    private String DATA_USER;

    @Value("${DATA_PAWD}")
    private String DATA_PAWD;

    @Value("${DATA_DRIVER}")
    private String DATA_DRIVER;

    @Value("${DATA_JDBC_URL}")
    private String DATA_JDBC_URL;

    @Bean // 数据源
    public DataSource dataSource() throws Exception{
        ComboPooledDataSource dataSource = new ComboPooledDataSource();
        dataSource.setUser(DATA_USER);
        dataSource.setPassword(DATA_PAWD);
        dataSource.setDriverClass(DATA_DRIVER);
        dataSource.setJdbcUrl(DATA_JDBC_URL);
        return dataSource;
    }

    @Bean // jdbc模板
    public JdbcTemplate jdbcTemplate() throws Exception{
        JdbcTemplate jdbcTemplate = new JdbcTemplate(dataSource());
        return jdbcTemplate;
    }

    @Bean // 事务管理
    public PlatformTransactionManager transactionManager() throws Exception{
        return new DataSourceTransactionManager(dataSource());
    }

}
Transaction class
import java.util.List;
import java.util.Map;
import org.springframework.beans.factory.annotation.Autowired;
import org.springframework.stereotype.Service;
import org.springframework.transaction.annotation.Transactional;
import com.itdragon.dao.ITDragonDao;

@Service
public class ITDragonServer {

    @Autowired(required=false)
    private ITDragonDao itdragonDao;

    public List> findAll() {
        return itdragonDao.findAll();
    }

    @Transactional
    public void updateNameById(String name, Long id) {
        itdragonDao.updateUserNameById(name, id);
        System.out.println(0/0); // 事务异常
    }
}
For complete code, please asynchronous github
Bean annotations are similar to in xml filesa7685ab4ea6ced401fca280af1a612f9 tag, in which the method name modified by the Bean annotation corresponds to the id in the 60e23eb984d18edbb092da6b8f295aba tag. The value of the id can also be set through the value attribute of the Bean annotation. It is widely used in the underlying code of SpringBoot.
If you want the object to be created after the container is started and obtained directly from the container after use, you do not need to do anything, because Spring is a single instance by default, that is, the object is created after the container is started and saved to the container. , and then get it from the container when using it.
If you want the object not to be created after the container is started, but to be created when used, then saved in the container, and then retrieved from the container next time it is used, this can be achieved through lazy loading, that is, using Lazy annotations Grooming.
If you want the container not to create an object after it is started, but to create it every time it is used, use the multi-instance method, that is, use Scope annotation, and the value of the parameter is prototype, that is, @Scope("prototype") .
If you want to select the beans that need to be injected based on conditions after the container is started, you can use the annotation Conditional to judge. SpringBoot's underlying evaluation uses this annotation.
import org.springframework.context.annotation.Bean;
import org.springframework.context.annotation.ComponentScan;
import org.springframework.context.annotation.ComponentScan.Filter;
import org.springframework.context.annotation.Conditional;
import org.springframework.context.annotation.Configuration;
import org.springframework.context.annotation.FilterType;
import org.springframework.context.annotation.Lazy;
import org.springframework.stereotype.Controller;
import com.itdragon.entity.ITDragonEntity;
import com.itdragon.server.ITDragonServer;

/**
 * 知识点二:配置自动扫描包路径
 * 一、注解ComponentScan的value值设置自动扫描包的路径
 * 二、注解ComponentScan的excludeFilters值设置扫描排除的规则
 *     1)、通过注解@Filter设置排除的类型,type=ANNOTATION表示按照注解包含排除。classes是具体的注解,如Controller,Server,Repository
 * 三、注解ComponentScan的includeFilters值设置扫描加入的规则
 *  1)、通过设置useDefaultFilters=false关闭Spring默认扫描全部的功能,使includeFilters生效
 *
 * 知识点三:@Filter常用的拦截类型
 * 一、FilterType.ANNOTATION:按照注解
 * 二、FilterType.ASSIGNABLE_TYPE:按照给定的类型,包括其子类和实现类
 * 三、FilterType.CUSTOM:使用自定义规则
 *
 * 第一个ComponentScan注解表示在指定包下不扫描通过Controller注解修饰的类和ITDragonServer类及其子类和实现类
 * 第二个ComponentScan注解表示在指定包下只扫描通过Controller注解修饰的类
 * 第三个ComponentScan注解表示在指定包下根据自定义拦截规则,不扫描满足规则的类
 */
@Configuration
@ComponentScan(value="com.itdragon",excludeFilters={@Filter(type=FilterType.ANNOTATION,classes={Controller.class}),
        @Filter(type=FilterType.ASSIGNABLE_TYPE,classes={ITDragonServer.class})})
//@ComponentScan(value="com.itdragon",includeFilters={@Filter(type=FilterType.ANNOTATION,classes={Controller.class})},useDefaultFilters=false)
//@ComponentScan(value="com.itdragon",excludeFilters={@Filter(type=FilterType.CUSTOM,classes={ITDragonCustomTypeFilter.class})})
public class ITDragonConfig {

    /**
     * 知识点一:配置bean
     * 一、注解Bean的value值表示bean的id
     * 二、注解Bean的value值未设置,则方法名表示bean的id
     */
    @Bean(value="itdragonBean")
    public ITDragonEntity itdragonEntity() { //方法名很重要,类似xml的id名,也可以通过@bean的value值重定义
        return new ITDragonEntity("itdragon", "configuration-password", 25);
    }

    /**
     * 知识点四:Scope属性
     * @Scope,调整作用域,默认单实例
     * singleton:单实例:ioc容器启动后创建对象放到ioc容器中,需要是从容器中获取。
     * prototype:多实例:ioc容器启动后每次获取对象时都要创建对象。
     * request:同一次请求创建一个实例
     * session:同一个session创建一个实例
     *
     * 知识点五:懒加载
     * 针对单实例而言,在容器启动后不创建对象,在第一次使用Bean时创建对象。可以理解为单实例的一种补充。
     *
     */
//    @Scope("prototype")
    @Lazy
    @Bean
    public ITDragonEntity scopeTopicBean() {
        System.out.println("^^^^^^^^^^^^^^^^^^^^^Create Bean");
        return new ITDragonEntity("scopeBean", "singleton-prototype-request-session", 25);
    }

    /**
     * 知识点六:Conditional条件判断
     * 满足条件才会注册bean,可以修饰在类上,管理整个类下的组件注入。
     */
    @Bean
    @Conditional({ITDragonCustomCondition.class})
    public ITDragonEntity conditionalBean() {
        return new ITDragonEntity("conditionalBean", "Conditional-Condition-CustomCondition", 25);
    }

    /**
     * 知识点七:FactoryBean工厂Bean
     * FactoryBean默认通过调用getObject创建的对象,通过调用isSingleton设置单实例和多实例。
     */
    @Bean
    public ITDragonFactoryBean itdragonFactoryBean() {
        return new ITDragonFactoryBean();
    }
}
Customized conditional judgment component injection class
import org.springframework.beans.factory.support.BeanDefinitionRegistry;
import org.springframework.context.annotation.Condition;
import org.springframework.context.annotation.ConditionContext;
import org.springframework.core.type.AnnotatedTypeMetadata;

/**
 * 自定义的条件判断组件注入
 * @author itdragon
 *
 */
public class ITDragonCustomCondition implements Condition{

    /**
     * 判断注册的bean中是否含有指定的bean
     */
    public boolean matches(ConditionContext context, AnnotatedTypeMetadata metadata) {
        // 获取bean的注册类
        BeanDefinitionRegistry registry = context.getRegistry();
        return registry.containsBeanDefinition("scopeTopicBean"); // 有则加载conditionalBean
    }

}
Customized Bean factory class
import org.springframework.beans.factory.FactoryBean;
import com.itdragon.entity.ITDragonEntity;
/**
 * 自定义Bean的工厂类
 * @author itdragon
 *
 */
public class ITDragonFactoryBean implements FactoryBean{

    public ITDragonEntity getObject() throws Exception {
        System.out.println("^^^^^^^^^^^^^^^^^^^^^FactoryBean Create Bean");
        return new ITDragonEntity(); // 创建对象并返回到容器中
    }

    public Class getObjectType() {
        return ITDragonEntity.class;
    }

    public boolean isSingleton() {
        return false; // 设置多实例,true则为单例
    }

}
Attribute assignment steps:
Step one: Introduce external files by annotating PropertySource. Multiple ones can be introduced. If you are worried that the file does not exist, you can ignore it by setting the ignoreResourceNotFound parameter
Step 2: Get the value from the external file through the annotation Value, generally using the ${} format, and also supports #{} SpEL Expressions can also be passed directly as strings. If you want to receive some complex values, such as collections, you can consider using the annotation ConfigurationProperties. The advantages and disadvantages of both will be introduced in detail later.
import org.springframework.beans.factory.annotation.Value;
import org.springframework.context.annotation.Bean;
import org.springframework.context.annotation.Configuration;
import org.springframework.context.annotation.PropertySource;
import com.itdragon.entity.ITDragonEntity;

/**
 * 知识点一: 引入外部文件,并从文件中获取值
 * @PropertySource 引入外部文件,支持多个,如果文件不存在会报错,可以通过设置参数ignoreResourceNotFound=true忽略
 * @Value 从外部文件中获取值,支持spel表达式,#{},${},string
 * @author itdragon
 */
@Configuration
@PropertySource(value={"classpath:propertySource.properties","classpth:xxx.properties"},ignoreResourceNotFound=true)
public class ITDragonConfigValue {

    @Value("${ACCOUNT}")        // 从配置文件获取数据
    private String ACCOUNT;

    @Value("${PASSWORD}")
    private String PASSWORD;

    @Value("${AGE}")
    private Integer AGE;

    @Value("ITDragon")            // 普通赋值
    private String str;

    @Value("#{(1+2-3)/4*5}")    // 算术运算
    private String operator;

    @Value("#{1>2 || 2 <= 3}")    // 关系运算
    private Boolean comparison;

    @Value("#{systemProperties['java.version']}") // 系统配置:os.name
    private String systemProperties;

    @Value("#{T(java.lang.Math).abs(-18)}")    // 表达式
    private String mapExpression;

    @Bean("valueBean")
    public ITDragonEntity itdragonEntity() {
        System.out.println("^^^^^^^^^^^^^^^^^^^^ str : " + str);
        System.out.println("^^^^^^^^^^^^^^^^^^^^ operator : " + operator);
        System.out.println("^^^^^^^^^^^^^^^^^^^^ comparison : " + comparison);
        System.out.println("^^^^^^^^^^^^^^^^^^^^ systemProperties : " + systemProperties);
        System.out.println("^^^^^^^^^^^^^^^^^^^^ mapExpression : " + mapExpression);
        return new ITDragonEntity(ACCOUNT, PASSWORD, AGE);
    }

}这里并不是介绍如何学习一门技术,而是论养成一个学习习惯的重要性。大一时期,因为担心找不到工作而报了一个线上培训机构。经常被洗脑,其中一句话而我印象深刻 ---- "让优秀成为一种习惯"。听得我热血沸腾。花了五六千大洋报名,后来才发现网上有免费的。。。。个人不建议参加培训。
这钱花的还算值得,"让优秀成为一种习惯",这句话对我的影响很大,从大学到工作,每当遇到陌生的知识,并没有选择逃避它。而是抽时间从网上找资料,去学习,整理,实践直到弄懂它。可我万万没有想到,这种学习的精神竟然用到了装修上。。。。可能学习已经是我的一个习惯了吧!
开始,我是一个装修小白,不知道什么是全包、半包、清包;不知道什么是硬装、软装;也不知道装修的流程;不知道水电线、橱柜、洁具的品牌选择,不知道挂机、柜机、风管机、中央空调的优缺点;不知道封阳台的利弊;更不知道一个装修效果图要七八千。面对这些未知的领域,我寸步难行。我清楚的知道:如果你不懂,你就是砧板上的鱼肉,任人宰割。
现在,我通过在百度,知乎,兔巴兔等平台上找答案,并把内容用Markdown的格式整理!我都被自己吓到了。不仅如此,我还在抢设计师的饭碗,自己动手设计效果图。在制作效果图的过程中,发现了很多不合理的设想。庆幸问自己设计了一套效果图,不然又有很多无用功,耗时,耗力,耗钱。爸妈和女票就是客户,而我就一直处于改!改!改!的阶段。体验了一把前端工程师的辛酸。
我是谁?我在哪?我在做什么?
我是一名程序员,我在学习的道路上,我在做能提高自己的事情!
相关推荐:
The above is the detailed content of Detailed explanation of Java programming configuration ideas-JavaEE tutorial. For more information, please follow other related articles on the PHP Chinese website!