

Home >Backend Development >PHP Tutorial >Yii2 implements rbac permission control

This article mainly introduces the relevant information of Yii2 rbac permission control operation step tutorial. Friends in need can refer to it. I hope it will be helpful to everyone.
The topic of this article is the detailed operation steps of rbac permission control. Please pay attention to the operation steps. Regarding the configuration and establishment of rbac, our tutorial on building a perfect backend and implementing rbac permission control in yii2 cannot be more clear. .
However, according to the feedback from many people, they said that they followed the owner's steps exactly, and they were exactly the same. Why doesn't the menu appear? Why doesn't it appear? Why doesn't it appear? Emma, I finally found the reason when I was helping people debug in the group. It was not easy. The reason is that you have learned how to build but not how to operate. Ah, ah, let’s talk in detail today about how to operate the permission control of rbac! Of course, the premise is that you have successfully built a perfect backend and implemented rbac permission control as we mentioned above.
Take creating the user table and adding permissions to it as an example.
1. Create the user table, and then the creation is completed. It is very simple and we will not go into details.
2. Use gii to generate model+curd. If you If you don’t know how to operate, you can click on the detailed operation steps of yii2-gii to operate
3. We open the routing page/admin/route/index and the interface shown below will probably appear
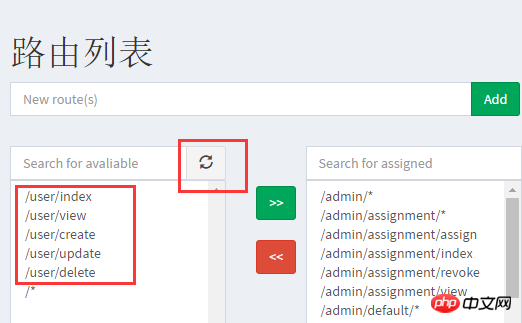
If the /user/* series of routes in the picture above do not appear on your left menu, please click the refresh button next to it to refresh.
Now we move the /user/* series selection on the left to the right
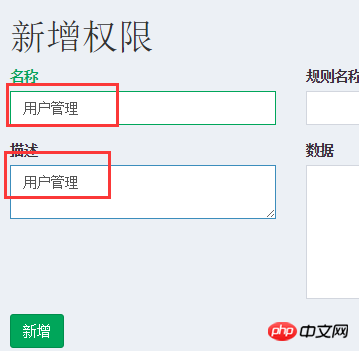
4. We open the permission interface /admin/permission/index
Click the Add Permission button and add a name and description as shown below
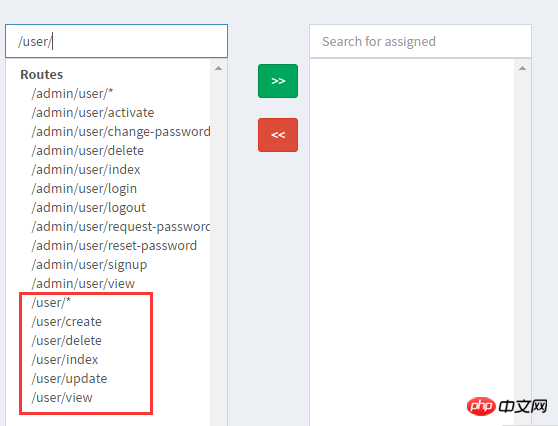
Click Add and you will jump to The details page of this permission, as shown in the picture below, select the /user/* series and move it to the right
5. We access the role To add a role on the list page/admin/role/index, just fill in the name and description. After the addition is successful, it will jump to the role details page. Then we only need to move the permission "User Management" as shown below
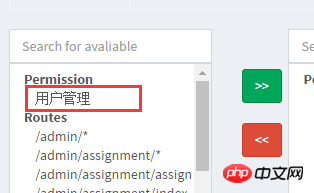
# means that we assign the "User Management" permission to the role we just created. In the fourth step, we have assigned "User Management" /user/* series of permissions.
6. We visit the assignment page /admin/assignment/index to assign the role just added to the current user. Note that it is a role, not a permission. Do not add it repeatedly.
7. If we want the newly added operation "User Management" to be displayed on the menu, we also need to open the menu list page
/admin/menu/ index Click to add a new menu.
Related reading: Yii2 rbac permission control menu menu example tutorial
At this point, we have basically completed the operation of assigning /user permissions to the current user Now, we can visit /user/index and have a look. If it is normal, it will be fine. If it is not still prompted that there is no permission, then it is probably your fault. Please start over and do it a few more times.
Related recommendations:
#The code automatic loading mechanism in Yii2
yii2.0 case sharing of integrating Alibaba Cloud oss (picture)
Sharing of a simple method to implement reversible encryption in Yii2 framework
The above is the detailed content of Yii2 implements rbac permission control. For more information, please follow other related articles on the PHP Chinese website!