
Home > Article > Backend Development > Analysis of how to send emails using PHPMailer in PHP

Introduction to PHPMailer Step 1: Enable QQ mailbox to send mail Step 2: Enable PHP to use QQ mailbox to send mail Step 3: Write the code to send mail ThinkPHP uses PHPMailer to send mail. This article will use QQ mailbox as an example to explain it to you. The usage methods and techniques of PHPMaIiler, I hope it can help everyone.
Introduction to PHPMailer
Can run on any platform; supports SMTP authentication; specifies multiple recipients, CC address, BCC address and reply address when sending an email; Note: Adding CC and BCC is only supported by SMTP mode under the win platform; supports multiple email encodings including: 8bit, base64, binary and quoted-printable; customizes email header information, which is similar to sending header information through the header function in PHP. It supports If the email body is made into HTMl content, you can insert pictures into the email body; tested and compatible SMTP servers include: Sendmail, qmail, Postfix, Imail, Exchange, etc.
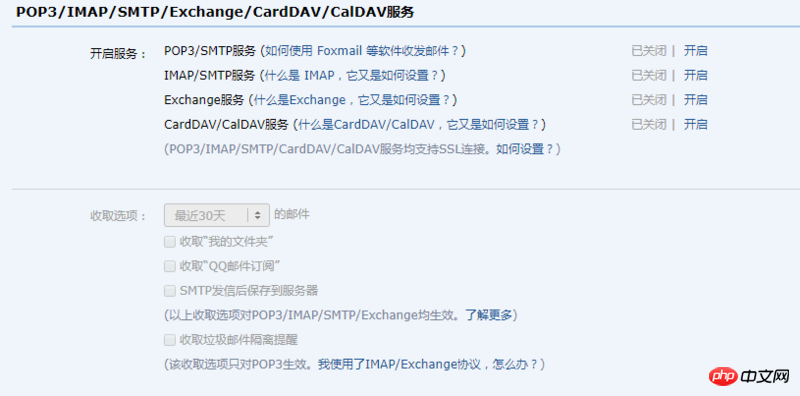
Step 1: Enable QQ mailbox to send emails
Our mailbox can originally send emails, but in order to send emails on our website, we need to set up our QQ mailbox , because our website now exists as a third-party client, so we need to use an SMTP server to send it. It is recommended to turn on the first two items here!
Enter QQ mailbox->Click settings->Click account

ffd43448117c1013fbeeed3f564491ad
9fd01892b579bba0c343404bcccd70fb
93f0f5c25f18dab9d176bd4f6de5d30e
 a80eb7cbb6fff8b0ff70bae37074b813
 b2386ffb911b14667cb8f0f91ea547a7Document6e916e0f7d1e588d4f442bf645aedb2f
9c3bca370b5104690d9ef395f2c5f8d1
6c04bd5ca3fcae76e30b72ad730ca86d
a5d651dec07a66ecf8bb333dc6ff2ace
 邮箱:4d4e320de773fbdddd07024ef40f5a5c
 标题:147bd8576257fafb67c20cd7fa362c37
 内容6e495b08f9eb812467887c361fca2bf4
 b467c22898c85f80a86ef00a1dfc7999
f5a47148e367a6035fd7a2faa965022e
36cc49f0c466276486e50c850b7e4956
73a6ac4ed44ffec12cee46588e518a5e
/**
 *发送邮件方法
 *@param $to:接收者 $title:标题 $content:邮件内容
 *@return bool true:发送成功 false:发送失败
 */
function sendMail($to,$title,$content){
 require_once("phpmailer/class.phpmailer.php");
 require_once("phpmailer/class.smtp.php");
 //实例化PHPMailer核心类
 $mail = new PHPMailer();
 //使用smtp鉴权方式发送邮件
 $mail->isSMTP();
 //smtp需要鉴权 这个必须是true
 $mail->SMTPAuth=true;
 //链接qq域名邮箱的服务器地址
 $mail->Host = 'smtp.qq.com';
 //设置使用ssl加密方式登录鉴权
 $mail->SMTPSecure = 'ssl';
 //设置ssl连接smtp服务器的远程服务器端口号,以前的默认是25,但是现在新的好像已经不可用了 可选465或587
 $mail->Port = 465;
 //设置发件人的主机域 可有可无 默认为localhost 内容任意,建议使用你的域名
 $mail->Hostname = 'http://www.lsgogroup.com';
 //设置发送的邮件的编码 可选GB2312 我喜欢utf-8 据说utf8在某些客户端收信下会乱码
 $mail->CharSet = 'UTF-8';
 //设置发件人姓名(昵称) 任意内容,显示在收件人邮件的发件人邮箱地址前的发件人姓名
 $mail->FromName = '发件人姓名(昵称)';
 //smtp登录的账号 这里填入字符串格式的qq号即可
 $mail->Username ='12345678@qq.com';
 //smtp登录的密码 使用生成的授权码(就刚才保存的最新的授权码)
 $mail->Password = '最新的授权码';
 //设置发件人邮箱地址 这里填入上述提到的“发件人邮箱”
 $mail->From = '12345678@qq.com';
 //邮件正文是否为html编码 注意此处是一个方法 不再是属性 true或false
 $mail->isHTML(true);
 //设置收件人邮箱地址 该方法有两个参数 第一个参数为收件人邮箱地址 第二参数为给该地址设置的昵称 不同的邮箱系统会自动进行处理变动 这里第二个参数的意义不大
 $mail->addAddress($to,'尊敬的客户');
 //添加多个收件人 则多次调用方法即可
 // $mail->addAddress('xxx@163.com','尊敬的客户');
 //添加该邮件的主题
 $mail->Subject = $title;
 //添加邮件正文 上方将isHTML设置成了true,则可以是完整的html字符串
 $mail->Body = $content;
 $status = $mail->send();
 //判断与提示信息
 if($status) {
  return true;
 }else{
  return false;
 }
}
401db16898d7e031fdcd644398de6076
//链接qq域名邮箱的服务器地址
$mail->Host = 'smtp.exmail.qq.com';
//smtp登录的密码 (QQ企业邮箱的登录密码)
$mail->Password = '登录密码';
/**
 * 邮件发送函数
 * @param $to:接收者 $title:标题 $content:邮件内容
 * @return bool true:发送成功 false:发送失败
 */
function sendMail($to, $title, $content) {
 Vendor('PHPMailer.PHPMailerAutoload');
 Vendor('PHPMailer.class.smtp');
 $mail = new PHPMailer(); //实例化
 $mail->IsSMTP(); // 启用SMTP
 $mail->Host=C('MAIL_HOST'); //smtp服务器的名称
 $mail->SMTPSecure = C('MAIL_SECURE');
 $mail->Port = C('MAIL_PORT');
 $mail->SMTPAuth = C('MAIL_SMTPAUTH'); //启用smtp认证
 $mail->Username = C('MAIL_USERNAME'); //你的邮箱名
 $mail->Password = C('MAIL_PASSWORD') ; //邮箱密码
 $mail->From = C('MAIL_FROM'); //发件人地址(也就是你的邮箱地址)
 $mail->FromName = C('MAIL_FROMNAME'); //发件人姓名
 $mail->AddAddress($to,"尊敬的客户");
 $mail->WordWrap = 50; //设置每行字符长度
 $mail->IsHTML(C('MAIL_ISHTML')); // 是否HTML格式邮件
 $mail->CharSet=C('MAIL_CHARSET'); //设置邮件编码
 $mail->Subject =$title; //邮件主题
 $mail->Body = $content; //邮件内容
 $mail->AltBody = "您好"; //邮件正文不支持HTML的备用显示
 return($mail->Send());
}
// 配置邮件发送服务器
 'MAIL_HOST' =>'smtp.qq.com',//smtp服务器的名称
 'MAIL_SMTPAUTH' =>true, //启用smtp认证
 'MAIL_USERNAME' =>'12345678@qq.com',//你的邮箱名
 'MAIL_FROM' =>'12345678@qq.com',//发件人地址
 'MAIL_FROMNAME'=>'12345678@qq.com',//发件人姓名
 'MAIL_PASSWORD' =>'xxxxxx,//邮箱密码
 'MAIL_CHARSET' =>'utf-8',//设置邮件编码
 'MAIL_ISHTML' =>TRUE, // 是否HTML格式邮件
 'MAIL_PORT' =>'465',//设置ssl连接smtp服务器的远程服务器端口号
 'MAIL_SECURE' =>'ssl',//设置使用ssl加密方式登录鉴权
ffd43448117c1013fbeeed3f564491ad
9fd01892b579bba0c343404bcccd70fb
93f0f5c25f18dab9d176bd4f6de5d30e
 a80eb7cbb6fff8b0ff70bae37074b813
 b2386ffb911b14667cb8f0f91ea547a7Document6e916e0f7d1e588d4f442bf645aedb2f
9c3bca370b5104690d9ef395f2c5f8d1
6c04bd5ca3fcae76e30b72ad730ca86d
6a05cc4047b14edf8236a3257621a8f8
 邮箱:4d4e320de773fbdddd07024ef40f5a5c
 标题:147bd8576257fafb67c20cd7fa362c37
 内容6e495b08f9eb812467887c361fca2bf4
 b467c22898c85f80a86ef00a1dfc7999
f5a47148e367a6035fd7a2faa965022e
36cc49f0c466276486e50c850b7e4956
73a6ac4ed44ffec12cee46588e518a5e
public function add(){
  if(sendMail($_POST['mail'],$_POST['title'],$_POST['content']))
   echo "发送成功";
  else
   echo "发送失败";
 }
Related recommendations: PHPMailer send email sample code
##Introduction to how laravel5.4 uses 163 mailbox to send emailThe above is the detailed content of Analysis of how to send emails using PHPMailer in PHP. For more information, please follow other related articles on the PHP Chinese website!