
Home > Article > Backend Development > Sample code for replacing Nginx server with Tengine in LNMP environment

The LNMP environment I have used before has always been the native Nginx server. In recent days, I have seen many large websites using Tengine developed by the Taobao team based on Nginx and decided to install it in my own virtual machine for fun.
I won’t say much about the introduction of Tengine. Anyway, it is said that the performance is much improved compared to the native Nginx (reference: http://tengine.taobao.org/)
The following is about Installation process:
Before this, I would like to recommend the simple and easy-to-use upload and download commands rz and sz of the Linux system
We can install it through yum install lrzsz
Upload and download Command test
1) Upload (rz)
Run the rz command on the client SSH command line. The command is as follows:
[root@oldboy ~]# rz
After execution, a file selection window for uploading will pop up, and you can select relevant files to upload (direct uploading of directories is not supported).
Tip: You can use rz -y to implement overlay upload. The default directory of the upload window can be set in the SSH client.
2) Download (sz)
To achieve downloading, you can directly use szfilename, where filename is the name of the file you want to download. If it is a directory, it needs to be packaged into a single file before downloading.
[root@oldboy ~]# sz oldboy.txt #<==oldboy.txt must exist, it can be a relative path or an absolute path.
The following is the installation of Tengine
To install Tengine we need to prepare two installation packages
google-perftools-1.8.2.tar.gz
tengine-2.1.2.tar.gz
After the download is completed, back up the original Nginx service first
# cd /usr/local/
# mv nginx nginxbak
Backup is complete, start installing Tengine
1.
1. Unzip the google-perftools-1.8.2.tar.gz installation package
# tar xf google-perftools-1.8.2.tar.gz
2. Install the source code
# cd google-perftools-1.8.2
#./configure --enable-frame-pointers
# make && make install
3. Complete the google-perftools-1.8.2 installation
2. Tengine installation
1. Also unzip the tengine-2.1.2.tar.gz installation package first
# tar xf tengine-2.1.2.tar.gz
2. Install the source code
  # ./configure
   --prefix=/usr/local/nginx
  --with-http_stub_status_module
  --with-http_ssl_module
  --with-http_spdy_module
  --with-http_gzip_static_module
  --with-ipv6 --with-http_sub_module
  --with-google_perftools_module
  --with-http_image_filter_module
  --with-http_realip_module
  --with-http_concat_module
        # make && make install
3. Complete the installation
3. Check the nginx version
# nginx -V
If you encounter this error: nginx: error while loading shared libraries: libprofiler.so.0: cannot open shared object file: No such file or directory
That means the system does not know which directory xxx.so is placed in.
At this time, you need to add the directory where xxx.so is located in /etc/ld.so.conf.
Generally speaking, there are many so in the directory /usr/local/lib, so adding the line /usr/local/lib to /etc/ld.so.conf can solve this problem .
After saving /etc/ld.so.conf, you also need to execute /sbin/ldconfig –v to update it
Then try again #nginx -V
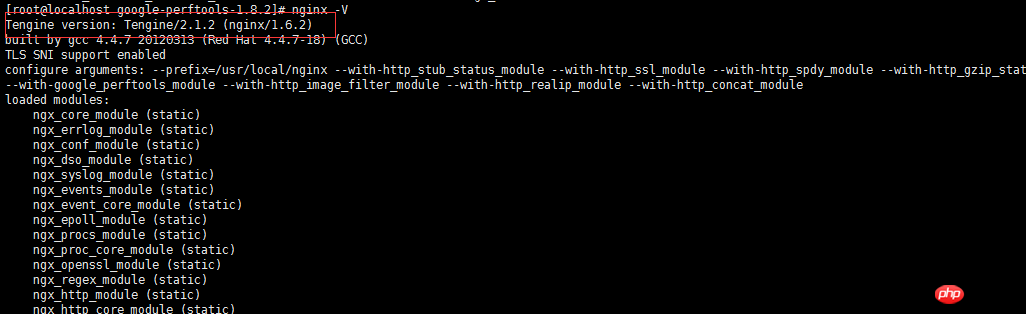
This means the installation has been successful
4. Restart Nginx
# service nginx restart
If you encounter the following situation:

You can use: # pkill -9 nginx to kill the process
Then use: # service nginx restart
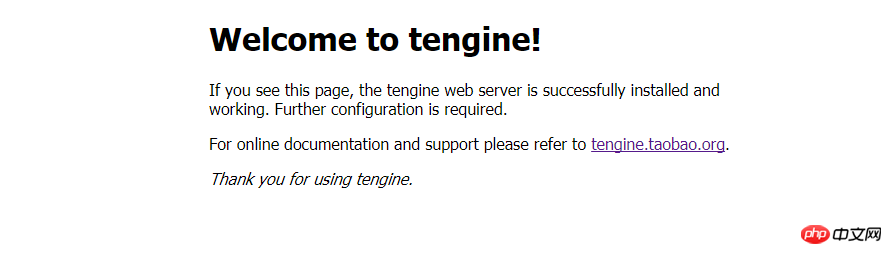
After the restart is completed, visit:
   http {
           #关闭 版本号信息设置
           server_tag off;
           server_info off;
           server_tokens off;
      }
Set to prohibit access through IP, only through domain name server {
#设置禁止通过 ip 访问,只能通过域名
listen 80 default;
server_name _;
return 500;
} At this point, the Tengine installation and configuration is almost completed. (If there are any errors or deficiencies in the above content, I hope you will forgive me. Welcome to exchange and learn from each other; thank you!) The above is the detailed content of Sample code for replacing Nginx server with Tengine in LNMP environment. For more information, please follow other related articles on the PHP Chinese website!