

I have my own note-taking blog, where I often do some analysis of technical articles. When querying some articles, in the past, I could only use like fuzzy matching in mysql to query the content. When there are too many articles, this method is definitely not efficient. So I set my sights on the Chinese search plug-in coreseek and successfully used it in my project.
Rendering: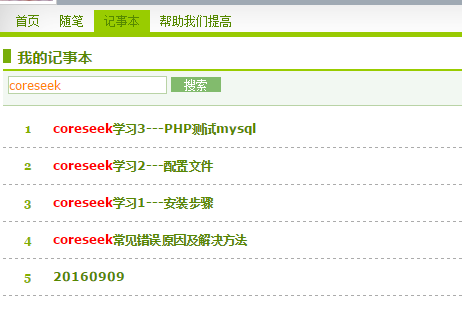
I hope that through this analysis, interested students will avoid some detours.
Sphinx is an open source search engine that supports full-text search in English. However, the natural word segmentation symbol in English is a space, while Chinese has more complex word segmentation requirements. The Chinese provide a Chinese full-text search engine based on Sphinx that can be used by enterprises. In other words, the actual core of Coreseek is still Sphinx. But the biggest difference is that coreseek has a Chinese word segmentation tool mmseg.
System: Ubuntu
http service: Apache/2.2.22
Mysql:Ver 14.14 Distrib 5.5.41
PHP: PHP 5.3.10
Installation steps
Download coreseek-3.2.14.tar.gz and place it in /usr/local/src
First of all, in order to avoid missing dependency packages during installation, you need to make up for it
apt-get install make gcc g++ automake libtool mysql-client libmysqlclient15-dev libxml2-dev libexpat1-dev
Just execute the above command, otherwise various strange problems may occur because the software package is not new enough. For example, I updated the 159M software package. (I went back and replenished my blood after encountering various pitfalls)
1, install mmseg word segmentation module
cd /usr/local/src

tar zxvf coreseek-3.2.14.tar.gz #解压

cd coreseek-3.2.14

cd mmseg-3.2.14

./bootstrap #输出的warning信息可以忽略,如果出现error则需要解决

./configure --prefix=/usr/local/mmseg3 #配置

make #编译

make install #安装
1.1) Possible problems and solutions:
The error ./bootstrap: 27: ./bootstrap: autoconf: not found occurs when executing ./bootstrap,
Reason: Because the automake tool is not installed, (ubuntu 10.04) just install it with the following command.
sudo apt-get install autoconf automake libtool
1.2) Possible problems: When installing the word segmentation module mmseg, and at the end of the compilation and installation, an error of annot find input file: src/Makefile.in appears
Then I checked and found the solution, as follows:
aclocal // is a perl script program, its definition is: "aclocal - create aclocal.m4 by scanning configure.ac"
libtoolize --force //运行后有一个错误,不用管它。

automake --add-missing

autoconf

autoheader

make clean
Then recompile
./configure --prefix=/usr/local/mmseg3
make && make install
Compilation and installation successful
Summary: In fact, I didn’t find out the reason for this error. Anyway, I succeeded according to the solution. If anyone knows, please leave a message, thank you.
2. Install CoreSeek
cd /usr/local/src

cd coreseek-3.2.14

cd csft-3.2.14

sh buildconf.sh    #输出的warning信息可以忽略,如果出现error则需要解决

./configure --prefix=/usr/local/coreseek  --without-unixodbc --with-mmseg --with-mmseg-includes=/usr/local/mmseg3/include/mmseg/ --with-mmseg-libs=/usr/local/mmseg3/lib/ --with-mysql  #配置

make  #编译
make install  #安装
3, test mmseg word segmentation, coreseek search, MySQL data source
cd /usr/local/src
cd coreseek-3.2.14
cd testpack
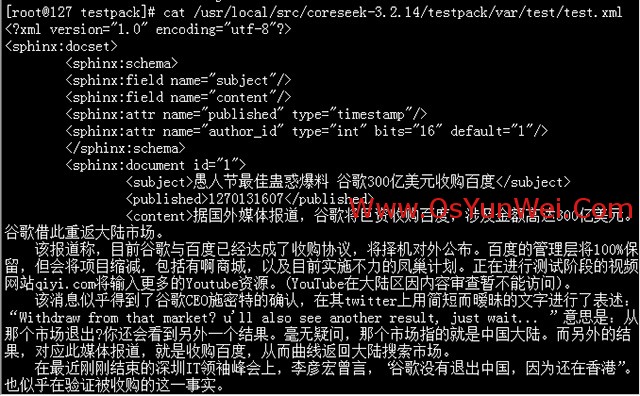
cat /usr/local/src/coreseek-3.2.14/testpack/var/test/test.xml #Chinese should be displayed correctly at this time, as shown in the figure below
/usr/local/mmseg3/bin/mmseg -d /usr/local/mmseg3/etc /usr/local/src/coreseek-3.2.14/testpack/var/test/test.xml
/usr/local/coreseek/bin/indexer -c /usr/local/src/coreseek-3.2.14/testpack/etc/csft.conf --all
/usr/local/coreseek/bin/search -c /usr/local/src/coreseek-3.2.14/testpack/etc/csft.conf Network search

/usr/local/coreseek/bin/indexer -c /usr/local/coreseek/etc/sphinx-min.conf.dist
/usr/local/coreseek/bin/indexer -c /usr/local/src/coreseek-3.2.14/testpack/etc/csft.conf --all --rotate #Start the service and update the index
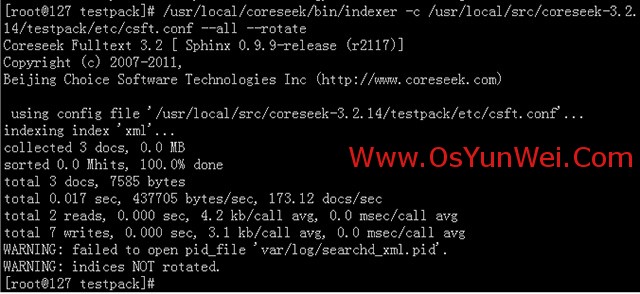
As shown in the picture, and no error is reported. It means that your coreseek is already running normally.
3.1) Possible problems and solutions:
When typing /usr/local/coreseek/bin/indexer -c etc/csft.conf --all, xmlpipe2 support NOT compiled in. To use xmlpipe2, install missing error is reported
Reason:
The xmlpipe2 library is missing, solution:
apt-get install expat-*
Then recompile coreseek, remember to make clean
4, coreseek configuration and usage
cp  /usr/local/src/coreseek-3.2.14/testpack/etc/csft_mysql.conf  /usr/local/coreseek/etc/csft_mysql.conf  #拷贝MySQL数据源配置文件

ln -s  /usr/local/coreseek/etc/csft_mysql.conf  /etc/csft_mysql.conf  #添加软连接

vim  /etc/csft_mysql.conf  #编辑,修改
以我自己的配置文件为例:
/usr/local/coreseek/etc/csft_mysql.conf
#索引源定义
source mysql
{
    type                    = mysql
    sql_host                = localhost
    sql_user                =xxxx
    sql_pass                =xxxx
    sql_db                    =xxxx
    sql_port                = 3306
    sql_query_pre            = SET NAMES utf8
    sql_query                = SELECT id,id,uid,title,data FROM notebook_notepad
                                                              #sql_query第一列id需为整数
                                                              #title、data作为字符串/文本字段,被全文索引
    sql_attr_uint            = id           #从SQL读取到的值必须为整数
    #sql_attr_timestamp        = time  #从SQL读取到的值必须为整数,作为时间属性
    sql_attr_uint   = uid

    sql_query_info_pre      = SET NAMES utf8                                        #命令行查询时,设置正确的字符集
    sql_query_info            = SELECT * FROM notebook_notepad WHERE id=$id #命令行查询时,从数据库读取原始数据信息
}

#index定义
index mysql
{
    source            = mysql             #对应的source名称
    path            =/usr/local/coreseek/var/data/mysql #请修改为实际使用的绝对路径,例如:/usr/local/coreseek/var/...
    docinfo            = extern
    mlock            = 0
    morphology        = none
    min_word_len        = 1
    html_strip                = 0

    #中文分词配置,详情请查看:http://www.coreseek.cn/products-install/coreseek_mmseg/
    charset_dictpath = /usr/local/mmseg3/etc/ #BSD、Linux环境下设置,/符号结尾
    #charset_dictpath = etc/                             #Windows环境下设置,/符号结尾,最好给出绝对路径,例如:C:/usr/local/coreseek/etc/...
    charset_type        = zh_cn.utf-8
}

#全局index定义
indexer
{
    mem_limit            = 128M
}

#searchd服务定义
searchd
{
    listen                  =   9312
    read_timeout        = 5
    max_children        = 30
    max_matches            = 1000
    seamless_rotate        = 0
    preopen_indexes        = 0
    unlink_old            = 1
    pid_file =/usr/local/coreseek/var/log/searchd_mysql.pid  #请修改为实际使用的绝对路径,例如:/usr/local/coreseek/var/...
    log =/usr/local/coreseek/var/log/searchd_mysql.log        #请修改为实际使用的绝对路径,例如:/usr/local/coreseek/var/...
    query_log =/usr/local/coreseek/var/log/query_mysql.log #请修改为实际使用的绝对路径,例如:/usr/local/coreseek/var/...
}
这样搜索的话就会从索引文件中查出id,uid,title,data字段。
OK,配置完成以后,重启Coreseek 服务就能从生产你想要的查询索引,以后你就可以摆脱mysql的桎梏,什么中文,英文都可以,还自带分词。怎么样,是不是打开了新世界的大门。
下面讲一下重建索引可能出错的地方,以及解决办法。有兴趣的同学看一下,否则可以跳到下一节:PHP测试Coreseek 。
重建索引时报错误:WARNING: failed to open pid_file '/usr/local/coreseek/var/log/searchd_mysql.pid'.
解决方法:
试着停止一下coreseek服务
/usr/local/coreseek/bin/searchd -c /usr/local/coreseek/etc/csft_mysql.conf --stop 停止服务
然后重启
/usr/local/coreseek/bin/searchd -c /usr/local/coreseek/etc/csft_mysql.conf 启动服务
再次建立索引
/usr/local/coreseek/bin/indexer -c /usr/local/coreseek/etc/csft_mysql.conf --all 建立索引
如果提示:FATAL: failed to lock /usr/local/coreseek/var/data/xxxx.spl: Resource temporarily unavailable, will not index. Try --rotate option.
则尝试重建索引
/usr/local/coreseek/bin/indexer -c /usr/local/coreseek/etc/csft_mysql.conf --all --rotate 重建索引
1,将sphinxapi.php放到测试目录下
cp /usr/local/src/coreseek-3.2.14/testpack/api/sphinxapi.php ./
vim test.php
    header("Content-type: text/html; charset=utf-8");
    //require("./    ");
    $s = new SphinxClient;
    $s->setServer("127.0.0.1", 9312);
    //SPH_MATCH_ALL, 匹配所有查询词(默认模式); SPH_MATCH_ANY, 匹配查询词中的任意一个; SPH_MATCH_EXTENDED2, 支持特殊运算符查询
    $s->setMatchMode(SPH_MATCH_ALL);
    $s->setMaxQueryTime(30);                                        //设置最大搜索时间
    $s->SetArrayResult(false);                                        //是否将Matches的key用ID代替
    $s->SetSelect ( "*" );                                            //设置返回信息的内容,等同于SQL
    $s->SetRankingMode(SPH_RANK_BM25);
    $s->SetLimits ( 0, 30, 1000, 0 );                                //设置结果集偏移量  SetLimits
    $res = $s->query('coreseek','mysql','--single-0-query--');         #[coreseek]关键字,[mysql]数据源source

    $err = $s->GetLastError();
    echo '';
    var_dump($res);
    var_dump($res['matches']);
    var_export($err);
    echo '';
php5 test.php
运行结果:matches为匹配后的结果集

1,Sphinx扩展安装安装
Coreseek官方教程中建议php使用直接include一个php文件进行操作,事实上php有独立的sphinx模块可以直接操作coreseek(coreseek就是sphinx!)已经进入了php的官方函数库,而且效率更高!但php模块依赖于libsphinxclient包。我是按照以下这篇文章的步骤安装了Sphinx扩展。
感谢:http://blog.csdn.net/e421083458/article/details/21529969
[第一步] 安装依赖libsphinxclient
# cd /var/install/coreseek-4.1-beta/csft-4.1/api/libsphinxclient/
# ./configure  --prefix=/usr/local/sphinxclient

configure: creating ./config.status
config.status: creating Makefile
config.status: error: cannot find input file: Makefile.in   #报错configure失败

//处理configure报错
编译过程中报了一个config.status: error: cannot find input file: src/Makefile.in这个的错误,然后运行下列指令再次编译就能通过了:
# aclocal
# libtoolize --force
# automake --add-missing
# autoconf
# autoheader
# make clean

//从新configure编译
# ./configure

# make && make install
[第二步] 安装sphinx的PHP扩展
http://pecl.php.net/package/sphinx
# wget http://pecl.php.net/get/sphinx-1.3.0.tgz
# tar zxvf sphinx-1.3.0.tgz
# cd sphinx-1.3.0
# phpize
# ./configure --with-php-config=/usr/bin/php-config --with-sphinx=/usr/local/sphinxclient
# make && make install
# cd /etc/php.d/
# cp gd.ini  sphinx.ini
# vi sphinx.ini

extension=sphinx.so

# service php-fpm restart
安装完PHP的Sphinx扩展后,就可以直接使用$coreseek = new SphinxClient();而无需引入源文件了。
简单说一下我在TP里使用coreseek查询,并高亮关键词的思路:
1,通过sphinx查出id,uid的集合
2,然后$sql = "select * from post where id in($ids)";$res = mysql_query($sql);获取到数据库的真实数据
3,用BuildExcerpts将title和data的关键字高亮,然后分页展示
关键代码:
     $where = array();
        $where['uid']=$uid;
        if(!empty($search)){    //有需要查找的内容,则去 coreseek 忠查出对应的id
            $coreseek = new \SphinxClient();
            $coreseek->setServer("127.0.0.1", 9312);
            //SPH_MATCH_ALL, 匹配所有查询词(默认模式); SPH_MATCH_ANY, 匹配查询词中的任意一个; SPH_MATCH_EXTENDED2, 支持特殊运算符查询
            $coreseek->setMatchMode(SPH_MATCH_ALL);
            $coreseek->setMaxQueryTime(30);                        //设置最大搜索时间
            $coreseek->SetArrayResult(false);                    //是否将Matches的key用ID代替
            $coreseek->SetSelect ( "*" );                        //设置返回信息的内容,等同于SQL
            $coreseek->SetLimits ( 0, 30, 1000, 0 );            //设置结果集偏移量  SetLimits
            $res = $coreseek->query($search,'mysql','--single-0-query--');
            $key = array_keys($res['matches']);
            $where['id']=array('in',$key);
            $coreseek->close();
        }else{

        }
        //获取总数据条数
        $total=$mod->where($where)->count();
高亮的关键代码:
     if(!empty($search)){
            $page->parameter['search']=$search;
            //代码高亮
            $opt = array("before_match"=>"","after_match"=>"");
            $coreseek1 = new \SphinxClient();
            $coreseek1->setServer("127.0.0.1", 9312);
            $coreseek1->SetMatchMode(SPH_MATCH_ALL);
            $i=0;
            $tags_title=array();
            foreach($info as $key=>$row){
                $tags_title[]=$row['title'];
            }
            $replace_title=$coreseek1->BuildExcerpts($tags_title,'mysql',$search,$opt);
            foreach($info as $key=>&$row){
                $info[$key]['title']=$replace_title[$key];
            }
            $coreseek1->close();
        }
OK,至此,coreseek已经能够在TP里完美运行了。这篇分享的文章也可以画上句号了。以上是我一步步安装时的细节,记录下怕以后自己忘记,也希望能给感兴趣的同学一些帮助。文章信息量偏大,如果有哪些疏漏,万望指正!