
Home > Article > Web Front-end > A brief analysis of how to use JWT in nodejs?

This article will take you to understand JWT, introduce the application of JWT in node, and the advantages and disadvantages of JWT. I hope it will be helpful to everyone!

JWT is the abbreviation of JSON Web Token, that is In order to provide an authentication solution in a network application environment, in the traditional authentication mechanism, it is nothing more than the following steps:
1. 用户将账号密码发送到服务器;

2. 服务器通过验证账号密码后,会在当前session中保存一些用户相关的信息,用户角色或者过期时间等等;

3. 服务器给用户一个session_id, 写入用户的Cookie或者客户端自行保存在本地;

4. 用户每次请求服务,都需要带上这个session_id,或许会通过Cookie,或者其他的方式;

5. 服务器接收到后,回去数据库查询当前的session_id,校验该用户是否有权限;
One advantage of this model is that the server can terminate the user's permissions at any time. Go to the database to modify or delete the current user's session information. But there is also a disadvantage, that is, if it is a server cluster, all machines need to share the session information to ensure that each server can obtain the same session storage information. Although these problems can be solved, the amount of work is huge.
The advantage of the JWT solution is that this information is not saved. The token data is saved on the client. Every time a request is accepted, it only needs to be verified. [Related tutorial recommendations: nodejs video tutorial, Programming teaching]
Let’s briefly talk about JWT The principle is actually that when the client sends an authentication request, the server will generate a JSON object after authenticating the user, which probably includes "who are you, what do you do, etc., Expiration time" The important thing is that the information must have an expiration time; the general format is:
{
    username: "贼烦字符串er",
    role: "世代码农",
    endTime: "2022年5月20日"
}
But it will not be passed to you in such a superficial way. It will pass through the established signature algorithm and some information about the payload you submitted. Use a reversible signature algorithm for signature and transmission. I use a picture to represent the general format:
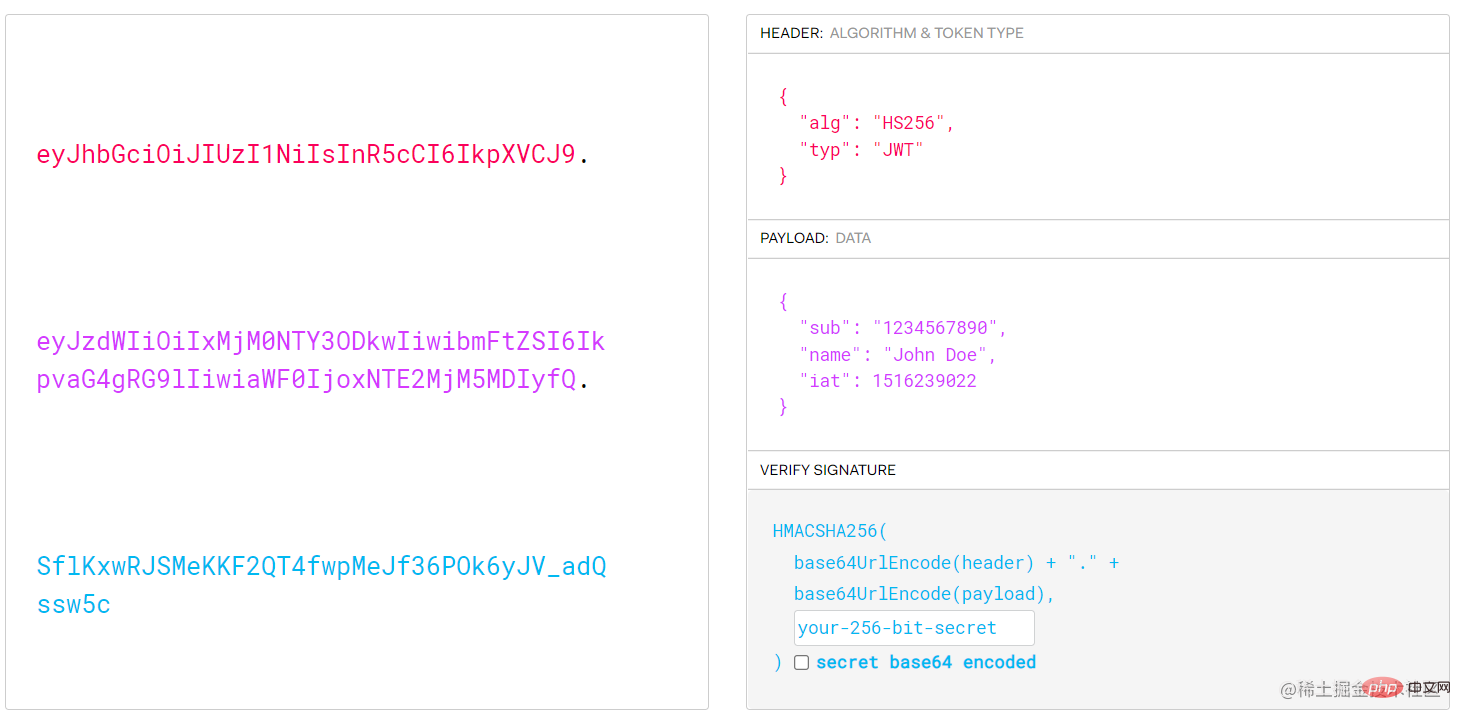
As can be seen from the picture, the returned information is roughly divided into three parts. The left side is the result after signing, which is the result returned to the client. The right side is also the source code of Decoded. The three parts are separated by "dots" and correspond to the three colors of red, purple and cyan:
The first red part is the Header, which mainly specifies the method. The signature algorithm in the picture (default HS256) is HMAC with SHA-256 It is a symmetric algorithm, only one key is shared between the two parties, and the typ field is marked as JWT type;
The second purple part payload is a JSON object, which is the actual There are seven official fields available for the transmitted data:
In addition to these fields, you can also create some custom fields. Since JWT is not encrypted by default, try to use it when using it. Be careful not to use some sensitive data.
The third part is the Signature signature. This part is a secret key specified by yourself and only exists on the server. Then use the algorithm specified in the header to pass the following signature method.
Let’s experience the specific use:
Step one: We need to build A node project; initialize a project through npm init -y; then we need to install dependencies, respectively express, jsonwebtoken And nodemon three dependencies:
$ npm i express jsonwebtoken nodemon
Then add nodemon app.js# in the scripts field in package.json ##Command:
"scripts": {
    "start": "nodemon app.js"
},
Step 2: Initialize the node application and create the app.js file in the root directory; // app.js
const express = require("express");
const app = express();
app.use(express.json());
app.listen(3000, () => {
console.log(3000 + " listening..."); // 监听3000端口
}); Step 3: Introduce jsonwebtoken dependencies , and create the private key of the interface and server;
// app.js

//...
const jwt = require("jsonwebtoken");

const jwtKey = "~!@#$%^&*()+,";
// ...
The jwtKey here is our custom private key that is only saved in the server, and then we start writing a /login interface , used to log in, and create a local simulation database for verification, and verify the signature through the jwt.sign method:
// app.js
const database = {
  username: "username",
  password: "password",
};

app.post("/login", (req, res) => {
  const { username, password } = req.body;
  if (username === database.username && password === database.password) {
    jwt.sign(
      {
        username,
      },
      jwtKey,
      {
        expiresIn: "30S",
      },
      (_, token) => {
        res.json({
          username,
          message: "登陆成功",
          token,
        });
      }
    );
  }
});
In the above code, we created the database variables are used to simulate the creation of a local account and password database to verify login; then a post interface of /login is established to verify that the account and password completely match After that, we sign through the sign method under the jwt object imported by the jsonwebtoken package. This method has three interface signatures:
export function sign(
    payload: string | Buffer | object,
    secretOrPrivateKey: Secret,
    options?: SignOptions,
): string;

export function sign(
    payload: string | Buffer | object,
    secretOrPrivateKey: Secret,
    callback: SignCallback,
): void;

export function sign(
    payload: string | Buffer | object,
    secretOrPrivateKey: Secret,
    options: SignOptions,
    callback: SignCallback,
): void;
这里用到了函数重载的方式实现接口,我们这里将实现最后一个接口签名,第一个参数可以是一个自定义的对象类型,也可以是一个Buffer类型,还可以直接是一个string类型,我们的源码使用了object类型,自定义了一些字段,因为jwt在进行签名是也会对这些数据一并进行签名,但是值得注意的是,这里尽量不要使用敏感数据,因为JWT默认是不加密的,它的核心就是签名,保证数据未被篡改,而检查签名的过程就叫做验证。
当然你也可以对原始Token进行加密后传输;
第二个参数:是我们保存在服务器用来签名的秘钥,通常在客户端-服务端模式中,JWS 使用 JWA 提供的 HS256 算法加上一个密钥即可,这种方式严格依赖密钥,但在分布式场景,可能多个服务都需要验证JWT,若要在每个服务里面都保存密钥,那么安全性将会大打折扣,要知道,密钥一旦泄露,任何人都可以随意伪造JWT。
第三个参数:是签名的选项SignOptions,接口的签名:
export interface SignOptions {
    algorithm?: Algorithm | undefined;
    keyid?: string | undefined;
    expiresIn?: string | number | undefined;
    /** expressed in seconds or a string describing a time span [zeit/ms](https://github.com/zeit/ms.js).  Eg: 60, "2 days", "10h", "7d" */
    notBefore?: string | number | undefined;
    audience?: string | string[] | undefined;
    subject?: string | undefined;
    issuer?: string | undefined;
    jwtid?: string | undefined;
    mutatePayload?: boolean | undefined;
    noTimestamp?: boolean | undefined;
    header?: JwtHeader | undefined;
    encoding?: string | undefined;
}这里我们用的是expiresIn字段,指定了时效时间,使用方法参考这个文档;
第四个参数是一个回调,回调的第二个参数就是我们通过签名生成的token,最后将这个token返回给前端,以便存储到前端本地每次请求是带上到服务端进行验证。
接下来,我们来验证一下这个接口:
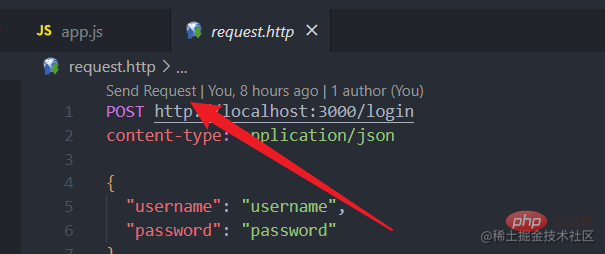
我是在vscode安装的REST Client插件,之后在根目录创建一个request.http的文件,文件内写上请求的信息:
POST http://localhost:3000/login
content-type: application/json

{
  "username": "username",
  "password": "password"
}之后在命令行执行npm run start命令启动服务,之后在requset.http文件上方点击Send Request按钮,发送请求:
请求成功后,会看到这样的响应报文:
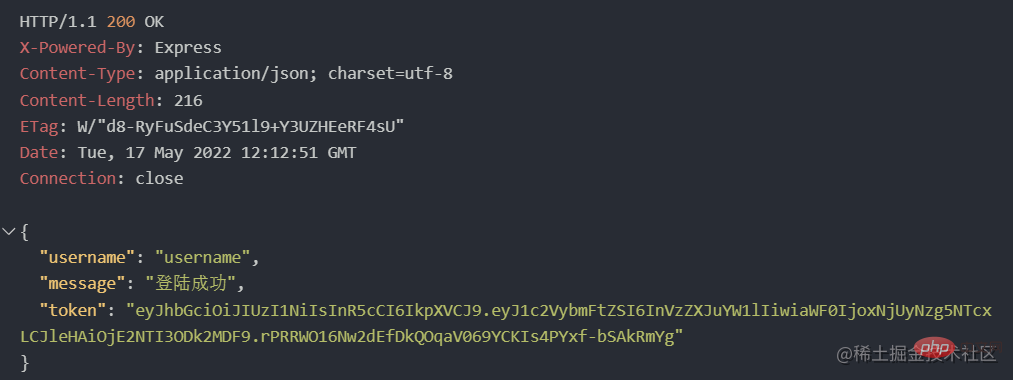
token字段就是我们JWT生成的token;
下面来验证一下这个token是否有效,我们在写一个登录过后的接口:
app.get("/afterlogin", (req, res) => {
  const { headers } = req;

  const token = headers["authorization"].split(" ")[1];
  // 将token放在header的authorization字段中
  jwt.verify(token, jwtKey, (err, payload) => {
    if (err) return res.sendStatus(403);
    res.json({ message: "认证成功", payload });
  });
});这段代码中,通过获取请求头中的authorization字段中的token进行获取之前通过JWT生成的token。
之后通过调用jwt.verify校验方法校验这个token是否有效,这个方法分别有三个参数:
// 有四个接口签名,可以自行查文档

export function verify(
    token: string,
    // 需要检验的token
    secretOrPublicKey: Secret | GetPublicKeyOrSecret,
    // 定义在服务器的签名秘钥
    callback?: VerifyCallback,
    // 获取校验信息结果的回调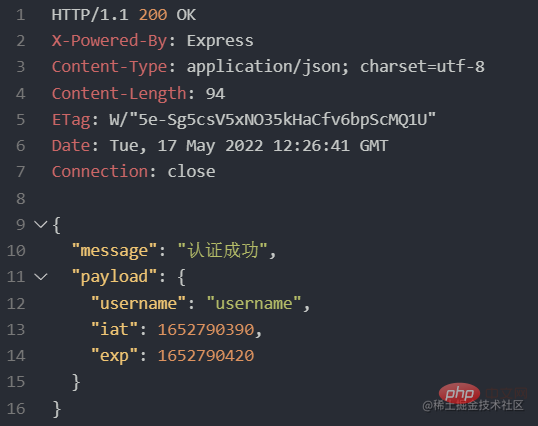
): void; 接下来我们把刚才响应的token复制到请求头中:
###
GET http://localhost:3000/afterlogin
authorization: Bearer eyJhbGciOiJIUzI1NiIsInR5cCI6IkpXVCJ9.eyJ1c2VybmFtZSI6InVzZXJuYW1lIiwiaWF0IjoxNjUyNzg5NzA3LCJleHAiOjE2NTI3ODk3Mzd9.s9fk3YLhxTUcpUgCfIK4xQN58Hk_XEP5y9GM9A8jBbY
前面的Bearer认证, 是http协议中的标准认证方式
同样点击Send Request当看到下面图片的响应,就意味着响应成功:
其实以上就是JWT的一些简单的用法,接下来再说一下JWT本身存在的优缺点.
JWT占用的存储空间其实并不小,如果我们需要签名做过多的信息,那么token很可能会超出cookie的长度限制,例如对比一下这两张图片:
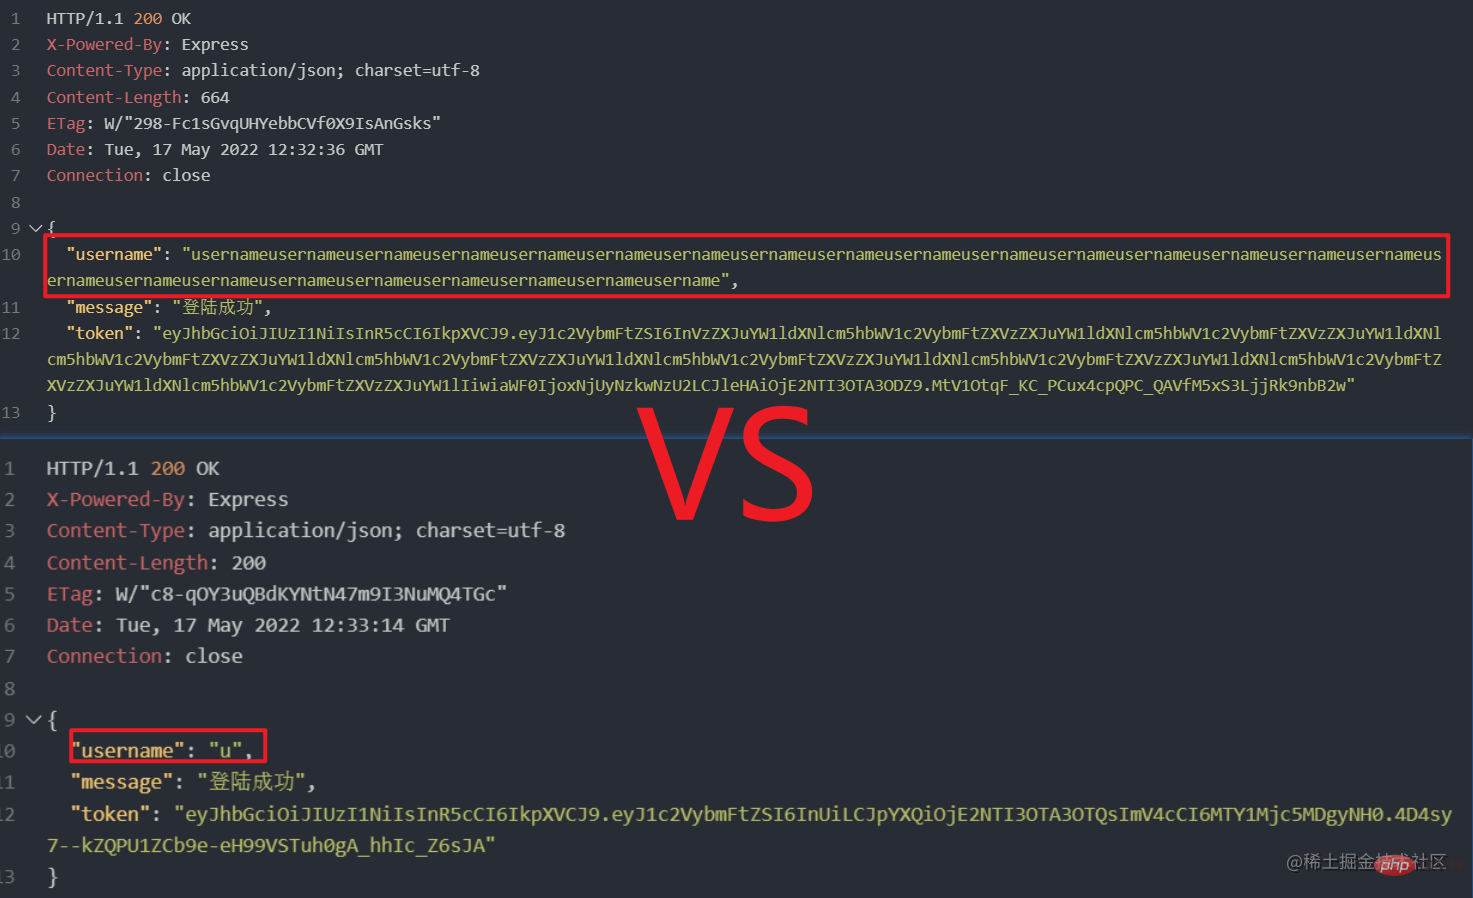
很明显,随着payload的信息量增大,token的长度也会增加;
安全性,其实如果token的占用空间过大,Cookie最大存储空间只有4kb前端可以存储在localStorage之类的本地存储,但是会带来一个问题,如果不是放在cookie的话,安全性就会大打折扣,就会有通过js脚本获取到的风险,就意味着任何hacker都可以拿着它做任何事情;
不灵活的时效性,其实JWT的某方面意义在于用户token不需要持久化存储,而是采用服务器校验的方式对token进行有效校验,刚才看到了,签名也是把到期时间一并签名的,如果改变到期时间token就会被篡改,由于没有存储和手动更改时效的方法,所以很难立刻将这个token删掉,如果用户重复登陆两次,生成两个token,那么原则上两个token都是有效的;
以上主要讲了几点:
The principle of JWT is mainly to conduct conversation with the token generated by the JSON signature through the server's private key;
is also introduced The composition of the internal data of JWT is used by Header to specify the signature algorithm and type, payload to transmit JSON data, and Signature to perform signature algorithm on the data and prevent tampering;
detailed introduction Let’s take a look at how to use JWT through nodejs, perform data signing through the sign method, and verify method for signature verification;
also introduced some JWT Shortcomings:
One is that the storage space increases with the increase in the amount of signature data;
The other is security. If the storage space is too large, it will not be stored in the Cookie with a relatively high security level, causing the script to be obtained at will;
Then there is the timeliness, which cannot be flexibly controlled. token’s timeliness;
This is the demo source code of nodejs above, for reference;
https://github.com/wangzi6224/jwt-usage-nodejs
For more node-related knowledge, please visit: nodejs tutorial!
The above is the detailed content of A brief analysis of how to use JWT in nodejs?. For more information, please follow other related articles on the PHP Chinese website!