
Home > Article > Web Front-end > How the MVVM framework resolves two-way binding
This article mainly introduces the two-way binding of MVVM framework analysis. Now I will share it with you and give you a reference.
MVVM Framework
An obvious front-end development trend in recent years is the migration of architecture from the traditional MVC model to the MVVM model. Under traditional MVC, the entire page will be refreshed after data interaction between the current front-end and back-end, resulting in a poor user experience. Therefore, we communicate with the gateway REST API through Ajax and refresh a certain section of the page asynchronously to optimize and enhance the experience.
Basic concepts of MVVM framework
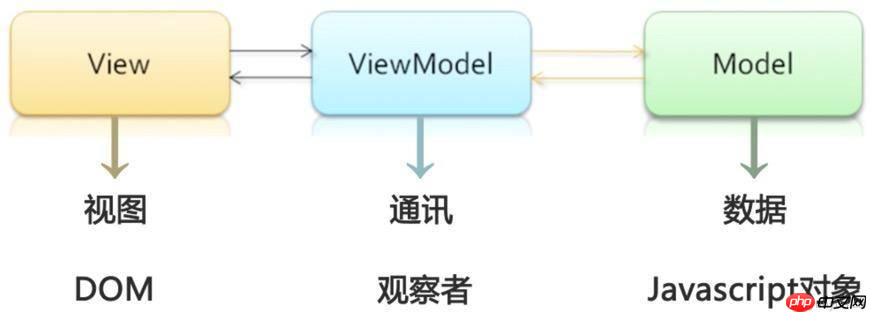
In the MVVM framework, View (view) and Model (data) cannot communicate directly Yes, there is ViewModel as an intermediary between them, which acts as an observer. When the user operates the View, the ViewModel senses the change, and then notifies the Model of the corresponding change; conversely, when the Model (data) changes, the ViewModel can also sense the change, causing the View to update accordingly. This back and forth process is what we know as two-way binding.
Application scenarios of the MVVM framework
The benefits of the MVVM framework are obvious: when the front-end operates on data, the data can be persisted through Ajax requests, and only needs to be changed The part of the data content in the dom that needs to be changed without having to refresh the entire page. Especially on mobile, refreshing the page is too expensive. Although some resources will be cached, the DOM, CSS, and JS of the page will be re-parsed by the browser, so mobile pages are usually made into SPA single-page applications. On this basis, many MVVM frameworks were born, such as React.js, Vue.js, Angular.js, etc.
Simple implementation of MVVM framework
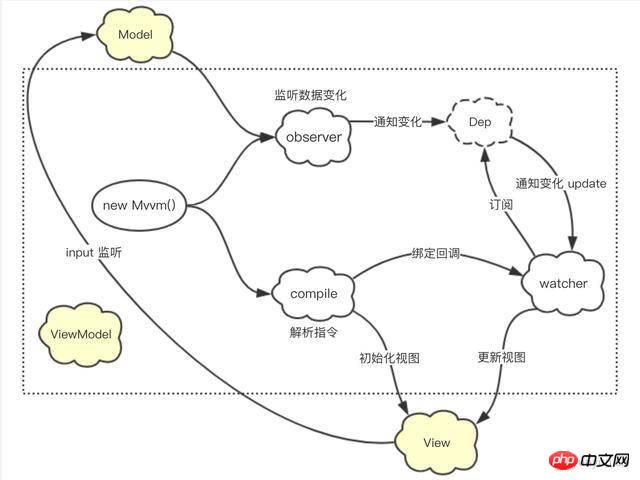
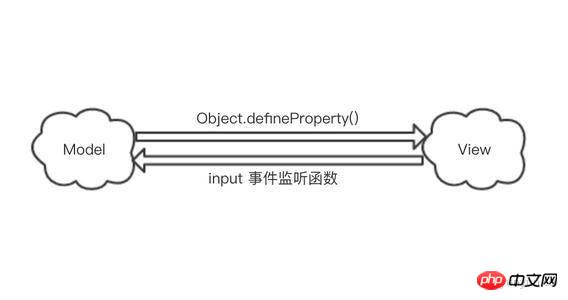
#Simulates Vue’s two-way binding flow and implements a simple MVVM framework. You can see the dotted line from the above figure In the square is the ViewModel intermediary layer mentioned earlier, which plays the role of an observer. In addition, you can find that the View to Model in the two-way binding flow is actually implemented through the event listening function of the input. If you switch to React (one-way binding flow), it will be handed over to the state management tool (such as Redux) at this step. accomplish. In addition, the Model to View in the two-way binding flow is actually implemented in the same way by each MVVM framework. The core method used is Object.defineProperty(). Through this method, data can be hijacked and when the data changes, it can be captured. Change accordingly for subsequent processing.
The implementation of Mvvm (entry file)
Generally the Mvvm framework is called like this
const vm = new Mvvm({
      el: '#app',
      data: {
       title: 'mvvm title',
       name: 'mvvm name'
      },
     })
But like this If you want to get the title attribute, you need to get it in the form of vm.data.title. In order to let vm.title get the title attribute, add a proxy method to the prototype of Mvvm. The code is as follows:
function Mvvm (options) {
 this.data = options.data
 const self = this
 Object.keys(this.data).forEach(key =>
  self.proxyKeys(key)
 )
}
Mvvm.prototype = {
 proxyKeys: function(key) {
  const self = this
  Object.defineProperty(this, key, {
   get: function () { // 这里的 get 和 set 实现了 vm.data.title 和 vm.title 的值同步
    return self.data[key]
   },
   set: function (newValue) {
    self.data[key] = newValue
   }
  })
 }
}
After implementing the proxy method, step into the implementation of the main process
function Mvvm (options) {
 this.data = options.data
 // ...
 observe(this.data)
 new Compile(options.el, this)
}
Observer (observer) implementation
The observer’s responsibility is to monitor the Model(JS object ), the core part is the use of the get and set methods of Object.defineProperty(). When the value of the Model (JS object) is to be obtained, the get method will be automatically called; when the value of the Model (JS object) is changed , the set method will be automatically called; thus hijacking the data is achieved. The code is as follows.
let data = {
 number: 0
}
observe(data)
data.number = 1 // 值发生变化
function observe(data) {
 if (!data || typeof(data) !== 'object') {
  return
 }
 const self = this
 Object.keys(data).forEach(key =>
  self.defineReactive(data, key, data[key])
 )
}
function defineReactive(data, key, value) {
 observe(value) // 遍历嵌套对象
 Object.defineProperty(data, key, {
  get: function() {
   return value
  },
  set: function(newValue) {
   if (value !== newValue) {
    console.log('值发生变化', 'newValue:' + newValue + ' ' + 'oldValue:' + value)
    value = newValue
   }
  }
 })
}
Run the code and you can see that the console output value changes newValue:1 oldValue:0. This completes the logic of the observer.
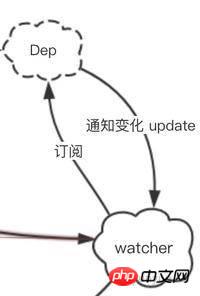
The relationship between Dep (subscriber array) and watcher (subscriber)
After observing changes, we always need to notify specific groups of people and let them make decisions Deal with it accordingly. In order to understand it more easily, we can think of subscription as subscribing to a WeChat official account. When the content of the WeChat official account is updated, it will push (update) the content to the people who subscribe to it.
There are thousands of people who subscribe to the same WeChat official account, so the first thing that comes to mind is to use new Array() to store these people (html nodes) Bar. So we have the following code:
// observer.js
function Dep() {
 this.subs = [] // 存放订阅者
}
Dep.prototype = {
 addSub: function(sub) { // 添加订阅者
  this.subs.push(sub)
 },
 notify: function() { // 通知订阅者更新
  this.subs.forEach(function(sub) {
   sub.update()
  })
 }
}
function observe(data) {...}
function defineReactive(data, key, value) {
 var dep = new Dep()
 observe(value) // 遍历嵌套对象
 Object.defineProperty(data, key, {
  get: function() {
   if (Dep.target) { // 往订阅器添加订阅者
    dep.addSub(Dep.target)
   }
   return value
  },
  set: function(newValue) {
   if (value !== newValue) {
    console.log('值发生变化', 'newValue:' + newValue + ' ' + 'oldValue:' + value)
    value = newValue
    dep.notify()
   }
  }
 })
}
At first glance, the code is relatively smooth, but it may get stuck in Dep.target and sub.update, so we naturally turn our attention to watcher,
// watcher.js
function Watcher(vm, exp, cb) {
 this.vm = vm
 this.exp = exp
 this.cb = cb
 this.value = this.get()
}
Watcher.prototype = {
 update: function() {
  this.run()
 },
 run: function() {
  // ...
  if (value !== oldVal) {
   this.cb.call(this.vm, value) // 触发 compile 中的回调
  }
 },
 get: function() {
  Dep.target = this // 缓存自己
  const value = this.vm.data[this.exp] // 强制执行监听器里的 get 函数
  Dep.target = null // 释放自己
  return value
 }
}
从代码中可以看到当构造 Watcher 实例时,会调用 get() 方法,接着重点关注 const value = this.vm.data[this.exp] 这句,前面说了当要获取 Model(JS 对象) 的值时,会自动调用 Object.defineProperty 的 get 方法,也就是当执行完这句的时候,Dep.target 的值传进了 observer.js 中的 Object.defineProperty 的 get 方法中。同时也一目了然地在 Watcher.prototype 中发现了 update 方法,其作用即触发 compile 中绑定的回调来更新界面。至此解释了 Observer 中 Dep.target 和 sub.update 的由来。
来归纳下 Watcher 的作用,其充当了 observer 和 compile 的桥梁。
1 在自身实例化的过程中,往订阅器(dep) 中添加自己
2 当 model 发生变动,dep.notify() 通知时,其能调用自身的 update 函数,并触发 compile 绑定的回调函数实现视图更新
最后再来看下生成 Watcher 实例的 compile.js 文件。
compile(编译) 的实现
首先遍历解析的过程有多次操作 dom 节点,为提高性能和效率,会先将跟节点 el 转换成 fragment(文档碎片) 进行解析编译,解析完成,再将 fragment 添加回原来的真实 dom 节点中。代码如下:
function Compile(el, vm) {
 this.vm = vm
 this.el = document.querySelector(el)
 this.fragment = null
 this.init()
}
Compile.prototype = {
 init: function() {
  if (this.el) {
   this.fragment = this.nodeToFragment(this.el) // 将节点转为 fragment 文档碎片
   this.compileElement(this.fragment) // 对 fragment 进行编译解析
   this.el.appendChild(this.fragment)
  }
 },
 nodeToFragment: function(el) {
  const fragment = document.createDocumentFragment()
  let child = el.firstChild // △ 第一个 firstChild 是 text
  while(child) {
   fragment.appendChild(child)
   child = el.firstChild
  }
  return fragment
 },
 compileElement: function(el) {...},
}
这个简单的 mvvm 框架在对 fragment 编译解析的过程中对 {{}} 文本元素、v-on:click 事件指令、v-model 指令三种类型进行了相应的处理。
Compile.prototype = {
 init: function() {
  if (this.el) {
   this.fragment = this.nodeToFragment(this.el) // 将节点转为 fragment 文档碎片
   this.compileElement(this.fragment) // 对 fragment 进行编译解析
   this.el.appendChild(this.fragment)
  }
 },
 nodeToFragment: function(el) {...},
 compileElement: function(el) {...},
 compileText: function (node, exp) { // 对文本类型进行处理,将 {{abc}} 替换掉
  const self = this
  const initText = this.vm[exp]
  this.updateText(node, initText) // 初始化
  new Watcher(this.vm, exp, function(value) { // 实例化订阅者
   self.updateText(node, value)
  })
 },
 compileEvent: function (node, vm, exp, dir) { // 对事件指令进行处理
  const eventType = dir.split(':')[1]
  const cb = vm.methods && vm.methods[exp]
  if (eventType && cb) {
   node.addEventListener(eventType, cb.bind(vm), false)
  }
 },
 compileModel: function (node, vm, exp) { // 对 v-model 进行处理
  let val = vm[exp]
  const self = this
  this.modelUpdater(node, val)
  node.addEventListener('input', function (e) {
   const newValue = e.target.value
   self.vm[exp] = newValue // 实现 view 到 model 的绑定
  })
 },
}
在上述代码的 compileTest 函数中看到了期盼已久的 Watcher 实例化,对 Watcher 作用模糊的朋友可以往上回顾下 Watcher 的作用。另外在 compileModel 函数中看到了本文最开始提到的双向绑定流中的 View 到 Model 是借助 input 监听事件变化实现的。
项目地址
本文记录了些阅读 mvvm 框架源码关于双向绑定的心得,并动手实践了一个简版的 mvvm 框架,不足之处在所难免,欢迎指正。
上面是我整理给大家的,希望今后会对大家有帮助。
相关文章:
The above is the detailed content of How the MVVM framework resolves two-way binding. For more information, please follow other related articles on the PHP Chinese website!