
Home > Article > Web Front-end > How to customize form validation using vux-ui
This time I will show you how to use vux-ui to customize form verification, what are the notes for using vux-ui to customize form verification, the following is a practical case, Let’s take a look.
When I first started using the framework vue with vux, I found that using this UI library was a bit incompetent. Let’s talk about the two demand problems I encountered during the form verification process and how to solve them.
1. Using the x-input component, we can see that the official only provides three types of is-typeverifier, namely: email, china-name, china-mobile, others are required How to write a custom validator?
Solution: Customize the is-type validator (you can use regular verification in valid after testing)
<x-input type="number" v-model="code" placeholder="请输入验证码" :is-type="codeValue" />
export default {
  data() {
    return{
      code: '',
      codeValue: function(value){
        return {
          valid: value.length === 4,
          msg: "验证码有误!"
        }
      }
    }
  }
}
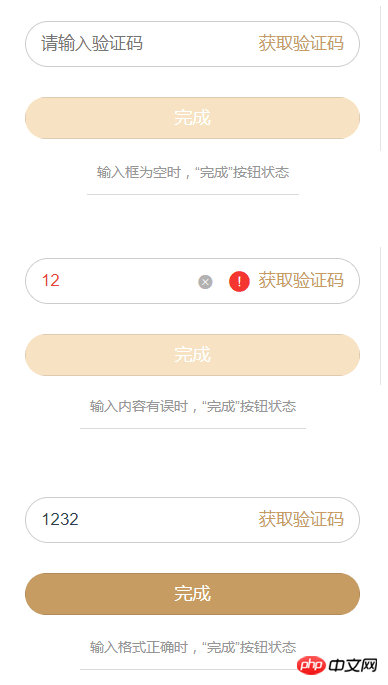
2. Only after the form content is filled in correctly can the button to submit the form be triggered ( As shown in the picture)
Solution: Use the @on-change event of the x-input component and the ref attribute
<x-input type="number" v-model="code" placeholder="请输入验证码" :is-type="codeValue" ref="refcode" @on-change="keyDown" />
<x-button action-type="submit" :disabled="disabled">完成</x-button>
 export default {
    data() {
      return{
        code: '',
        disabled: true,
        codeValue: function(value){
          return {
            valid: value.length === 4,
            msg: "验证码有误!"
          }
        }
      }
    },
    methods: {
      keyDown(){
        if(this.$refs.refcode.valid == true && this.code != ''){
          this.disabled = false;
        }else{
          this.disabled = true;
        }
      }
    }
  }
I believe you have already read the case in this article After mastering the method, please pay attention to other related articles on the php Chinese website for more exciting content!
Recommended reading:
How to use routing guards in Angular routing
How to implement login in react-router routing with React Verification Control
The above is the detailed content of How to customize form validation using vux-ui. For more information, please follow other related articles on the PHP Chinese website!