
Home > Article > Web Front-end > Detailed explanation of the steps to asynchronously upload files using the PHP+jQuery plug-in
This time I will bring you a detailed explanation of the steps for asynchronous uploading of files by the PHP jQuery plug-in. What are the precautions for asynchronous uploading of files by the PHP jQuery plug-in? The following is a practical case, let's take a look.
The most commonly used JQuery image upload plug-in is Uploadify, which works very well. However, since the mobile phone does not support flash, I have to find another1. Detailed explanation of the syntax parameters of the ajaxFileUpload plug-in
Principle:ajaxfileupload is implemented by monitoring the onload method of the iframe , when the processing from the server is completed, the onload event of the iframe is triggered to call its binding method, and in the binding method, the data body returned by the server in the iframe is obtained (supported ordinary text, json, xml, script, html)
Syntax:$.ajaxFileUpload([options])
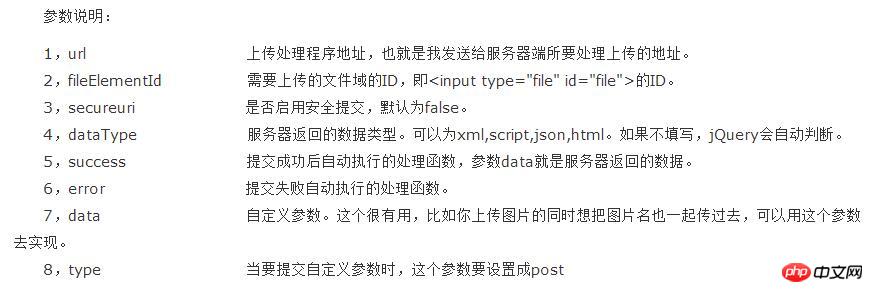
2. Next, let’s see how to use it
1. First introduce the ajaxFileUpload plug-in.Here I am using the jq1.11.1 version. It is said on the Internet that the jq version and the ajaxfileupload version must correspond so that there will be no abnormal errors. Anyway, I have no errors now. 2. Paste the HTML code.
The main thing here is the code of . Don't worry about the other ones, because here I am On the mobile side, the jqueryMobile plug-in is used. 3. Go to the js code for processing.
说明:请上传手持证件的半身照,请确保照片内证件信息清晰可读。
$(document).bind('pageinit', function(){
//照片异步上传
$('#id_photos').change(function(){ //此处用了change事件,当选择好图片打开,关闭窗口时触发此事件
$.ajaxFileUpload({
url:'/uploader/', //处理图片的脚本路径
type: 'post', //提交的方式
secureuri :false, //是否启用安全提交
fileElementId :'id_photos', //file控件ID
dataType : 'json', //服务器返回的数据类型
success : function (data, status){ //提交成功后自动执行的处理函数
if(1 != data.total) return; //因为此处指允许上传单张图片,所以数量如果不是1,那就是有错误了
var url = data.files[0].path;
$('.id_photos').empty();
//此处效果是:当成功上传后会返回一个json数据,里面有url,取出url赋给img标签,然后追加到.id_photos类里显示出图片
$('.id_photos').append(' ');
//$('.upload-box').remove();
},
error: function(data, status, e){ //提交失败自动执行的处理函数
alert(e);
}
})
});
');
//$('.upload-box').remove();
},
error: function(data, status, e){ //提交失败自动执行的处理函数
alert(e);
}
})
}); Here I basically write comments on each line of code for everyone to understand. The process is to upload the image to uploader.php for processing. The json data is returned successfully, and then the url value is taken out of the json, assigned to the img tag, and then the img tag is appended and displayed on the page. Here I attach the data returned by json:
{
 "total": 1,
 "success": 1,
 "files": [
 {
  "srcName": "3.jpg",
  "error": 0,
  "size": 10715,
  "type": "image/jpeg",
  "success": true,
  "path": "http://m.kellyblog.com/upload/20150528/857f4a35664b4a665e713322306d73b2.0x124x126.jpg",
  "width": 124,
  "height": 126
 }
 ]
}
The HTML page before uploading is like this:


class UploaderController extends XXXX_Controller {
 public function index() {
 $files = array();
 $success = 0; //用户统计有多少张图片上传成功了

 foreach ($_FILES as $item) {
  $index = count($files);
  $files[$index]['srcName'] = $item['name']; //上传图片的原名字
  $files[$index]['error'] = $item['error']; //和该文件上传相关的错误代码
  $files[$index]['size'] = $item['size']; //已上传文件的大小,单位为字节
  $files[$index]['type'] = $item['type']; //文件的 MIME 类型,需要浏览器提供该信息的支持,例如"image/gif"
  $files[$index]['success'] = false;  //这个用于标志该图片是否上传成功
  $files[$index]['path'] = '';  //存图片路径
  // 接收过程有没有错误
  if($item['error'] != 0) continue;
  //判断图片能不能上传
  if(!is_uploaded_file($item['tmp_name'])) {
  $files[$index]['error'] = 8000;
  continue;
  }
  //扩展名
  $extension = '';
  if(strcmp($item['type'], 'image/jpeg') == 0) {
  $extension = '.jpg';
  }
  else if(strcmp($item['type'], 'image/png') == 0) {
  $extension = '.png';
  }
  else if(strcmp($item['type'], 'image/gif') == 0) {
  $extension = '.gif';
  }
  else {
  //如果type不是以上三者,我们就从图片原名称里面去截取判断去取得(处于严谨性)
  $substr = strrchr($item['name'], '.');
  if(FALSE == $substr) {
   $files[$index]['error'] = 8002;
   continue;
  }
  //取得元名字的扩展名后,再通过扩展名去给type赋上对应的值
  if(strcasecmp($substr, '.jpg') == 0 || strcasecmp($substr, '.jpeg') == 0 || strcasecmp($substr, '.jfif') == 0 || strcasecmp($substr, '.jpe') == 0 ) {
   $files[$index]['type'] = 'image/jpeg';
  }
  else if(strcasecmp($substr, '.png') == 0) {
   $files[$index]['type'] = 'image/png';
  }
  else if(strcasecmp($substr, '.gif') == 0) {
   $files[$index]['type'] = 'image/gif';
  }
  else {
   $files[$index]['error'] = 8003;
   continue;
  }
  $extension = $substr;
  }
  //对临时文件名加密,用于后面生成复杂的新文件名
  $md5 = md5_file($item['tmp_name']);
  //取得图片的大小
  $imageInfo = getimagesize($item['tmp_name']);
  $rawImageWidth = $imageInfo[0];
  $rawImageHeight = $imageInfo[1];
  //设置图片上传路径,放在upload文件夹,以年月日生成文件夹分类存储,
  //rtrim(base_url(), '/')其实就是网站的根目录,大家自己处理
  $path = rtrim(base_url(), '/') . '/upload/' . date('Ymd') . '/';
  //确保目录可写
  ensure_writable_dir($path);
  //文件名
  $name = "$md5.0x{$rawImageWidth}x{$rawImageHeight}{$extension}";
  //加入图片文件没变化到,也就是存在,就不必重复上传了,不存在则上传
  $ret = file_exists($path . $name) ? true : move_uploaded_file($item['tmp_name'], $serverPath . $name);
  if($ret === false) {
  $files[$index]['error'] = 8004;
  continue;
  }
  else {
  $files[$index]['path'] = $path . $name; //存图片路径
  $files[$index]['success'] = true;  //图片上传成功标志
  $files[$index]['width'] = $rawImageWidth; //图片宽度
  $files[$index]['height'] = $rawImageHeight; //图片高度
  $success ++; //成功+1
  }
 }
 //将图片已json形式返回给js处理页面 ,这里大家可以改成自己的json返回处理代码
 echo json_encode(array(
  'total' => count($files),
  'success' => $success,
  'files' => $files,
 ));
 }
}
/*********************************分割*************************************************/
//这里我附上ensure_writable_dir()函数的代码
/**
* 确保文件夹存在并可写
*
* @param string $dir
*/
function ensure_writable_dir($dir) {
 if(!file_exists($dir)) {
 mkdir($dir, 0766, true);
 chmod($dir, 0766);
 chmod($dir, 0777);
 }
 else if(!is_writable($dir)) {
 chmod($dir, 0766);
 chmod($dir, 0777);
 if(!is_writable($dir)) {
  throw new FileSystemException("目录 $dir 不可写");
 }
 }
}
The code is basically commented, so that everyone can understand it more easily , although PHP is used to process image uploads, but if you understand the logical ideas processed by the program code when uploading, you can still use the ideas in .net or java. I believe you have mastered the method after reading the case in this article. For more exciting information, please pay attention to other related articles on the php Chinese website! Recommended reading:
How jQuery converts the url address to obtain the url directory
Detailed explanation of the steps for jquery to parse XML string XML files (With code)
The above is the detailed content of Detailed explanation of the steps to asynchronously upload files using the PHP+jQuery plug-in. For more information, please follow other related articles on the PHP Chinese website!