
Home > Article > Web Front-end > What is vue2 family bucket and how to use it?
This time I will bring you what vue2 family bucket is and how to use it? , what is vue2 family bucket? What are the precautions used? The following is a practical case, let’s take a look.
It is said that Vue2 is simple and easy to get started, but you will know after trying it yourself. In addition to the ES6 syntax and webpack configuration that make you feel unfamiliar, the important thing is the change of thinking. In the past, you could just use global variables. The hammer for modifying the DOM can no longer be used, so we have to focus on the data itself. The official documentation of vue is quite good, ranging from shallow to deep, but when you use vue-cli to build a project, you find that the official documentation is still not enough. You have to refer to open source projects on git and learn es6. And vue’s family buckets (vue-cli, vue-router, vue-resource, vuex) still need to be installed.
This build tool greatly reduces the difficulty of using webpack, supports hot updates, and has the support of webpack-dev-server, which is equivalent to starting a request server, giving You set up a test environment and just focus on development.
# 全局安装 vue-cli
$ npm install --global vue-cli
# 创建一个基于 webpack 模板的新项目
$ vue init webpack my-project
# 安装依赖,走你
$ cd my-project
$ npm install
$ npm run dev
The mechanism of hot update is to detect file changes and use websocket to notify the client to make corresponding updates. For details, you can move to: [webpack]--Module hot replacement
Vue’s routing is still very convenient, much more convenient than ag1. This convenience is reflected in three aspects:
1 is the correspondence between routing and page (component):
import Vue from 'vue'import Router from 'vue-router'import Home from '@/components/Home'import Chat from '@/components/Chat'import Firends from '@/components/Firends'import Logon from '@/components/Logon'Vue.use(Router)
let router=new Router({
  routes: [
    {
      path: '/home',
      name: 'Home',
      component: Home
    },
     { path: '/', redirect: '/home' },//重定向
    {
      path: '/chat',
      name: 'Chat',
      component: Chat
    },
    {
      path: '/firends',
      name: 'Firends',
      component: Firends
    },
    {
      path: '/logon',
      name: 'Logon',
      component: Logon
    }
  ]
});
This is how ordinary people think, and control is also needed in ag1 Container (There is no such concept in vue, instead just focus on the component), which makes it easier to use. In MVC mode, you need to point to the action under the controller. If there are many navigation categories, the corresponding strategy is nested routing.
2 can be specific to elements:
首页
The home (ignoring case) after this to is the route name defined above. This is very convenient. Routing similar to Asp.net MVC can render the path by name without having to enter the path at all times.
3 is event interception:
If we want to verify, the best thing is to verify before the user reaches the page:
router.beforeEach((to, from, next) => {  //todo 以后增加不需要验证的地址判断
  if(to.path!=="/logon"&&!store.state.userInfo.Account){
     next({ path: '/logon' })     return;
  }else{
   next();
  }
})
For example, process it in beforeEach . It also has many functions, so I won’t list them all. Official documentation: http://router.vuejs.org/zh-cn/
See I have used several mobile UI libraries. I was surprised at first that there was no footer component. Now I understand that routing is so convenient. There is no need for third-party UI to encapsulate the footer, and it is not convenient to encapsulate it (because it relies on routing). So navigation is probably the first component you need to write yourself.
For example, a Footer.vue
     首页


      统计


      更多
You only need to introduce it in App.Vue
import VFooter from './VFooter'
 export default {
name: 'app',
data () {return {
msg: 'this is home'}
},components:{VFooter}}
Then you can use it in App.Vue
If you want to register it globally, use it in main first Introduce
import Footer from './components/VFooter'//Vue.component('VFooter', Footer)//写在构造函数之前
into .js. At this step, you can happily assemble your own page. If you need to add a sliding effect to the page, you can add a transition (located in app.vue):
.slide-out-enter-active,
.slide-out-leave-active,
.slide-in-enter-active,
.slide-in-leave-active {
  will-change: transform;
  transition: all 400ms;
  position: absolute;
}.slide-out-enter {
  opacity: 0;
   transform: translateX(-100%);

}.slide-out-leave-active {
  opacity: 0;
   transform: translateX(100%);

}.slide-in-enter {
  opacity: 0;
   transform: translateX(100%);
}.slide-in-leave-active {
  opacity: 0;
   transform: translateX(-100%);
How to switch left and right?
The page is ready and you need to be able to send requests. https://github.com/pagekit/vue-resource If the front-end does not write the interface by itself, the first thing it cares about is how to set up the proxy. This is located in the proxyTable under config/index.js.
    proxyTable: {    '/api':
     {
           target: 'http://11.111.249.12:11',           changeOrigin: true,
           pathRewrite:
           {              '^/api': ''
            }
    },
Cross-domain settings cannot be without changeOrigin. Also note the last '^/api': ''. Pay attention to whether the "/api" you choose is part of the original path, otherwise it is easy to make an error.
Then there is another part which is setting the request header (main.js):
import VueResource from 'vue-resource'Vue.use(VueResource);
Vue.http.interceptors.push(function(request, next) {// modify method
  //request.method = 'POST';
  // modify headers
  request.headers.set('token',“token”);// continue to next interceptor  next();
});
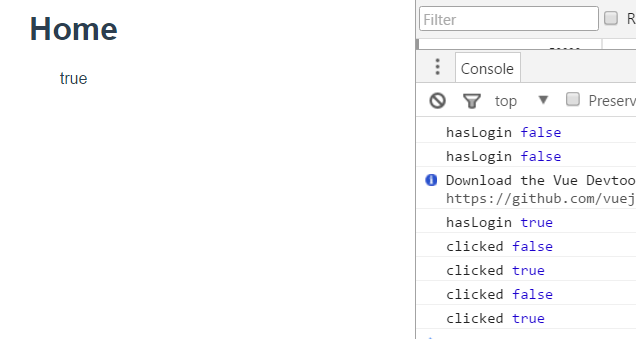
What confused me most in the whole family bucket was this vuex . What the hell is this, why do you need this. I have never played React and don’t know what state management is. When you want to use a global variable, you find that all the previous methods don't work. For example, set a login status
let login=(name,pwd,success,fail)=>}).then(res=>
and then display it on the homepage:
{{hasLogin}}
data () {    return {
      hasLogin:window.hasLogin
    }
  },
   methods:{
     toggle(){
       window.hasLogin=!window.hasLogin;
       console.log("clicked",window.hasLogin)
     }
   },
You find that true is indeed displayed after you log in, but it will not switch to false or true no matter how you click.
需要再赋值一次:
this.hasLogin=window.hasLogin;
为什么呢?因为你自己定义的变量,根本不属于vue的model。也就是没有处理过geter和seter,虽然变量的值是变化了,但仍然无法改变界面上的状态。所以你需要一个状态管理,按照一定的机制把你的变量变换成vue内部的模型。这个东西就是vuex。因为约定比较多,略显复杂点,但是耐心看一下还是很容易接受的。它主要分四个部分,state,getters,mutations,actions。先定义一个user.js如下:
state就是我们放共享变量的地方。比如下面的userInfo.
import Vue from 'vue';
import Vuex from 'vuex';
Vue.use(Vuex);
const userStore=new Vuex.Store({
   state:{
       userInfo:{
           userName:""
       }
   },
   getters:{
       getUserInfo(state){           return state.userInfo;
       }
   },
   mutations:{
       setUserInfo(state,userInfo){
           state.userInfo=userInfo;
       }
   },
   actions:{
       setUserInfo({commit}){
           commit('setUserInfo');
       }
   }
})
export default userStore;
而getters顾名思义就是获取接口,mutations(突变)这个词有点唬人,其实就是setters嘛。里面的方法自带state参数。而actions就是mutations的异步方法。然后再main.js中引用一下:
import store from './store/user';//...
new Vue({
el: '#app',
router, store,
template: '
然后我们在设置或获取的时候就可以使用指定的方法:
import store from '@/store/user';
//...
store.commit('setUserInfo',user)
可以直接通过store.state获取变量,也可以通过getters接口:
 computed:{   ...mapGetters({username:'getUserName'})
  },
这三个点是es6中的扩展运算符。将一个数组转为用逗号分隔的参数序列。
当然这些状态刷新之后就没有了,如果想要暂存下来,可以放到sessionStorage中:
if (window.sessionStorage.user) {    var json=JSON.parse(window.sessionStorage.user);
    store.commit('setSessionUser',json)}
当然要在muations中放进去
==
官方文档: https://vuex.vuejs.org/zh-cn/
相信看了本文案例你已经掌握了方法,更多精彩请关注php中文网其它相关文章!
推荐阅读:
The above is the detailed content of What is vue2 family bucket and how to use it?. For more information, please follow other related articles on the PHP Chinese website!