Home >Web Front-end >JS Tutorial >Detailed example of using vue to encapsulate the plug-in and publish it to npm
This article mainly introduces the method and steps of using vue to encapsulate the plug-in and publish it to npm. The editor thinks it is quite good, so I will share it with you now and give it as a reference. Let’s follow the editor to take a look, I hope it can help everyone.
1. National area code list based on vue
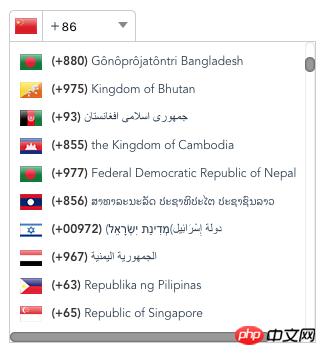
vue-flag-list contains the area codes of most countries. Click the triangle on the right to expand the list to select the national area code. If there is no area code in the list, You can also enter the area code yourself.

Global area code list
1.1 Initialization component
Use vue-cli to initialize the component, although there are many things No, because I’m familiar with this, I’ll just follow this step.
vue init webpack vue-flag-list
cd vue-flag-list
cnpm install
npm run dev
1.2 Implement specific functions according to your own needs. My main functions are written in the vue-flag-list.vue component.
<template>
 <p id="flag">
 ...
 </p>
</template>

<script>
 export default {
  name: 'vue-flag-list',
  ...
 }
</script>

<style scoped>
 ...
</style>
After the function is written, modify the package.json and other configuration files to prepare for packaging and release
1.3 Add index.js
import flagComponent from './Vue-Flag-List.vue'

const VueFlagList = {
 install: function (Vue) {
 if (typeof window !== 'undefined' && window.Vue) {
  Vue = window.Vue
 }
 Vue.component('VueFlagList', flagComponent)
 }
}

export default VueFlagList
1.4 Modify the configuration file
1.4.1 package.json
{
 "name": "vue-flag-list",
 "version": "1.0.0",
 "description": "A vue plugin for entering and selecting area code",
 "author": "guimin",
 // 因为组件包是公用的,所以private为false
 "private": false,
 // 配置main结点,如果不配置,我们在其他项目中就不用import XX from '包名'来引用了,只能以包名作为起点来指定相对的路径
 "main": "dist/vue-flag-list.min.js",
 "scripts": {
 "dev": "node build/dev-server.js",
 "start": "node build/dev-server.js",
 "build": "node build/build.js"
 },
 // 指定代码所在的仓库地址
 "repository": {
 "type": "git",
 "url": "git+https://github.com/linmoer/vue-flag-list.git"
 },
 // 指定打包之后,包中存在的文件夹
 "files": [
 "dist",
 "src"
 ],
 // 指定关键字
 "keywords": [
 "vue",
 "flag",
 "code",
 "flag code"
 ],
 "license": "MIT", //开源协议
 // 项目官网的url
 "homepage": "https://github.com/linmoer/vue-flag-list#readme",
 "dependencies": {
 "vue": "^2.3.3"
 },
 "devDependencies": {
 ...
 },
 "engines": {...},
 "browserslist": [...]
}
1.4.2 .gitignore file
Because you need to use the dist folder, remove dist/ in the .gitignore file.
1.4.3 webpack.prod.conf.js file
In order to support multiple usage scenarios, we need to choose an appropriate packaging format. Common packaging formats include CMD, AMD, and UMD. CMD can only be executed in the Node environment, AMD can only be executed in the browser, and UMD supports both execution environments. Obviously, we should choose UMD format. The setting item that specifies the output format in Webpack is output.libraryTarget. The supported formats are:
"var" - output in the form of a variable: var Library = xxx (default);
"this" - output as an attribute of this: this["Library"] = xxx;
"commonjs" - output as an attribute of exports An attribute output: exports["Library"] = xxx;
"commonjs2" - output in the form of module.exports: module.exports = xxx;
"amd" - Output in AMD format;
"umd" - Output in AMD, CommonJS2 and global properties simultaneously.
The following is an example of output settings in webpack.prod.conf.js:
 output: {
 path: path.resolve(__dirname, '../dist'),
 publicPath: '',
 filename: 'vue-flag-list.min.js',
 library: 'VueFlagList',
 libraryTarget: 'umd',
 umdNamedDefine: true
 },
Vue is an external dependency of the component library. Users of the component library will import Vue by themselves. When packaging, Vue should not be packaged into the component library. However, if you introduce the packaged component library directly in the form of