
Home > Article > Web Front-end > Detailed explanation of serialized form tutorial
This article mainly introduces the form serialization operation. By serializing the key values in the form into a submittable string, and attaching a code example to explain the results in detail after operation, friends in need can refer to the following
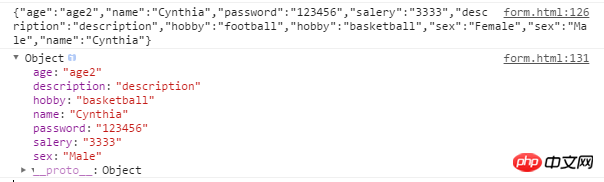
Serialization of the form, that is, serializing the key values in the form into a submittable string
Form
Method 1
function serializeForm1(form){
   var setForm = "";
   for(var key in form){
    if(form.hasOwnProperty(key)){
     setForm += '"'+form[key].name+'"'+':'+'"'+form[key].value + '"'+',';
    }
   }
   setForm = "{" + setForm.slice(0,setForm.length -1) + "}";
   console.log(setForm);
   // console.log(JSON.parse(setForm));
   return JSON.parse(setForm);
  }

  // 调用
  var oForm = document.getElementById('target');
  console.log(serializeForm3(oForm));
Result:
Method 2
 function serializeForm2(form) {
   var parts = [];
   for (var i = 0, i1 = form.elements.length; i < i1; i++) {
    var field = form.elements[i];
    switch (field.type) {
     case 'select-one':
     case 'select-multiple':
      if (field.type.length) {
       for (var j = 0, j1 = field.options.length; j < j1; j++) {
        var option = field.options[j];
        if (option.selected) {
         var optionValue = '';
         if (option.hasAttribute('value') && option.attributes['value'].specified) {
          //specified表明是否有此属性,有的话返回true,若定义了此属性但尚未添加到元素中也返回true。
          optionValue = option.value;
         } else {
          optionValue = optionValue.text;
         }
         parts.push(encodeURIComponent(field.name) + '=' + encodeURIComponent(optionValue));
        }
       }
      }
      break;
     case undefined:
     case 'file':
     case 'submit':
     case 'reset':
     case 'button':
      break;
     case 'radio':
     case 'checkbox':
      if(!field.checked){
       break;
      }else{
       parts.push(encodeURIComponent(field.name) + '=' + encodeURIComponent(field.dataset['index']));
       break;
      }
     default:
      if(field.name.length){
       parts.push(encodeURIComponent(field.name) + '=' + encodeURIComponent(field.value));
      }
    }
   }
   return parts.join('&');
  }

  // 调用
  var oForm = document.getElementById('target');
    console.log(serializeForm2(oForm));
Result:

Method 3
 function serializeForm3(form){
   if(!form||form.tagName.toUpperCase()!='FORM'){
    return false;
   }
   var res=[];
   var tag,tagType,tagVal,tagName;
   for(var i=0;iResult:
The above is the detailed content of Detailed explanation of serialized form tutorial. For more information, please follow other related articles on the PHP Chinese website!