
Home > Article > Web Front-end > The BootStrap Fileinput plug-in and the table plug-in are combined to realize the steps of file upload, preview and submission of imported Excel data.
This article mainly introduces the steps of importing Excel data by combining the BootStrap Fileinput plug-in and the Bootstrap table table plug-in to realize file upload, preview, and submission. Friends in need can refer to the
bootstrap-fileinput source code: https://github.com/kartik-v/bootstrap-fileinput
bootstrap-fileinput Online API: http://plugins.krajee.com/file-input
bootstrap-fileinput Demo Display: http://plugins.krajee.com/file-basic-usage-demo
This plug-in mainly introduces how to handle image upload processing operations. Originally, my Excel import operation used the Uploadify plug-in. You can refer to my essay "Usage of Attachment Upload Component Uploadify", but this requires Flash control support, which is more troublesome in some browsers (such as Chrome), so I decided to use a more general upload plug-in. This time, first of all, based on The framework system of the Bootstrap front-end architecture has been upgraded to replace the original Uploadify plug-in, so that the page upload function can be implemented without any difference in various browsers.
Generally, we need to introduce the following two files before the plug-in can be used normally:
bootstrap-fileinput/css/fileinput.min.css
bootstrap-fileinput/js/fileinput.min.js
When using the File input plug-in, if it is based on Asp.NET MVC, then we can Use BundleConfig.cs to add the corresponding reference and add it to the Bundles collection reference.
 //添加对bootstrap-fileinput控件的支持
 css_metronic.Include("~/Content/MyPlugins/bootstrap-fileinput/css/fileinput.min.css");
 js_metronic.Include("~/Content/MyPlugins/bootstrap-fileinput/js/fileinput.min.js");
 js_metronic.Include("~/Content/MyPlugins/bootstrap-fileinput/js/locales/zh.js");
In the page, we use the following HTML code to implement the interface display. The main bootstrap fileinput plug-in statement is mainly the basic interface code.
The interface display imported from Excel is as follows.

After selecting the specified file, we can see the Excel file list, as shown in the following interface.

After uploading the file, the data is directly displayed in the list of the pop-up layer. The Bootstrap-table table plug-in is used directly for display.
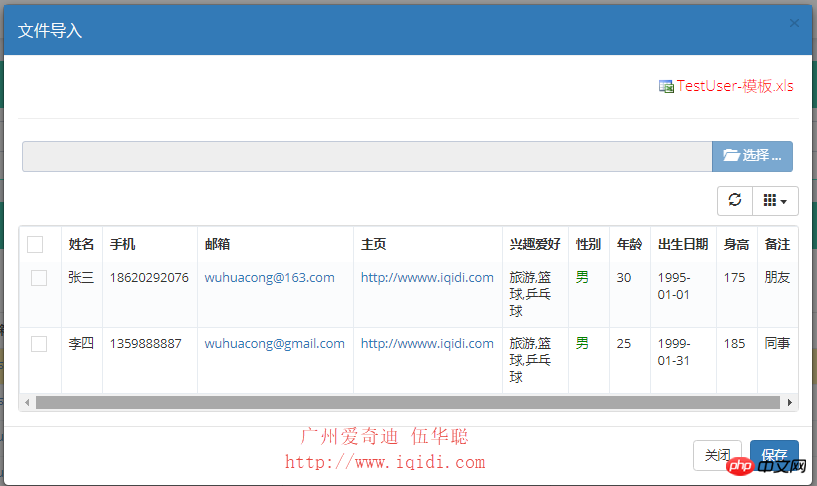
In this way, we can display the Excel records, realize the preview function, check the necessary records, and then save them and submit them to the server for saving. This is achieved Real import of Excel data into database for processing.
2. Detailed introduction to Excel export operation
In the interface where we actually import Excel, the HTML code is as follows.
文件导入
For various attributes of bootstrap fileinput, we use JS to initialize them here, which facilitates unified management and modification.
 //初始化Excel导入的文件
 function InitExcelFile() {
 //记录GUID
 $("#AttachGUID").val(newGuid());
 $("#excelFile").fileinput({
 uploadUrl: "/FileUpload/Upload",//上传的地址
 uploadAsync: true, //异步上传
 language: "zh",  //设置语言
 showCaption: true, //是否显示标题
 showUpload: true, //是否显示上传按钮
 showRemove: true, //是否显示移除按钮
 showPreview : true, //是否显示预览按钮
 browseClass: "btn btn-primary", //按钮样式
 dropZoneEnabled: false, //是否显示拖拽区域
 allowedFileExtensions: ["xls", "xlsx"], //接收的文件后缀
 maxFileCount: 1,  //最大上传文件数限制
 previewFileIcon: '',
 allowedPreviewTypes: null,
 previewFileIconSettings: {
  'docx': '',
  'xlsx': '',
  'pptx': '',
  'jpg': '',
  'pdf': '',
  'zip': '',
 },
 uploadExtraData: { //上传的时候,增加的附加参数
  folder: '数据导入文件', guid: $("#AttachGUID").val()
 }
 }) //文件上传完成后的事件
 .on('fileuploaded', function (event, data, previewId, index) {
 var form = data.form, files = data.files, extra = data.extra,
  response = data.response, reader = data.reader;
 var res = data.response; //返回结果
 if (res.Success) {
  showTips('上传成功');
  var guid = $("#AttachGUID").val();
  //提示用户Excel格式是否正常,如果正常加载数据
  $.ajax({
  url: '/TestUser/CheckExcelColumns?guid=' + guid,
  type: 'get',
  dataType: 'json',
  success: function (data) {
  if (data.Success) {
  InitImport(guid); //重新刷新表格数据
  showToast("文件已上传,数据加载完毕!");
  //重新刷新GUID,以及清空文件,方便下一次处理
  RefreshExcel();
  }
  else {
  showToast("上传的Excel文件检查不通过。请根据页面右上角的Excel模板格式进行数据录入。", "error");
  }
  }
  });
 }
 else {
  showTips('上传失败');
 }
 });
 }
The above logic is specifically to set the background page for uploading files to:/FileUpload/Upload, as well as the configuration parameters of various plug-ins. UploadExtraData sets additional parameters for submission, which is received by the background controller. Parameters, among which the
.on('fileuploaded', function (event, data, previewId, index) {function handles the processing function after the file is uploaded. If the result returned by the uploaded file is successful, then we call ajax again to check whether the Excel field meets the requirements, as shown below:
url: '/TestUser/CheckExcelColumns?guid=' + guid,
If the background of this check returns a successful record, then you need to extract the Excel record again to preview, and clear the bootstrap fileinput file upload plug-in to facilitate the next file upload. As shown in the following code.
 if (data.Success) {
 InitImport(guid); //重新刷新表格数据
 showToast("文件已上传,数据加载完毕!");
 //重新刷新GUID,以及清空文件,方便下一次处理
 RefreshExcel();
 }
 else {
 showToast("上传的Excel文件检查不通过。请根据页面右上角的Excel模板格式进行数据录入。", "error");
 }
Among them, RefreshExcel is to re-update the uploaded additional parameter values to facilitate the next upload. Otherwise, the values of the additional parameters will not change, which will cause the GUID we set to not change and problems will occur.
 //重新更新GUID的值,并清空文件
 function RefreshExcel() {
 $("#AttachGUID").val(newGuid());
 $('#excelFile').fileinput('clear');//清空所有文件
 //附加参数初始化后一直不会变化,如果需要发生变化,则需要使用refresh进行更新
 $('#excelFile').fileinput('refresh', {
 uploadExtraData: { folder: '数据导入文件', guid: $("#AttachGUID").val() },
 });
 }
Among them, InitImport obtains preview data and displays it on the Bootstrap-table table plug-in. For detailed use of this plug-in, you can review the essay "Experience Summary of Bootstrap Development Framework Based on Metronic (16)-- Use the plug-in bootstrap-table to implement query, paging, sorting and other processing of table records" to learn more.
 //根据条件查询并绑定结果
 var $import;
 function InitImport(guid) {
 var url = "/TestUser/GetExcelData?guid=" + guid;
 $import = $('#gridImport').bootstrapTable({
 url: url,  //请求后台的URL(*)
 method: 'GET',  //请求方式(*)
 striped: true,  //是否显示行间隔色
 cache: false,  //是否使用缓存,默认为true,所以一般情况下需要设置一下这个属性(*)
 pagination: false,  //是否显示分页(*)
 sidePagination: "server", //分页方式:client客户端分页,server服务端分页(*)
 pageNumber: 1,  //初始化加载第一页,默认第一页,并记录
 pageSize: 100,  //每页的记录行数(*)
 pageList: [10, 25, 50, 100], //可供选择的每页的行数(*)
 search: false,  //是否显示表格搜索
 strictSearch: true,
 showColumns: true,  //是否显示所有的列(选择显示的列)
 showRefresh: true,  //是否显示刷新按钮
 minimumCountColumns: 2, //最少允许的列数
 clickToSelect: true, //是否启用点击选中行
 uniqueId: "ID",  //每一行的唯一标识,一般为主键列
 queryParams: function (params) { },
 columns: [{
  checkbox: true,
  visible: true  //是否显示复选框
 }, {
  field: 'Name',
  title: '姓名'
 }, {
  field: 'Mobile',
  title: '手机'
 }, {
  field: 'Email',
  title: '邮箱',
  formatter: emailFormatter
 }, {
  field: 'Homepage',
  title: '主页',
  formatter: linkFormatter
 }, {
  field: 'Hobby',
  title: '兴趣爱好'
 }, {
  field: 'Gender',
  title: '性别',
  formatter: sexFormatter
 }, {
  field: 'Age',
  title: '年龄'
 }, {
  field: 'BirthDate',
  title: '出生日期',
  formatter: dateFormatter
 }, {
  field: 'Height',
  title: '身高'
 }, {
  field: 'Note',
  title: '备注'
 }],
 onLoadSuccess: function () {
 },
 onLoadError: function () {
  showTips("数据加载失败!");
 },
 });
 }
Finally, after confirming the submission, the data will be submitted to the background for processing through JS, as shown in the following code.
 //保存导入的数据
 function SaveImport() {
 var list = [];//构造集合对象
 var rows = $import.bootstrapTable('getSelections');
 for (var i = 0; i < rows.length; i++) {
 list.push({
  'Name': rows[i].Name, 'Mobile': rows[i].Mobile, 'Email': rows[i].Email, 'Homepage': rows[i].Homepage,
  'Hobby': rows[i].Hobby, 'Gender': rows[i].Gender, 'Age': rows[i].Age, 'BirthDate': rows[i].BirthDate,
  'Height': rows[i].Height, 'Note': rows[i].Note
 });
 }
 if (list.length == 0) {
 showToast("请选择一条记录", "warning");
 return;
 }
 var postData = { 'list': list };//可以增加其他参数,如{ 'list': list, 'Rucanghao': $("#Rucanghao").val() };
 postData = JSON.stringify(postData);
 $.ajax({
 url: '/TestUser/SaveExcelData',
 type: 'post',
 dataType: 'json',
 contentType: 'application/json;charset=utf-8',
 traditional: true,
 success: function (data) {
  if (data.Success) {
  //保存成功 1.关闭弹出层,2.清空记录显示 3.刷新主列表
  showToast("保存成功");
  $("#import").modal("hide");
  $(bodyTag).html("");
  Refresh();
  }
  else {
  showToast("保存失败:" + data.ErrorMessage, "error");
  }
 },
 data: postData
 });
 }
3. Background controller code analysis
Our JS code here involves several MVC background method processing: Upload, CheckExcelColumns, GetExcelData, SaveExcelData . They are introduced separately here.
The background controller method for file upload is as follows.
////// 上传附件到服务器上 /// /// 附件信息 /// 附件组GUID /// 指定的上传目录 ///[AcceptVerbs(HttpVerbs.Post)] public ActionResult Upload(string guid, string folder) { CommonResult result = new CommonResult(); HttpFileCollectionBase files = HttpContext.Request.Files; if (files != null) { foreach (string key in files.Keys) { try { #region MyRegion HttpPostedFileBase fileData = files[key]; if (fileData != null) { HttpContext.Request.ContentEncoding = Encoding.GetEncoding("UTF-8"); HttpContext.Response.ContentEncoding = Encoding.GetEncoding("UTF-8"); HttpContext.Response.Charset = "UTF-8"; // 文件上传后的保存路径 string filePath = Server.MapPath("~/UploadFiles/"); DirectoryUtil.AssertDirExist(filePath); string fileName = Path.GetFileName(fileData.FileName); //原始文件名称 string fileExtension = Path.GetExtension(fileName); //文件扩展名 //string saveName = Guid.NewGuid().ToString() + fileExtension; //保存文件名称 FileUploadInfo info = new FileUploadInfo(); info.FileData = ReadFileBytes(fileData); if (info.FileData != null) { info.FileSize = info.FileData.Length; } info.Category = folder; info.FileName = fileName; info.FileExtend = fileExtension; info.AttachmentGUID = guid; info.AddTime = DateTime.Now; info.Editor = CurrentUser.Name;//登录人 result = BLLFactory .Instance.Upload(info); if (!result.Success) { LogTextHelper.Error("上传文件失败:" + result.ErrorMessage); } } #endregion } catch (Exception ex) { result.ErrorMessage = ex.Message; LogTextHelper.Error(ex); } } } else { result.ErrorMessage = "fileData对象为空"; } return ToJsonContent(result); }
After the file is uploaded and processed, a general CommonResult result object is returned, which is also convenient for us to judge and process on the JS client.
The process of checking whether the data we import into Excel meets the column requirements is to determine whether its data columns are consistent with our pre-set column names.
//导入或导出的字段列表 string columnString = "姓名,手机,邮箱,主页,兴趣爱好,性别,年龄,出生日期,身高,备注"; ////// 检查Excel文件的字段是否包含了必须的字段 /// /// 附件的GUID ///public ActionResult CheckExcelColumns(string guid) { CommonResult result = new CommonResult(); try { DataTable dt = ConvertExcelFileToTable(guid); if (dt != null) { //检查列表是否包含必须的字段 result.Success = DataTableHelper.ContainAllColumns(dt, columnString); } } catch (Exception ex) { LogTextHelper.Error(ex); result.ErrorMessage = ex.Message; } return ToJsonContent(result); }
GetExcelData formats Excel data into a specific Liste102f619a96037929d66950f39a4bdcd collection, so that we can easily operate various attributes on the client. Its code is as follows.
////// 获取服务器上的Excel文件,并把它转换为实体列表返回给客户端 /// /// 附件的GUID ///public ActionResult GetExcelData(string guid) { if (string.IsNullOrEmpty(guid)) { return null; } List list = new List (); DataTable table = ConvertExcelFileToTable(guid); if (table != null) { #region 数据转换 int i = 1; foreach (DataRow dr in table.Rows) { bool converted = false; DateTime dtDefault = Convert.ToDateTime("1900-01-01"); DateTime dt; TestUserInfo info = new TestUserInfo(); info.Name = dr["姓名"].ToString(); info.Mobile = dr["手机"].ToString(); info.Email = dr["邮箱"].ToString(); info.Homepage = dr["主页"].ToString(); info.Hobby = dr["兴趣爱好"].ToString(); info.Gender = dr["性别"].ToString(); info.Age = dr["年龄"].ToString().ToInt32(); converted = DateTime.TryParse(dr["出生日期"].ToString(), out dt); if (converted && dt > dtDefault) { info.BirthDate = dt; } info.Height = dr["身高"].ToString().ToDecimal(); info.Note = dr["备注"].ToString(); info.Creator = CurrentUser.ID.ToString(); info.CreateTime = DateTime.Now; info.Editor = CurrentUser.ID.ToString(); info.EditTime = DateTime.Now; list.Add(info); } #endregion } var result = new { total = list.Count, rows = list }; return ToJsonContent(result); }
Another function of SaveExcelData is the final processing function for processing data import. It mainly writes the collection into a specific database. The specific code is as follows.
////// 保存客户端上传的相关数据列表 /// /// 数据列表 ///public ActionResult SaveExcelData(List list) { CommonResult result = new CommonResult(); if (list != null && list.Count > 0) { #region 采用事务进行数据提交 DbTransaction trans = BLLFactory .Instance.CreateTransaction(); if (trans != null) { try { //int seq = 1; foreach (TestUserInfo detail in list) { //detail.Seq = seq++;//增加1 detail.CreateTime = DateTime.Now; detail.Creator = CurrentUser.ID.ToString(); detail.Editor = CurrentUser.ID.ToString(); detail.EditTime = DateTime.Now; BLLFactory .Instance.Insert(detail, trans); } trans.Commit(); result.Success = true; } catch (Exception ex) { LogTextHelper.Error(ex); result.ErrorMessage = ex.Message; trans.Rollback(); } } #endregion } else { result.ErrorMessage = "导入信息不能为空"; } return ToJsonContent(result); }
上面这几个函数的代码一般是比较有规律的,不需要一个个去编写,一般通过代码生成工具Database2Sharp批量生成即可。这样可以有效提高Web的界面代码和后台代码的开发效率,减少出错的机会。
整个导入Excel数据的处理过程,所有代码都贴出来了,基本上整个逻辑了解了就可以很好的了解这个过程的代码了。
The above is the detailed content of The BootStrap Fileinput plug-in and the table plug-in are combined to realize the steps of file upload, preview and submission of imported Excel data.. For more information, please follow other related articles on the PHP Chinese website!
