
Home > Article > Web Front-end > Batch add and delete function of react.js

The following editor will bring you an article about the batch addition and deletion functions of react.js. The editor thinks it is quite good, so I will share it with you now and give it as a reference for everyone. Let’s follow the editor and take a look.
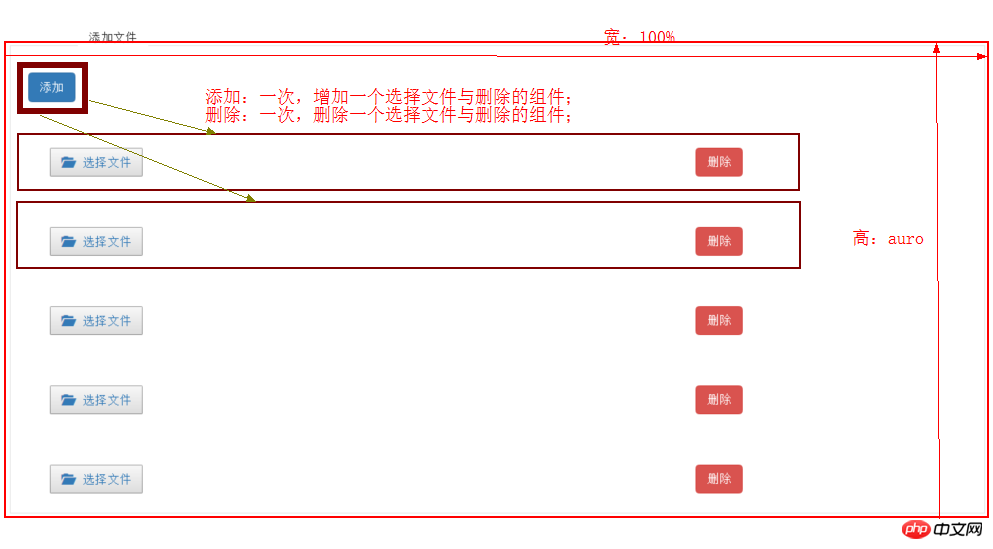
The CMS I recently built requires the function of adding images in batches: In the container box for adding files, there are two contents, namely:Add Button and Select File component added.
Structural analysis:
The added component is called : UploadQiNiuFiles (Qiniu file upload component), contains a delete button to delete the current component
Add button event
The container where the added component is stored
To achieve this effect, you only need to understand the purpose of three methods:
Direct binding requires Delete the component's deleteType(), which is a method that calls removeContent()
//删除{qiniu}与{deleteQiNiu}内容,是把页面上的这两个内容一起删除
  deleteType(){
    let index = this.props.index;
    this.props.callbackParent(index);
  }
in the container where the component is added2cf1e8c0f302bbdf5d4025128a4cf4d9< ;/p>, batch add addContent() and delete removeContent() written for the add button
//批量添加
  addContent(event) {
    if (this.state.number.length >= this.state.maxNum) {
      return;
    }
    console.log("this.state.number:" + this.state.number);
    this.state.number.push(this.state.number[this.state.number.length - 1] + 1);
    let temp = this.state.number;
    this.setState({
      number: temp
    })
  }

  //删除
  removeContent(index) {
    if (this.state.number.length <= 1) {
      return;
    }
    this.state.number.splice(index, 1);
    this.setState({
      number: this.state.number
    })
  }
Code analysis:
Add a container for component storage2cf1e8c0f302bbdf5d4025128a4cf4d9
   {addToBtn} //添加按钮
   {items}   //被添加的组件
.pBorder {
  position: relative;
  width: 100%;
  height: auto;
  margin-top: 5%;
  border: 1px solid #e3e3e3;
  padding: 30px 10px;
  margin-bottom: 5%;

  -moz-position: relative;
  -moz-width: 100%;
  -moz-height: auto;
  -moz-border: 1px solid #e3e3e3;
  -moz-padding: 30px 10px;
  -moz-margin-bottom: 5%;
  -webkit-position: relative;
  -webkit-width: 100%;
  -webkit-height: auto;
  -webkit-border: 1px solid #e3e3e3;
  -webkit-padding: 30px 10px;
  -webkit-margin-bottom: 5%;
}
Added components: UploadQiNiuFiles and Method of deleting components deleteType()
/**
* Created by wf on 2016/5/16.
*/
import React,{Component} from 'react';
import {render} from 'react-dom';
import ReactBootstrap , {Input,Button,ButtonToolbar} from 'react-bootstrap';
import style from '../../../../css/meeting_data.css';
//七牛上传公共组件
import QiniuUpload from 'qiniu_uploader';
export default class UploadQiNiuFiles extends Component {
constructor(props){
super(props);
}
//获取qiniukey
getQiniuKey(qiniuKey){
this.props.setQiniuKey(qiniuKey);
}
//获取qiniutoken
getQiniuUptoken() {
this.props.acquireToken();
};
//删除{qiniu}与{deleteQiNiu}内容,是把页面上的这两个内容一起删除,直接绑定要删除的组件
//这个方法调用的是removeContent(),在下面有介绍
deleteType(){
let index = this.props.index;
this.props.callbackParent(index);
}
render(){
const qiniu = (
);
const deleteQiNiu = (
);
return(
{qiniu}
{deleteQiNiu}
);
}
}Qiniu upload component has been introduced. When making this component, you need to use the action method With state in reducers, please refer to this link. Because obtaining the parameters in orange font requires the use of methods in action
Add events in the container where p is pBorder
First load, Qiniu Upload component: UploadQiNiuFiles, its loading path is the method in webpack:
/**常用组件路径简写为:
  *
  * 例:config: path.join(__dirname,"./build/config.js")
  * config 变量名
  * path.join(__dirname,"./build/config.js") config的路径
  *
  * 使用方法: import {变量} from 'config'
  * //七牛上传公共组件
   import QiniuUpload from 'qiniu_uploader';
  * **/
 resolve: {
  alias: {
   qiniu_uploader: path.join(__dirname,"./public_component/qiniu_upload/QiniuUpload.js"),
   storage: path.join(__dirname,"./utils/Storage.js"),
   config: path.join(__dirname,"./build/config.js")
  }
 }
import React,{Component} from 'react';
import {render} from 'react-dom';
import ReactBootstrap , {Input,Button,ButtonToolbar} from 'react-bootstrap';
import { Link } from 'react-router';
//
import UploadQiNiuFiles from './UploadQiNiuFiles.js';The component name of batch upload files, I define For: UploadFileToFolde
The default parameters are:
constructor(props){
    super(props);
    this.state = {number: [1], maxNum: 10} //最大数据为10条,默认显示1条
  }
/*获取上个页面传过来的值 let local = this.props.location;
如果从(row,query)中跳转过来的页面,从query中传值过来要这么写:let query = local.query;
如果这个页面是包含在某个大的页面下的,要把query与对应的ID传过去
*/
componentDidMount(){
let local = this.props.location;
let query = local.query;
this.props.setActivityId(query.activityId);
}After the data rendering is completed, componentDidUpdate() needs to be executed. This is all the data in the state:
this.props.meetingState.addUploadFolderToFileList; Determine whether the data in it is empty or undefined. If this state has a value and is added successfully, all data will be cleared the next time you go to this page and you will be returned to the original page when you click the save button. The clearInvitation() method is to clear all business data. Its method is written in the action. Data is the business data. Write it according to the actual situation:
/* 清空*/

export const CLEAR_INVITATION = 'CLEAR_INVITATION';
 export function clearInvitation(){
  return {
    type: CLEAR_INVITATION,
    data:{
      addInvitationResponse:{},
      Invitations:[],
      deleteInvitationsResponse:{},
      invitationName:'',
      folderName: ''
    }
  }
}
componentDidUpdate(){
let addFileToFolderList = this.props.meetingState.addUploadFolderToFileList;
if (typeof(addFileToFolderList) != 'undefined') {
let status = addFileToFolderList.status;
if (200 == status) {
//如果新增成功,则下次添加前清空所有
this.props.clearInvitation();
//点击保存按钮,返回原来的页面
this.props.history.goBack();
}
}
}//批量添加,直接拿来使用
addContent(event) {
if (this.state.number.length >= this.state.maxNum) {
return;
}
console.log("this.state.number:" + this.state.number);
this.state.number.push(this.state.number[this.state.number.length - 1] + 1);
let temp = this.state.number;
this.setState({
number: temp
})
}//删除,直接拿来使用
removeContent(index) {
if (this.state.number.length <= 1) {
return;
}
this.state.number.splice(index, 1);
this.setState({
number: this.state.number
})
}There is a deleteType() deletion method in the Qiniu upload component, which calls the removeContent() method. It is missing It’s important to note that I also put the deleteType() method code here:
//绑定被删除的组件,直接拿来使用
  deleteType(){
    let index = this.props.index;
    this.props.callbackParent(index); //调用removeContent()方法
  }
render(){
//将要添加的组件定义为变量为一个数组 items
let items = [];
//从添加的组件数量中遍历,
for(let i = 0; i < this.state.number.length; i++){
//给这个items推送组件
items.push(
添加文件
{addToBtn}
{items}
);
}The above is the detailed content of Batch add and delete function of react.js. For more information, please follow other related articles on the PHP Chinese website!