

OAuth is an open standard that allows users to let third-party applications access the user's private resources (such as avatars, photos, videos, etc.) stored on a website. In this There is no need to provide usernames and passwords to third-party applications during the process.
Accessing data stored in a specific service provider is achieved using a token instead of a username and password. Each token authorizes a specific website to access specific resources for a specific period of time.
OAuth allows users to authorize third-party websites to flexibly access specific information stored on other resource servers, rather than all information. For example, if a user wants to log in to Zhihu through QQ, then Zhihu is a third-party application. If Zhihu wants to access some basic information of the user, it needs the user's authorization. If the user tells Zhihu his QQ user name and password, then Zhihu can access all the user's data, and only the user can revoke the permission by changing their password. This authorization method has great security risks. If you use OAuth, this problem can be solved well.
Using tokens allows users to flexibly authorize or withdraw permissions from third-party applications. OAuth 2 is the next version of the OAuth protocol, but is not backwards compatible with OAuth 1.0.
OAuth 2 focuses on simplicity for client developers, while providing specialized authentication processes for web applications, desktop applications, mobile devices, and living room devices. Traditional web development login authentication is generally based on Session, but continuing to use Session in a front-end and back-end separated architecture will cause many inconveniences, because the mobile terminal (Android, IOS, WeChat applet, etc.) either does not support Cookie (WeChat applet) , or it is very inconvenient to use. For these problems, using OAuth 2 authentication can solve them.
First understand several basic roles in OAuth 2
Resource owner: that is, the user, with avatars, photos, videos, etc. Resources
Client: that is, third-party application
Authorization server: used to verify whether the information provided by the user is correct and return a token For third-party applications
Resource server: A server that provides user resources, such as avatars, photos, videos and other resources
Generally speaking, The authorization server and resource server can be the same server.
Step 01: The client (third-party application) requests authorization from the user.
When the user clicks the Agree Authorization button on the service authorization page, the server will return an authorization certificate to the client.
Step 03: The client takes the authorization license to the authorization server to apply for a token.
Step 04: After the authorization server verifies that the information is correct, it issues the token to the client.
Step 05: The client takes the token to the resource server to access resources.
Step 06: The resource server verifies that the token is correct and opens the resource.
The authorization mode of the OAuth protocol is divided into 4 types, as follows
Since the OAuth protocol in Spring Boot is completed on the basis of Spring Security , so first you need to add Spring Security dependency, which requires OAuth 2, so add OAuth 2 related dependencies. The token can be stored on the Redis cache server. At the same time, Redis has functions such as expiration, which is very suitable for token storage, so Redis is also added. rely. Configuration application.propertiesorg.springframework.boot spring-boot-starter-web org.springframework.boot spring-boot-starter-data-redis io.lettuce lettuce-core redis.clients jedis org.springframework.boot spring-boot-starter-security org.springframework.security.oauth spring-security-oauth3 2.3.3.RELEASE
spring.redis.database=0
spring.redis.host=ip地址
spring.redis.port=6379
spring.redis.password=root
spring.redis.jedis.pool.max-active=8
spring.redis.jedis.pool.max-idle=8
spring.redis.jedis.pool.max-wait=-1ms
spring.redis.jedis.pool.min-idle=0
授权服务器和资源服务器可以是同一台服务器,也可以是不同服务器,此处假设是同一台服务器,通过不同的配置分别开启授权服务器和资源服务器,首先是授权服务器:
@Configuration
@EnableAuthorizationServer
public class AuthorizationServerConfig extends AuthorizationServerConfigurerAdapter {
    @Autowired
    AuthenticationManager authenticationManager;
    @Autowired
    RedisConnectionFactory redisConnectionFactory;
    @Autowired
    UserDetailsService userDetailsService;
    @Bean
    PasswordEncoder passwordEncoder() {
        return new BCryptPasswordEncoder();
    }
    @Override
    public void configure(ClientDetailsServiceConfigurer clients) throws Exception {
        clients.inMemory()
                .withClient("password")
                .authorizedGrantTypes("password", "refresh_token")
                .accessTokenValiditySeconds(1800)
                .resourceIds("rid")
                .scopes("all")
                .secret("$2a$10$RMuFXGQ5AtH4wOvkUqyvuecpqUSeoxZYqilXzbz50dceRsga.WYiq");
    }
    @Override
    public void configure(AuthorizationServerEndpointsConfigurer endpoints) throws Exception {
        endpoints.tokenStore(new RedisTokenStore(redisConnectionFactory))
                .authenticationManager(authenticationManager)
                .userDetailsService(userDetailsService);
    }
    @Override
    public void configure(AuthorizationServerSecurityConfigurer security) throws Exception {
        security.allowFormAuthenticationForClients();
    }
}
代码解释:
自定义类继承自 AuthorizationServerConfigurerAdapter ,完成对授权服务器的配置,然后通过 @EnableAuthorizationServer 注解开启授权服务器
注入 AuthenticationManager 用来支持 password 模式
注入 RedisConnectionFactory 用来完成 Redis 缓存,将令牌信息储存到 Redis 缓存中
注入 UserDetailsService 该对象为刷新 token 提供支持
在 configure(ClientDetailsServiceConfigurer clients) 方法中配置 password 授权模式,authorizedGrantTypes 表示 OAuth 2 中的授权模式为 password 和 refresh_token 两种,在标准的 OAuth 2 协议中,授权模式并不包括 refresh_token ,但是在 Spring Security 的实现中将其归为一种,因此如果要实现 access_token 的刷新,就需要添加这样一种授权模式;accessTokenValiditySeconds 方法配置了 access_token 的过期时间;resourceIds 配置了资源 id;secret 方法配置了加密后的密码,明文是 123
configure(AuthorizationServerEndpointsConfigurer endpoints) 方法配置了令牌的存储,AuthenticationManager 和 UserDetailsService 主要用于支持 password 模式以及令牌的刷新
configure(AuthorizationServerSecurityConfigurer security) 方法配置表示支持 client_id 和 client_secret 做登录认证
@Configuration
@EnableResourceServer
public class ResourceServerConfig extends ResourceServerConfigurerAdapter {
    @Override
    public void configure(ResourceServerSecurityConfigurer resources) throws Exception {
        resources.resourceId("rid").stateless(true);
    }
    @Override
    public void configure(HttpSecurity http) throws Exception {
        http.authorizeRequests()
                .antMatchers("/admin/**").hasRole("admin")
                .antMatchers("/user/**").hasRole("user")
                .anyRequest().authenticated();
    }
}
代码解释:
自定义类继承自 ResourceServerConfigurerAdapter ,并添加 @EnableResourceServer 注解开启资源服务器配置
resources.resourceId(“rid”).stateless(true); 配置资源 id,这里的资源 id 和授权服务器中的资源 id 一直,然后设置这些资源仅基于令牌认证
configure(HttpSecurity http) 方法配置 HttpSecurity
@Configuration
public class WebSecurityConfig extends WebSecurityConfigurerAdapter {
    @Bean
    @Override
    public AuthenticationManager authenticationManagerBean() throws Exception {
        return super.authenticationManagerBean();
    }
    @Bean
    @Override
    protected UserDetailsService userDetailsService() {
        return super.userDetailsService();
    }
    @Override
    protected void configure(AuthenticationManagerBuilder auth) throws Exception {
        auth.inMemoryAuthentication()
                .withUser("admin")
                .password("$2a$10$RMuFXGQ5AtH4wOvkUqyvuecpqUSeoxZYqilXzbz50dceRsga.WYiq")
                .roles("admin")
                .and()
                .withUser("sang")
                .password("$2a$10$RMuFXGQ5AtH4wOvkUqyvuecpqUSeoxZYqilXzbz50dceRsga.WYiq")
                .roles("user");
    }
    @Override
    protected void configure(HttpSecurity http) throws Exception {
        http.antMatcher("/oauth/**").authorizeRequests()
                .antMatchers("/oauth/**").permitAll()
                .and().csrf().disable();
    }
}
这里两个 Bean 将注入授权服务器配置类中使用,另外,这里的 HttpSecurity 配置主要是配置 /oauth/** 模式的 URL ,这一类的请求直接放行。在 Spring Security 配置和资源服务器配置中,一共涉及两个 HttpSecurity ,其中 Spring Security 中的配置优先级高于资源服务器中的配置,即请求地址先经过 Spring Security 的 HttpSecurity ,再经过资源服务器的 HttpSecurity。
首先创建三个简单的请求地址
@RestController
public class HelloController {
    @GetMapping("/admin/hello")
    public String admin() {
        return "Hello admin!";
    }
    @GetMapping("/user/hello")
    public String user() {
        return "Hello user!";
    }
    @GetMapping("/hello")
    public String hello() {
        return "hello";
    }
}
根据前文的配置,要请求这三个地址,分别需要 admin 角色、user 角色以及登录后访问。
所有都配置完成后,启动 Redis 服务器,再启动 Spring Boot 项目,首先发送一个 POST 请求获取 token,请求地址如下(注意这里是一个 POST 请求,为了显示方便,将参数写在地址栏中):http://localhost:8080/oauth/token?username=sang&password=123&grant_type=password&client_id=password&scope=all&client_secret=123
请求地址中包含的参数有用户名、密码、授权模式、客户端 id 、scope 以及客户端密码,基本就是授权服务器中所配置的数据,请求结果如图
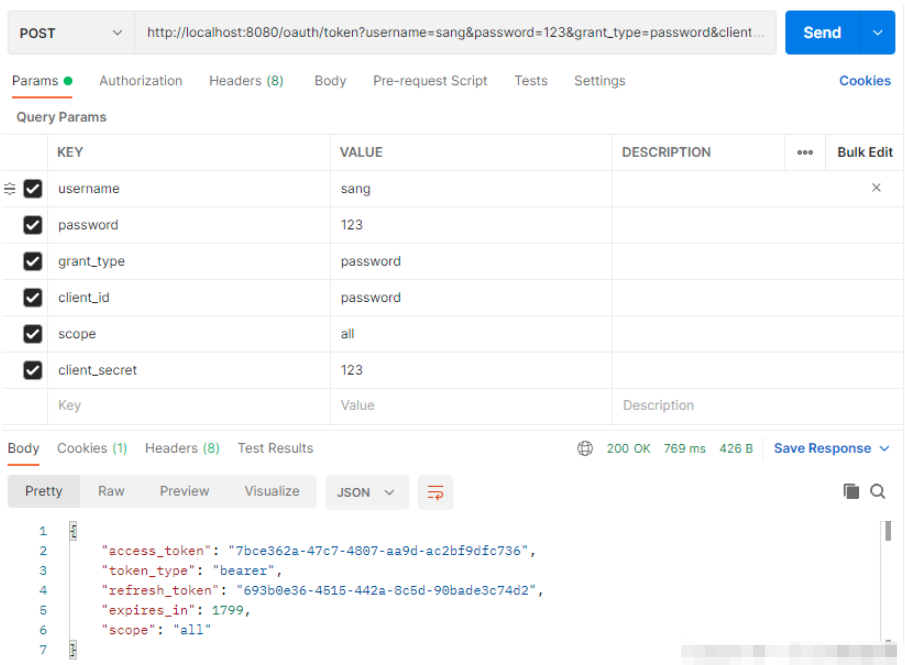
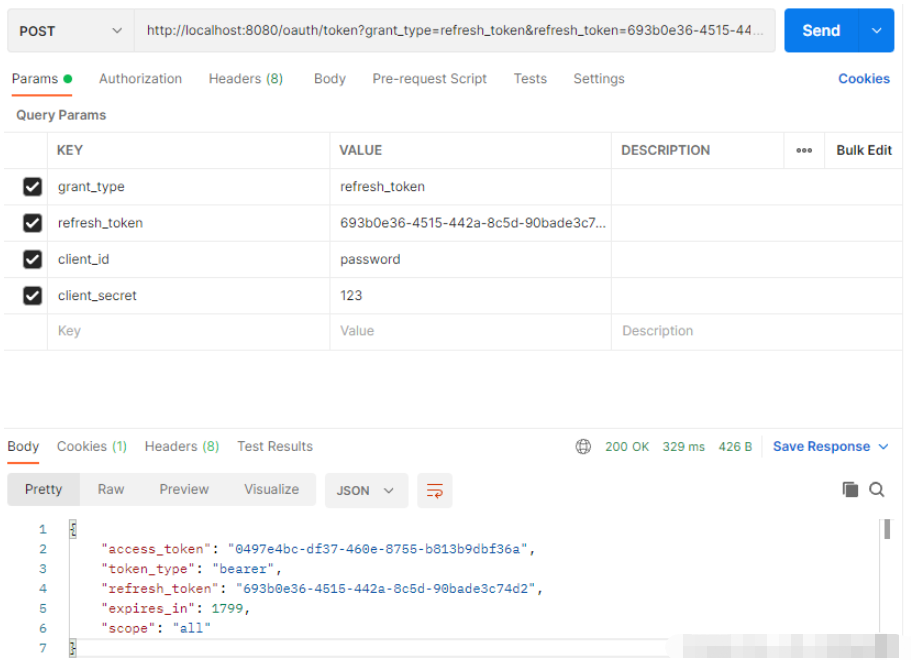
其中 access_token 是获取其它资源时要用的令牌,refresh_token 用来刷新令牌,expires_in 表示 access_token 过期时间,当 access_token 过期后,使用 refresh_token 重新获取新的 access_token (前提是 refresh_token 未过期),请求地址(注意也是POST请求):http://localhost:8080/oauth/token?grant_type=refresh_token&refresh_token=693b0e36-4515-442a-8c5d-90bade3c74d2&client_id=password&client_secret=123
获取新的 access_token 时需要携带上 refresh_token ,同事授权模式设置为 refresh_token ,在获取的结果中 access_token 会变化,同时 access_token 有效期也会变化,如图
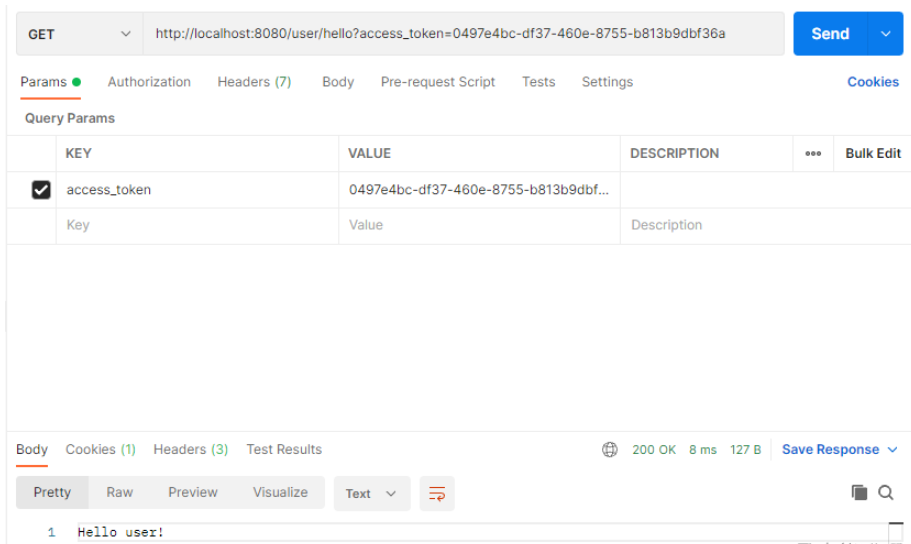
接下来访问所有资源,携带上 access_token 参数即可,例如 /user/hello 接口:http://localhost:8080/user/hello?access_token=0497e4bc-df37-460e-8755-b813b9dbf36a,访问结果如图
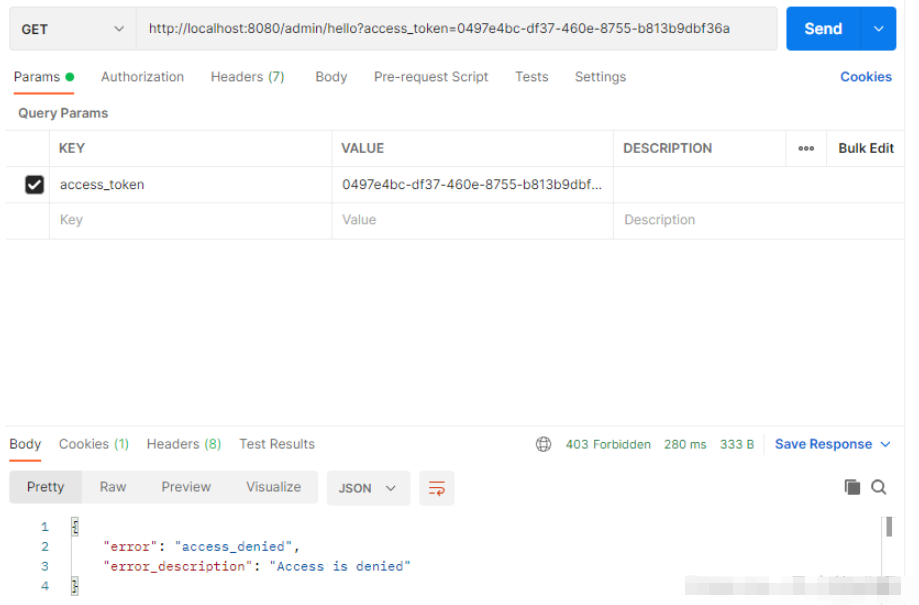
If a resource is illegally accessed, for example, the sang user accesses the /admin/hello interface, the result will be as shown in the figure
At this point, a The password mode OAuth authentication system is successfully established.
There are 4 authentication modes in OAuth. Developers need to choose one of them based on the actual situation of their own development. The password mode commonly used in front-end and back-end separation applications is introduced here. Other authorization modes are also Each has its own usage scenarios.
Overall, the use of Spring Security OAuth 2 is still relatively complicated, and the configuration is also relatively cumbersome. If the developer's application scenario is relatively simple, you can build your own OAuth 2 authentication system according to the authorization process introduced here. .
The above is the detailed content of How to use the OAuth2 framework of SpringBoot security management. For more information, please follow other related articles on the PHP Chinese website!