

But if we look carefully, we will find that when our projects all use a single database, then There may be the following problems:
All reading and writing pressure is borne by one database, High pressure
If the database server disk is damaged, data will be lost, a single point of failure
In order to solve the two problems mentioned above, we can prepare two (more) MySQL, one The master (Master) server, a slave (Slave) server, and the data change (write, update, delete operations) of the main database require Synchronization to the slave database (master-slave replication). When users access our project, if it is a write operation (insert, update, delete), they will directly operate main library; if it is a read operation (select ), then directly operate the slave library. This structure is read-write separation.

In this read-write separation structure, there can be multiple slave libraries
MySQL master Slave replication is an asynchronous replication process, and the underlying layer is based on the binary log function that comes with the Mysql database. It means that one or more MySQL databases (slave, that is, slave library) copies the log from another MySQL database (master, that is, main library), and then parses the log and Apply it to itself, and finally realize that the data of slave library is consistent with the data of main library. MySQL master-slave replication is a built-in function of the MySQL database and does not require the use of third-party tools.
The binary log (BINLOG) records all DDL (data definition language) statements and DML (data manipulation language) statements, but does not include data query statements. This log plays an extremely important role in data recovery during disasters. MySQL's master-slave replication is implemented through this binlog. By default, MySQL does not enable this log.
MySQL master writes data changes to the binary log ( binary log )
slave copies the master’s binary log to its relay log (relay log)
slave redoes events in the relay log , reflect the data changes to its own data

Before setting up the environment, we need to prepare There are two servers. If you live a wealthy life and use two cloud servers, remember to open the security group, that is, the firewall; if you live a better life than me but still use a virtual machine, remember not to start with so much memory. It's a blue screen (don't ask how you know it)
I won't show you the installation of the database and the operation of the firewall here. I feel that there are many resources on the Internet that can meet the problems encountered. When building the master-slave library Sometimes I saw on the Internet that MySQL versions should be consistent. I didn’t pay much attention and just operated on the previous MySQL. You can verify it yourself.
Server: 192.168.150.100 (Don’t try to hack it, this is the IP of the virtual machine)
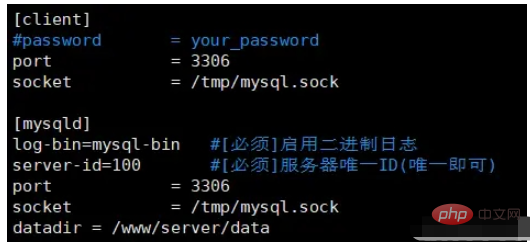
1. Modify the configuration file of the Mysql database vim /etc/my.cnf
在打开的文件中加入下面两行,其中的server-id不一定是100,确保唯一即可
log-bin=mysql-bin   #[必须]启用二进制日志
server-id=100       #[必须]服务器唯一ID
2. Restart the Mysql service
here There are three ways to restart MySQL. The simplest is undoubtedly to turn it off and on:
net stop mysql;net start mysql;
systemctl restart mysqld
service mysqld restart
3. Create a user for data synchronization and authorize
After logging in to MySQL To be able to execute the following command, because this is a SQL command, Linux does not know what this thing is.
GRANT REPLICATION SLAVE ON *.* to '用户名'@'开放的地址' identified by '密码';
eg: GRANT REPLICATION SLAVE ON *.* to 'masterDb'@'%' identified by 'Master@123456';
记得刷一下权限
FLUSH PRIVILEGES;
4. Check the master synchronization status
There is no need to exit MySQL at this time, because the following command is still a SQL command, execute the following SQL , we can get the two important parameters we need later.
show master status;

two attribute values in the red box to change. If an error occurs later, it may be the same as the two cents here. It’s related.
服务器:192.168.150.101(别试了黑不了的,这也是虚拟机的ip)
1、 修改Mysql数据库的配置文件 vim /etc/my.cnf

这里要注意server-id和主库以及其他从库都不能相同,否则后面将会配置不成功。
2、重启Mysql服务
这里有三个方法都能重启MySQL,最简单的无疑就是一关一开:
net stop mysql;net start mysql;
systemctl restart mysqld
service mysqld restart
3、设置主库地址及同步位置
登录进去MySQL之后才能够执行下面的命令,因为这是SQL命令
设置主库地址和同步位置
change master to master_host='192.168.150.100',master_user='masterDb',master_password='Master@123456',master_log_file='mysql-bin.000010',master_log_pos=68479;
记得记得开启从库配置
start slave;
参数说明:
master_host: 主库的 IP地址
master_user: 访问主库进行主从复制的 用户名 ( 上面在主库创建的 )
master_password: 访问主库进行主从复制的用户名对应的 密码
master_log_file: 从哪个 日志文件 开始同步 ( 即1.2.1中第4步获取的 File )
master_log_pos: 从指定日志文件的哪个 位置 开始同步 ( 即1.2.1中第4步获取的 Position )
4、查看从数据库的状态
这个时候还 不用退出MySQL ,因为下面的命令还是SQL命令,执行下面的SQL,可以看到从库的状态信息。通过状态信息中的 Slave_IO_running 和 Slave_SQL_running 可以看出主从同步是否就绪,如果这两个参数全为 Yes ,表示主从同步已经配置完成。
show slave status\G;

这可能是由于linux 是复制出来的,MySQL中还有一个 server_uuid 是一样的,我们也需要修改。 vim /var/lib/mysql/auto.cnf

这应该就是各位大牛设置server_id的时候不小心设置相同的id了,修改过来就行,步骤在上面的配置中。
这是狗子在操作过程中搞出来的一个错误……
出错的原因是在主库中删除了用户信息,但是在从库中同步的时候失败导致同步停止,下面记录自己的操作(是在进入MySQL的操作且是从库)。
MASTER_LOG_POS
STOP SLAVE;
SET GLOBAL SQL_SLAVE_SKIP_COUNTER=1;
START SLAVE;
SHOW SLAVE STATUS\G;
在数据库中操作时,一定要注意当前所在的数据库是哪个,作为一个良好的实践:在SQL语句前加 USE dbname 。
Sharding-JDBC定位为 轻量级Java框架 ,在Java的JDBC层提供的额外服务。 它使用客户端直连数据库,以 jar包 形式提供服务,无需额外部署和依赖,可理解为增强版的JDBC驱动, 完全兼容JDBC和各种ORM框架 。
使用Sharding-JDBC可以在程序中轻松的实现数据库 读写分离 。
Sharding-JDBC具有以下几个特点:
适用于任何基于JDBC的ORM框架,如:JPA, Hibernate, Mybatis, Spring JDBC Template或直接使用JDBC。
支持任何第三方的数据库连接池,如:DBCP, C3P0, BoneCP, Druid, HikariCP等。
支持任意实现JDBC规范的数据库。目前支持MySQL,Oracle,SQLServer,PostgreSQL以及任何遵循SQL92标准的数据库。
下面我们将用ShardingJDBC在项目中实现MySQL的读写分离。
在pom.xml文件中导入ShardingJDBC的依赖坐标
    org.apache.shardingsphere
    sharding-jdbc-spring-boot-starter
    4.0.0-RC1
在application.yml中增加数据源的配置
spring:
  shardingsphere:
    datasource:
      names:
        master,slave
      # 主数据源
      master:
        type: com.alibaba.druid.pool.DruidDataSource
        driver-class-name: com.mysql.cj.jdbc.Driver
        url: jdbc:mysql://192.168.150.100:3306/db_test?useUnicode=true&characterEncoding=utf-8&useSSL=false
        username: root
        password: 123456
      # 从数据源
      slave:
        type: com.alibaba.druid.pool.DruidDataSource
        driver-class-name: com.mysql.cj.jdbc.Driver
        url: jdbc:mysql://192.168.150.101:3306/db_test?useUnicode=true&characterEncoding=utf-8&useSSL=false
        username: root
        password: 123456
    masterslave:
      # 读写分离配置,设置负载均衡的模式为轮询
      load-balance-algorithm-type: round_robin
      # 最终的数据源名称
      name: dataSource
      # 主库数据源名称
      master-data-source-name: master
      # 从库数据源名称列表,多个逗号分隔
      slave-data-source-names: slave
    props:
      sql:
        show: true #开启SQL显示,默认false
  # 覆盖注册bean,后面创建数据源会覆盖前面创建的数据源
  main:
allow-bean-definition-overriding: true这时我们就可以对我们项目中的配置进行一个测试,下面分别调用一个更新接口和一个查询接口,通过查看日志中记录的数据源来判断是否能够按照我们预料中的跑。
更新操作(写操作)

查询操作(读操作)

Done! ! ! The program ran normally and successfully as we expected. With the help of ShardingJDBC, we successfully realized the separation of reading and writing of the database in our project.
The above is the detailed content of How to realize MySQL read and write separation in SpringBoot project. For more information, please follow other related articles on the PHP Chinese website!