

swagger is a popular real-time interface document generation tool. Interface documents are an indispensable tool in current front-end and back-end separation projects. Before front-end and front-end development, the back-end must first produce the interface document. The front-end will develop the project based on the interface document. After the development of both parties is completed, joint debugging and testing will be conducted.
So the interface document is actually an agreement between the two parties before development. Usually interface documents are divided into offline and real-time. Offline interface document tools include: word (equivalent to Wu said), YAPI, Xiaoyaoji, etc. This kind of document needs to be written by programmers, and generally has interface testing functions. Usually, developers first write information on the offline interface document, and then hand it over to the front-end personnel for reference development. The biggest drawback is that when our interface program changes, we need to go back and maintain the above content, which is very troublesome, really troublesome.
Real-time interface documents can automatically generate corresponding interface documents based on our code. The advantage is that when our code changes, the generated interface documents will be automatically updated. We do not need to pay attention to the modifications, and they need to be released on time. That’s it. However, since it is automatically generated based on the code, the biggest drawback is that the code is highly intrusive and requires us to integrate the relevant code for generating interface documents in the project code. There are many solutions for real-time interface documentation, but swagger is still one of the more influential ones.
Official website address: swagger.io Of course, the official website is all in English, which seems to be quite troublesome. I suggest you just follow my steps, it’s very simple.
At the same time, let me say something: swagger is divided into two commonly used versions: swagger2 and swagger3. The difference between the two is not very big. It mainly optimizes dependencies and annotations. Swagger2 needs to introduce two jar packages, and swagger3 only needs one. There is no big difference in use. The following takes swagger2 as an example.
    io.springfox
    springfox-swagger2
    2.9.2


    io.springfox
    springfox-swagger-ui
    2.9.2
First you need to add an annotation: @EnableSwagger2. We can add this annotation to the SpringBoot startup class, or we can customize a configuration class and put it on it. After adding this annotation, it means that we have enabled the Swagger function in the project.
We use the second method to define a configuration class ourselves, and we can also add a Docket configuration. The so-called Docket configuration is the configuration of a set of interface documents (a project or a version), such as setting names, contacts, etc.
We add a SwaggerConfig class under the config folder.
@Configuration
@EnableSwagger2
public class SwaggerConfig {
    /**
     * 设置多个:
     *
     * @Bean
     *     public Docket appApi() {
     *
     *         List pars = new ArrayList<>();
     *         ParameterBuilder token = new ParameterBuilder();
     *         token.name("token").description("用户令牌").modelRef(new ModelRef("string")).parameterType("header").required(false)
     *                 .build();
     *         pars.add(token.build());
     *
     *         return new Docket(DocumentationType.SWAGGER_2).select().paths(regex("/app/.*")).build()
     *                 .globalOperationParameters(pars).apiInfo(pdaApiInfo()).useDefaultResponseMessages(false)
     *                 .enable(enableSwagger)
     *                 .groupName("appApi");
     *
     *     }
     *
     *     @Bean
     *     public Docket adminApi() {
     *
     *         List pars = new ArrayList<>();
     *         ParameterBuilder token = new ParameterBuilder();
     *         token.name("token").description("用户令牌").modelRef(new ModelRef("string")).parameterType("header").required(false)
     *                 .build();
     *         pars.add(token.build());
     *         return new Docket(DocumentationType.SWAGGER_2).select().paths(regex("/admin/.*")).build()
     *                 .globalOperationParameters(pars).apiInfo(pdaApiInfo()).useDefaultResponseMessages(false)
     *                 .enable(enableSwagger)
     *                 .groupName("adminApi");
     *
     *     }
     *
     *
     * @return
     */

    @Bean
    public Docket createRestApi() {
        return new Docket(DocumentationType.SWAGGER_2).apiInfo(apiInfo()).select()
                .apis(RequestHandlerSelectors.basePackage("com.lsqingfeng.action.swagger.controller")).paths(PathSelectors.any())
                .build().globalOperationParameters(setHeaderToken());

    }

    private ApiInfo apiInfo() {
        return new ApiInfoBuilder().title("action-swagger").description("swagger实战").termsOfServiceUrl("")
                .version("1.0").build();
    }

    /**
     * @Description: 设置swagger文档中全局参数
     * @param
     * @Date: 2020/9/11 10:15
     * @return: java.util.List
     */

    private List setHeaderToken() {
        List pars = new ArrayList<>();
        ParameterBuilder userId = new ParameterBuilder();
        userId.name("token").description("用户TOKEN").modelRef(new ModelRef("string")).parameterType("header")
                .required(true).build();
        pars.add(userId.build());
        return pars;
    }
}
The above is a configuration example, and a setToken method is also set, which means that all interfaces that generate documents must contain a token parameter of header type.
The direct description of our interface document is mainly at the Controller level, such as the function of this interface, the name of the parameters, the name of the return value, etc. For these values, we need to add corresponding annotations to the methods, request parameters and return parameters on the Controller, so that swagger can help us generate the corresponding interface documents. This is the intrusion into existing code I mentioned earlier.
Let’s write a case.
First create a vo package, write our request and corresponding parameters in it, and use JavaBean to define the data structure of the request and response. Note that the corresponding annotations should be added here:
Request class:
package com.lsqingfeng.springboot.vo;
import io.swagger.annotations.ApiModel;
import io.swagger.annotations.ApiModelProperty;
import lombok.Data;
/**
 * @className: SwaggerReqVO
 * @description:
 * @author: sh.Liu
 * @date: 2022-03-22 19:19
 */
@Data
@ApiModel("创建Swagger请求参数")
public class SwaggerReqVO {

    @ApiModelProperty("id")
    private Integer id;

    @ApiModelProperty("姓名")
    private String name;

    @ApiModelProperty("性别")
    private Integer gender;
}
Response class:
package com.lsqingfeng.springboot.vo;

import io.swagger.annotations.ApiModel;
import io.swagger.annotations.ApiModelProperty;
import lombok.Data;

/**
 * @className: SwaggerResVO
 * @description:
 * @author: sh.Liu
 * @date: 2022-03-22 19:20
 */
@Data
@ApiModel("创建Swagger响应结果")
public class SwaggerResVO {

    @ApiModelProperty("id")
    private Integer id;

    @ApiModelProperty("姓名")
    private String name;

    @ApiModelProperty("性别")
    private Integer gender;

    @ApiModelProperty("啥啥")
    private String what;
}
The @ApiModel annotation and @@ApiModelProperty annotation are used here to define the entity Name and field name for easy display when generating interface documents.
Let’s look at the Controller again:
package com.lsqingfeng.springboot.controller;

import com.lsqingfeng.springboot.vo.SwaggerReqVO;
import com.lsqingfeng.springboot.vo.SwaggerResVO;
import io.swagger.annotations.Api;
import io.swagger.annotations.ApiOperation;
import org.springframework.web.bind.annotation.*;

/**
 * @className: SwaggerController
 * @description: swagger 接口测试
 * @author: sh.Liu
 * @date: 2022-03-22 19:18
 */
@RestController
@RequestMapping("/swagger")
@Api(value = "用户接口", tags = {"用户接口"})
public class SwaggerController {

    @ApiOperation("新增用户")
    @PostMapping("save")
    public String save(@RequestBody SwaggerReqVO req) {
        return "success";
    }

    @GetMapping("getById")
    @ApiOperation("根据条件查询用户")
    public SwaggerResVO getById(@RequestBody SwaggerResVO req) {
        return new SwaggerResVO();
    }
}
The @Api annotation and @ApiOperation annotation are used to mark the interface group name and interface name respectively. Now we start the project.
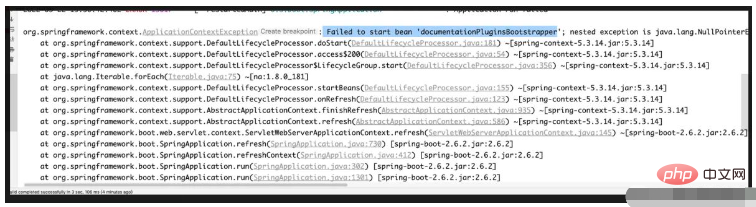
I found this error reported.
The reason for searching online is that the SpringBoot2.6 version is incompatible with Swagger2.9.2. Some people also say that it is caused by the version of the guava package being too low.
I tried them all separately, and the problem of replacing the high version dependency of guava still exists.
The main reason for this problem is indeed that the SpringBoot version is too high. If you are using SpringBoot2.5.x and earlier versions, there is no problem.
Spring Boot 2.6.X uses PathPatternMatcher to match paths. The path matching used by Springfox referenced by Swagger is based on AntPathMatcher.
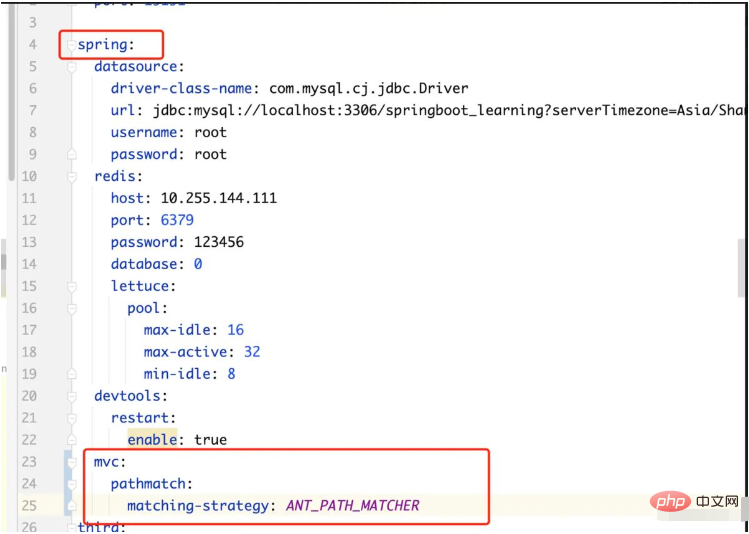
So if you want to solve it, add configuration and modify the road matching mode of springBoot MVC.
Add configuration in the springBoot configuration file:
spring.mvc.pathmatch.matching-strategy=ANT_PATH_MATCHER
If it is a configuration file in yml format:
Start again to solve the problem.
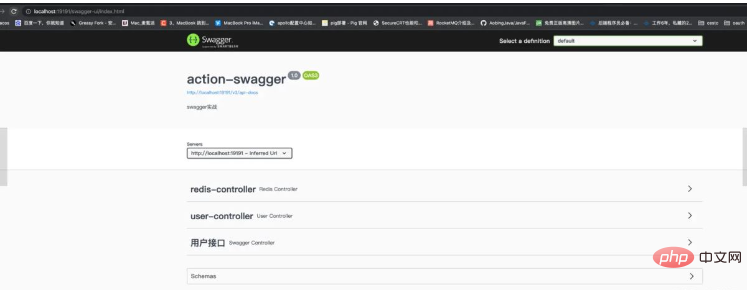
Access address: ip:port number/swagger-ui.html
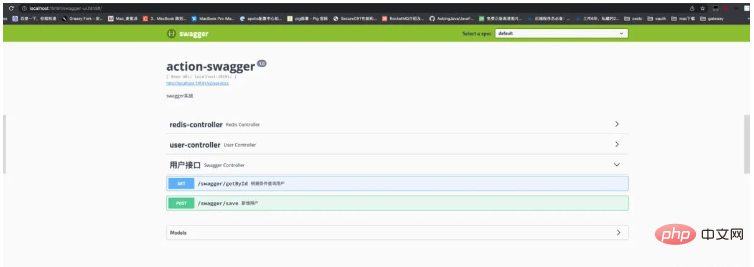
正常情况就可以看到我们的界面了。一会再说非正常情况。由于我们只给用户接口添加了注解,所有用户接口是可以直接观察中文文档的。而剩下的两个接口,由于没添加注解,所以都是以默认的形式展示的。
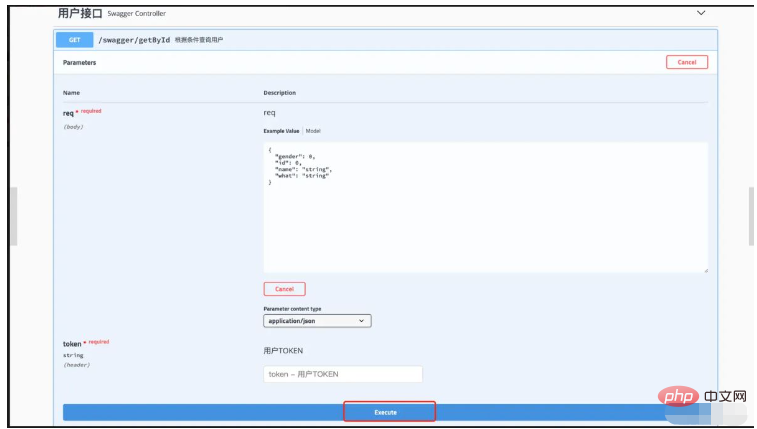
点开接口,我们可以看到接口中的想详细信息
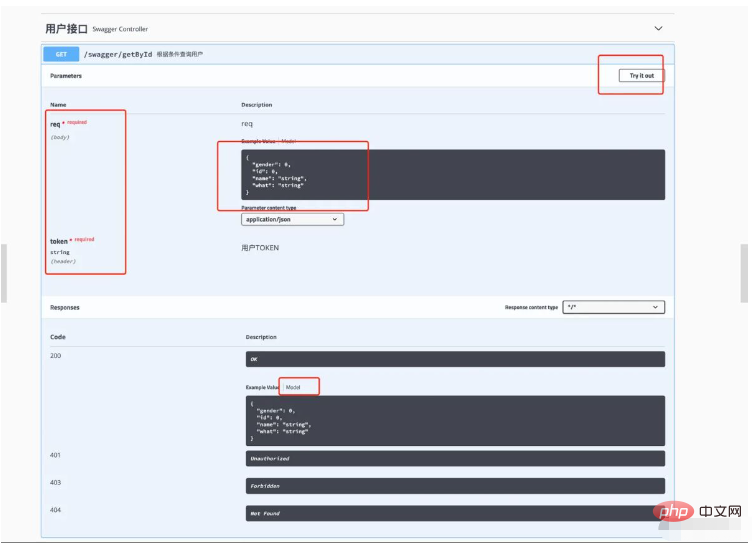
点击model,可以看到字段的中文描述。点击 Try it out,就可以直接调试接口。同时注意接口中都让填一个token,这就是我们之前的设置成效了。
截止到目前其实swagger的集成就已经完毕了,主要就是根据我们的注解生成文档,并且可以在线调用调试。开发的时候,我们只需要把Controller这一层的请求和响应,以及方法描述等内容先开发完毕,就可以提供给前端让他们参照开发了。
正常情况我们按照上面的步骤就可以出现页面,但是有些时候可能是由于springBoot的版本过高导致的,我们输入之前的地址,出现404的情况,这个主要是由于项目中无法读取到swagger依赖包下的页面导致的。如果出现了这个问题,我们可以添加一个配置类,让他实现WebMvcConfigurer 接口,在添加一个方法:
@Override
public void addResourceHandlers(ResourceHandlerRegistry registry) {
    registry.addResourceHandler("/**").addResourceLocations("classpath:/static/");
    registry.addResourceHandler("swagger-ui.html")
            .addResourceLocations("classpath:/META-INF/resources/");
    registry.addResourceHandler("/webjars/**")
            .addResourceLocations("classpath:/META-INF/resources/webjars/");
}
完整代码如下:
package com.lsqingfeng.springboot.config;

import com.lsqingfeng.springboot.interceptor.TokenInterceptor;
import org.springframework.context.annotation.Bean;
import org.springframework.context.annotation.Configuration;
import org.springframework.web.servlet.config.annotation.InterceptorRegistry;
import org.springframework.web.servlet.config.annotation.ResourceHandlerRegistry;
import org.springframework.web.servlet.config.annotation.WebMvcConfigurer;

/**
 * @className: WebMvcConfig
 * @description:webMvc配置
 * @author: sh.Liu
 * @date: 2022-01-13 09:51
 */
@Configuration
public class WebMvcConfig implements WebMvcConfigurer {


    @Override
    public void addResourceHandlers(ResourceHandlerRegistry registry) {
        registry.addResourceHandler("/**").addResourceLocations("classpath:/static/");
        registry.addResourceHandler("swagger-ui.html")
                .addResourceLocations("classpath:/META-INF/resources/");
        registry.addResourceHandler("/webjars/**")
                .addResourceLocations("classpath:/META-INF/resources/webjars/");
    }
}
这个时候在启动就可以了!
上面的整个过程已经完成了,但是生成的接口文档的页面,其实很多人不太喜欢,觉得不太符合国人的使用习惯,所有又有一些大神,提供了其他的UI测试页面。这个页面的使用还是比较广泛的。
修改方式:只需引入一个依赖包:
    com.github.xiaoymin
    swagger-bootstrap-ui
    1.9.6
然后把刚才实现的那个的那个方法再添加一条:
registry.addResourceHandler("doc.html")
                .addResourceLocations("classpath:/META-INF/resources/");
完成代码:
package com.lsqingfeng.springboot.config;

import com.lsqingfeng.springboot.interceptor.TokenInterceptor;
import org.springframework.context.annotation.Bean;
import org.springframework.context.annotation.Configuration;
import org.springframework.web.servlet.config.annotation.InterceptorRegistry;
import org.springframework.web.servlet.config.annotation.ResourceHandlerRegistry;
import org.springframework.web.servlet.config.annotation.WebMvcConfigurer;

/**
 * @className: WebMvcConfig
 * @description:webMvc配置
 * @author: sh.Liu
 * @date: 2022-01-13 09:51
 */
@Configuration
public class WebMvcConfig implements WebMvcConfigurer {

//    @Override
//    public void addInterceptors(InterceptorRegistry registry) {
//        //拦截
//        registry.addInterceptor(new TokenInterceptor())
//                .addPathPatterns("/**")
//                .excludePathPatterns("/login");
//    }

    @Override
    public void addResourceHandlers(ResourceHandlerRegistry registry) {
        registry.addResourceHandler("/**").addResourceLocations("classpath:/static/");
        registry.addResourceHandler("swagger-ui.html")
                .addResourceLocations("classpath:/META-INF/resources/");
        registry.addResourceHandler("/webjars/**")
                .addResourceLocations("classpath:/META-INF/resources/webjars/");
        registry.addResourceHandler("doc.html")
                .addResourceLocations("classpath:/META-INF/resources/");
    }
}
重新启动项目: 访问路径发生了变化:** ip:端口号/doc.html**
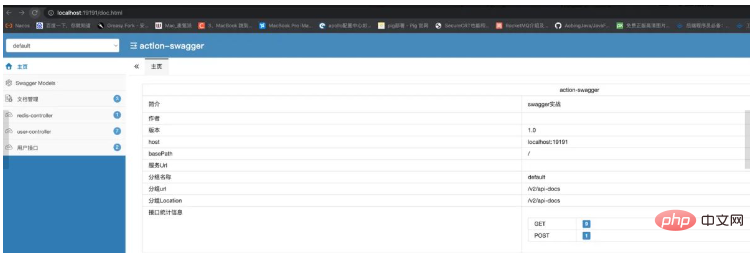
页面出现了。我们在看看我们的用户接口:
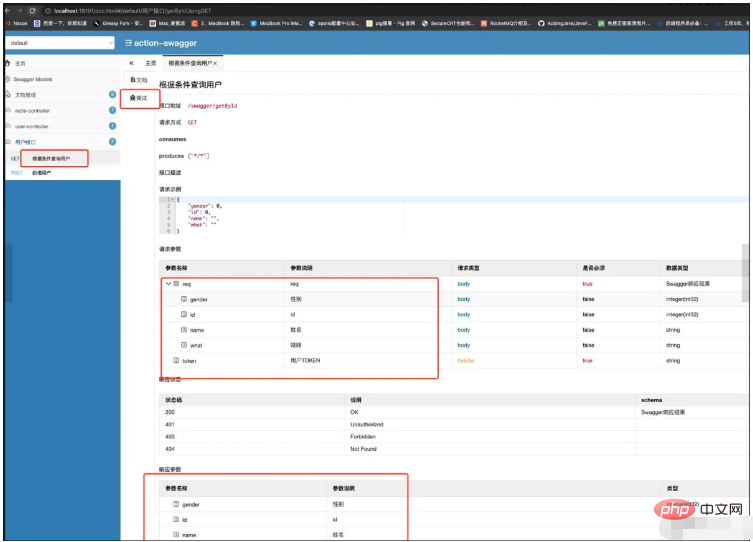
这个风格确实更加的直观,同时也是可以直接进行调试的。大部分的swagger都用的这个风格的文档。
上面已经很详细的讲解了swagger2的集成方式,而swagger3的集成方式更加的简洁一些。
首先引入依赖:
  io.springfox
  springfox-boot-starter
  3.0.0
然后是替换注解: swagger2使用的开启注解是: @EnableSwagger2
而在swagger3中,这个注解要换成: @EnableOpenApi
配置类:
import org.springframework.context.annotation.Bean;
import org.springframework.context.annotation.Configuration;
import springfox.documentation.builders.RequestHandlerSelectors;
import springfox.documentation.oas.annotations.EnableOpenApi;
import springfox.documentation.spi.DocumentationType;
import springfox.documentation.spring.web.plugins.Docket;

@Configuration
public class SwaggerConfig {
    @Bean
    public Docket createRestApi() {
        return new Docket(DocumentationType.OAS_30) // v2 不同
                .select()
                .apis(RequestHandlerSelectors.basePackage("com.example.swaggerv3.controller")) // 设置扫描路径
                .build();
    }
}
要注意,里边的版本类型换成了 OAS_30, 就是swagger3的意思。
OAS 是 OpenAPI Specification 的简称,翻译成中文就是 OpenAPI 说明书。
同时访问地址:原始地址,也就是没换UI的地址: localhost:8080/swagger-ui/index.html这个要和swagger2区分开。
swagger3的原始UI风格也发生了一些变化:
同时swagger3也是可以更换UI的。方法和swagger2一样。
如果我们的项目中有关于跨域的处理,同时还有拦截器,然后还要使用swagger,这种情况大家要注意了,有可能我们的拦截器会将swagger中的页面路径拦截掉导致swagger页面出不来,当我们在拦截器中把swagger的页面排除掉的时候,也有可能会导致跨域配置的失效。
具体解决方案简单提一下:
拦截器:
/**
 * 拦截器配置
 *
 * @author liuShuai
 */
@Configuration
public class InterceptorConfig implements WebMvcConfigurer {

    @Bean
    public TokenInterceptor tokenInterceptor() {
        return new TokenInterceptor();
    }


    @Override
    public void addInterceptors(InterceptorRegistry registry) {
        registry
                .addInterceptor(tokenInterceptor())
                .addPathPatterns("/**")
                .excludePathPatterns("/user/login")
                .excludePathPatterns("/user/downloadExcel")
                .excludePathPatterns("/swagger-resources/**", "/webjars/**", "/v2/**", "/swagger-ui.html/**");
    }

    @Override
    public void addResourceHandlers(ResourceHandlerRegistry registry) {
        registry.addResourceHandler("swagger-ui.html")
                .addResourceLocations("classpath:/META-INF/resources/");
        registry.addResourceHandler("/webjars/**")
                .addResourceLocations("classpath:/META-INF/resources/webjars/");
    }
}
跨域配置:
import org.springframework.context.annotation.Bean;
import org.springframework.context.annotation.Configuration;
import org.springframework.web.cors.CorsConfiguration;
import org.springframework.web.cors.UrlBasedCorsConfigurationSource;
import org.springframework.web.filter.CorsFilter;

/**
 * @className: CorsConfig
 * @description:
 * @author: sh.Liu
 * @date: 2020-12-02 10:16
 */
@Configuration
public class CorsConfig {

    @Bean
    public CorsFilter corsFilter() {
        CorsConfiguration config = new CorsConfiguration();
        config.addAllowedOrigin("*");
        config.setAllowCredentials(true);
        config.addAllowedMethod("*");
        config.addAllowedHeader("*");
        UrlBasedCorsConfigurationSource configSource = new UrlBasedCorsConfigurationSource();
        configSource.registerCorsConfiguration("/**", config);
        return new CorsFilter(configSource);
    }
}
用这两种方式去配置,就可以让他们和平共处了。
另: 配套项目代码已托管中gitCode: gitcode.net/lsqingfeng/…
分支: feautre/MybatisPlus
The above is the detailed content of SpringBoot integrated swagger example analysis. For more information, please follow other related articles on the PHP Chinese website!