

If it is a normal Maven project, you need to add it manually.
jar


    org.springframework.boot
    spring-boot-starter-parent
    2.3.3.RELEASE


        org.springframework.boot
        spring-boot-starter-web


        org.springframework.boot
        spring-boot-starter-test
        test


        org.projectlombok
        lombok
        provided
If it is a normal Maven project, it needs to be added manually.
@SpringBootApplication
public class xxxApplication {
    public static void main(String[] args) {
        SpringApplication.run(xxxApplication.class, args);
    }
}
Copy all the java code in src\main\java to src\main\java in the new project.
Copy the directory where mapper.xml is stored in src\main\resources to src\main\resources in the new project.
What to copy in the following steps
    mysql
    mysql-connector-java
    runtime
You also need jdbc dependencies (transactions)
application.properties
spring.datasource.driver-class-name=com.mysql.jdbc.Driver
spring.datasource.url=jdbc:mysql:///数据库库名?useUnicode=true&characterEncoding=utf8&serverTimezone=GMT%2B8
spring.datasource.username=root
spring.datasource.password=admin
At this time, the database connection pool object obtained by running the test can be executed successfully, and we see the connection pool used It's Hikari, the full name is Hikaricp.
In fact, after Spring Boot 2.0, the default connection pool used is Hikari, which is known as "the fastest connection pool in history", so we can use it directly without adding dependencies. Spring Boot The automatic configuration contains the DataSourceAutoConfiguration configuration class. It will first check whether there is a connection pool object in the container. If not, the default connection pool will be used and the connection pool object will be automatically configured according to specific properties. The property values used come from DataSourceProperties object.
Of course, if we still want to use Druid as the connection pool in the project, it is also possible. You only need to add dependencies. What is added at this time is the druid-spring-boot-starter automatic configuration package of Druid, which contains the DruidDataSourceAutoConfigure automatic configuration class, which will automatically create the Druid connection pool object, so Spring If Boot finds that there is already a connection pool object, it will no longer use Hikari.
    com.alibaba
    druid-spring-boot-starter
    1.1.21
Note: If the added dependency is the previous ordinary package, which only depends on Druid itself and is not an automatic configuration package, the following configuration is required:
    com.alibaba
    druid
    1.1.19
Add parameters in the configuration file
spring.datasource.type=com.alibaba.druid.pool.DruidDataSource
So generally if Spring Boot-related automatic configuration packages have been provided, it will be more convenient to use automatic configuration directly.
For Hikari and Druid, both are open source products. Alibaba’s Druid has a Chinese open source community, which makes communication more convenient and has been tested by multiple Alibaba systems. The experiment is also very stable, and Hikari is the default connection pool of Spring Boot 2.0. It is also widely used around the world. For most businesses, it is almost the same which one to use. After all, the performance bottleneck is generally not in the connection pool. .
    org.mybatis.spring.boot
    mybatis-spring-boot-starter
    1.3.1
Scan Mapper interfaceJust configure any class in ##Post a comment@MapperScan and specify the package path to be scanned.
@SpringBootApplication
@MapperScan("cn.xxx.mapper")
public class SsmApplication {
    public static void main(String[] args) {
        SpringApplication.run(SsmApplication.class, args);
    }
}
MyBatis configuration properties Configure those MyBatis properties previously configured in XML in application.properties, with the property prefix mybatis. # 配置别名 mybatis.type-aliases-package=cn.xxx.domain # 打印 SQL 日志 logging.level.cn.xxx.mapper=traceTransaction managementAdd dependency
    org.springframework.boot
    spring-boot-starter-jdbc
business layer implementation class or directly on its method Just post the @Transactional comment.
@Transactional annotation can be used directly.
spring.aop.proxy-target-class=falseTest verificationAdd a method to the test class and print the business object to see its true type.
@Test
public void testSave() {
    System.out.println(departmentService.getClass());
}
Integrated WebAdd dependenciesorg.springframework.boot spring-boot-starter-web
server.port=80Directory structureCopy static resources and template files
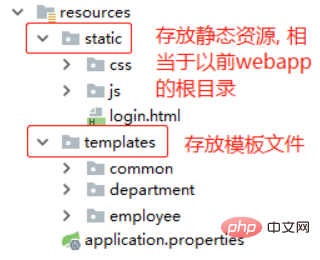
# 告诉 Spring Boot 必须要以怎样的路径开头才能访问到静态资源,这样做是为了后期如果需要拦截,拦截器可以统一排除掉这些以这个开头的访问
spring.mvc.static-path-pattern=/static/**
Front-end controller mapping path configurationIn Spring Boot automatic configuration, the WebMvcAutoConfiguration automatic configuration class imports the DispatcherServletAutoConfiguration configuration object, and the DispatcherServlet front-end controller will be automatically created. The default mapping path is /. Spring Boot is mostly used for front-end and back-end separation and microservice development. It supports the RESTFul style by default, so generally the default can be used without making changes.
# 在匹配模式时是否使用后缀模式匹配(严格匹配后缀)一般前后端分离做严格区分时配置
spring.mvc.pathmatch.use-suffix-pattern=true
    org.springframework.boot
    spring-boot-starter-thymeleaf
# Thymelea 模板配置
spring.thymeleaf.prefix=classpath:/templates/
spring.thymeleaf.suffix=.html
spring.thymeleaf.mode=HTML
spring.thymeleaf.encoding=UTF-8
# 上面几个配置都是默认值不需要配置

# 热部署文件,页面不产生缓存,及时更新(开发时禁用缓存)
spring.thymeleaf.cache=false
使用 Thymeleaf 的语法替换之前 JSP 中的 EL 表达式和 JSTL。
Spring Boot 默认情况下,会把所有错误都交给 BasicErrorController 类完成处理,错误的视图我们放到 classpath:/static/error/ 和 classpath:/templates/error/ 路径上,HTTP 错误状态码就是默认视图的名称。如:
出现 404 错误 -> classpath:/static/error/404.html
出现 5xx 错误 -> classpath:/static/error/5xx.html (因为 5xx 错误是后台错误, 原因很多种, 有时有需求需要根据原因不一样响应不同的内容, 甚至响应数据格式都不一样,所以我们一般都用统一异常处理,然后再根据错误原因把对应内容放到页面上)
自己定义一个控制器增强器,专门用于统一异常处理,该方式一般用于处理 5xx 类错误。
@ControllerAdvice
// 控制器消息,这个注解为了spring帮我们创建对象
public class ExceptionControllerAdvice {
    @ExceptionHandler(RuntimeException.class) // 处理什么类型的异常
    //返回值形式也可以自定义,可以返回modelAndView,
    public String handlException(RuntimeException e, Model model,HandlerMethod m) {
    	//HandlerMethod这个对象存放了spring对控制器的方法和控制器对象
    	//将错误信息存入到model中
        e.printStackTrace(); // 记得这行代码保留,不然项目后台出异常,开发工具控制台看不到错误信息
        return "errorView"; // 指定错误页面视图名称,然后在页面从model对象中拿到错误信息
    }
}定义一个配置类,实现 WebMvcConfigurer 接口,在 addInterceptors 方法注册拦截器。
@Configuration
public class MvcJavaConfig implements WebMvcConfigurer {

    @Autowired
    private LoginInterceptor loginInterceptor;
    //拦截器类实现HandlerInterceptor

    @Autowired
    private PermissionInterceptor permissionInterceptor;
    //拦截器类实现HandlerInterceptor

    public void addInterceptors(InterceptorRegistry registry) {
        // 注册登录拦截器
        registry.addInterceptor(loginInterceptor)
            // 对哪些资源起过滤作用
            .addPathPatterns("/**")
            // 对哪些资源起排除作用
            .excludePathPatterns("/login", "/static/**");//多个路径

		//多个拦截器
        // 注册权限拦截器
        registry.addInterceptor(permissionInterceptor)
            // 对哪些资源起过滤作用
            .addPathPatterns("/**")
            // 对哪些资源起排除作用
            .excludePathPatterns("/login", "/static/**");
    }
}比起 System.out.println,日志框架更为灵活,可以把日志的输出和代码分离。
日志框架可以方便的定义日志的输出环境,控制台,文件,数据库。
日志框架可以方便的定义日志的输出格式和输出级别。
Spring Boot 默认已经开启日志,其默认的日志格式为:时间 日志级别 线程ID 线程名称 日志类 日志说明。
Spring Boot 的日志分为:系统日志和应用日志。
日志级别,级别越高,输出的内容越少,如果设置的级别为 info,则 debug 以及 trace 级别的都无法显示,日志级别由低到高 trace
Spring Boot 默认选择 Logback 作为日志框架,也能选择其他日志框架,但是没有必要。
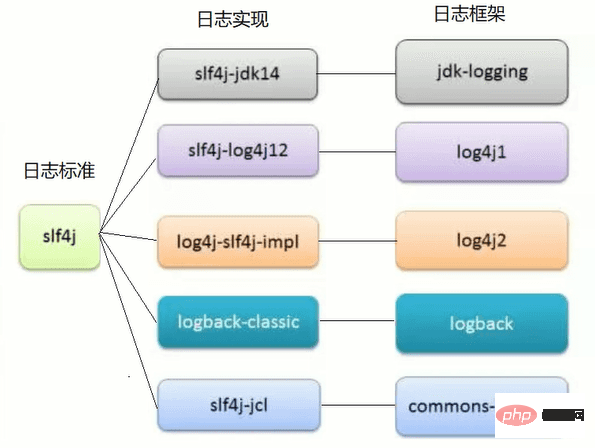
由于slf4j是后来出现的日志标准,目的是统一之前很多日志框架的使用方式,对主流的日志框架主动的实现了这个标准,实际就是调用各日志框架的api
在我们自定义的类中可以使用日志框架来输出。
在类中注入一个静态 Logger 对象,传入当前类的作用是方便输出日志时可以清晰地看到该日志信息是属于哪个类的。
private static final Logger log = LoggerFactory.getLogger(当前类.class);
使用 Lombok 提供的 @Slf4j 注解来简化代码,其实和方式一的作用是一样的。
@Slf4j
@Service
public class PermissionServiceImpl implements IPermissionService {}
在需要输出日志的地方使用日志的输出方法
log.info(...);
log.error(...);
...
// 输出日志中有变量可以使用 {} 作为占位符
log.info("删除id为{}的数据", id);日志级别由低到高 trace
log.debug("权限插入成功:{}",expression);
log.info("权限插入成功:{}",expression);
log.warn("权限插入成功:{}",expression);
执行权限加载功能后,发现控制台出现 info 与 warn 的信息,debug 的没有显示,原因是因为 Spring Boot 默认的日志级别是 info,所以 debug 低于 info 级别,就不会显示出来了。

若要修改日志显示级别,最快速的方式是在 application.properties 配置,配置如下
# 把日志级别修改为 debug,不过我们一般不会更改,除非要调试找 bug,不然控制台显示的内容太多也容易乱,下面为全局配置,单路径配置如打印 SQL 日志 logging.level.cn.xxx.mapper=trace
logging.level.root=debug
Logback 框架默认会自动加载 classpath:logback.xml,作为框架的配置文件,在 Spring Boot项目中使用时,还会额外的支持自动加载classpath:logback-spring.xml,在 Spring Boot 项目中推荐使用 logback-spring.xml,功能更强大些。
    ${appName}


            %d{yyyy-MM-dd-HH:mm:ss} %level [%thread]-%logger{35} >> %msg %n


            %-4relative [%thread] %level %logger{35} - %msg %n

        true
        MyLog.log
参考日志格式:
%d{yyyy-MM-dd-HH:mm:ss} %level [%thread]-%class:%line >> %msg %n
格式中的标识符组成:
%logger{n}:输出 Logger 对象类名,n 代表长度
%class{n}:输出所在类名
%d{pattern} 或者 date{pattern}:输出日志日期,格式同 Java
%L/line:日志所在行号
%m/msg:日志内容
%method:所在方法名称
%p/level:日志级别
%thread:所在线程名称
一般开发过程,日志记录到控制台
实际上线了, 日志一般记录到文件中
Spring Boot 提供了一些扩展点,比如修改 banner:在 resources 根目录中放入 banner.txt 文件,替换默认的启动spring打印的字样。
# application.properties
# 关闭 banner
spring.main.banner-mode=off
除了使用 JRebel 插件(收费)来实现热部署,还可以使用 Spring Boot 提供的 spring-boot-devtools 包来完成 Springboot 应用热部署,从而实现更改方法内代码和模板文件不需要重启,只需要点击编译即可。
    org.springframework.boot
    spring-boot-devtools
Spring Boot 重启是 reload 重启,通过监控 classpath 的变化,如果 classpath 中的文件发生变化,即触发重启。Spring Boot 通过两个 classpath 来完成 reload,一个 basic classloader 中加载不变的类(jar 包中的类),一个 restart classloader 中加载 classpath 中的类(自己写的类),重启的时候,restart classloader 中的类丢弃并重新加载。
下面是相关的一些配置,一般不用配置
# 默认排除不需要更新的资源
spring.devtools.restart.exclude=static/**,templates/**,public/**

# 增加额外的排除资源
# 处理默认配置排除之外的
spring.devtools.restart.additional-exclude=public/**

# 禁用自动重启
spring.devtools.restart.enabled=false
在实际开发中,一个系统是有多套运行环境的,如开发时有开发的环境,测试时有测试的环境,不同的环境中,系统的参数设置是不同的,如:连接开发数据和测试数据库的 URL 绝对是不同的,那么怎么快速的切换系统运行的环境呢?我们需要为不同的环境创建不同的配置文件,如下:
# application-dev.properties
server.port=8081
# application-test.properties
server.port=8082
最后我们在 application.properties 中指定需要使用的环境即可
# 在 application.properties 中指定需要使用的环境即可
spring.profiles.active=dev
在命令行模式下启动也可以激活: java -jar xxx --spring.profiles.active=dev
The above is the detailed content of What is the method for ssm to transform spring boot project?. For more information, please follow other related articles on the PHP Chinese website!