

Abstract: In project development, it is often expected to achieve front-end and back-end separation. That is to say, back-end developers often need to output a large number of service interfaces. Whether the interface provider is a language such as Java or PHP, it often costs a certain amount of money. Spend more energy to write interface documents, such as the address of the A interface, the parameters that need to be passed, the JSON data format of the return value, and the description of each field. Of course, you must also consider the HTTP request header, request content and other information. As the project progresses and iterates rapidly, the interfaces output by the backend often face modifications, repairs and other problems, which also means that the interface documents must also be adjusted accordingly. The maintainability and readability of interface documents are greatly reduced.
Since interface documents require effort to maintain and proper face-to-face communication, why don’t we think of a way, first: there is no need to write interface documents; second: front-end and back-end communication interface issues At this time, can the backend provide a URL, in which all the service interfaces that can be called are listed, and in each service interface are listed the description of the parameters and the description of the return value. Third: if the backend interface Being able to simulate calls solves all problems. In this article, we focus on integrating the Swagger2 framework in Sringboot.
1.1. Add Swagger2 dependency
Add the following dependencies in the project's pom.xml file.
 io.springfox
 springfox-swagger2
 2.7.0


 io.springfox
 springfox-swagger-ui
 2.7.0
First, we need to create a startup class, the code is as follows:
@SpringBootApplication
public class Application {
 public static void main(String[] args) {
 SpringApplication.run(Application.class, args);
 }
}
Then create a new swagger2 configuration class in the directory of the same level as the above class as follows:
@Configuration
@EnableSwagger2
public class Swagger2 {
  @Bean
  public Docket createRestApi() {
    return new Docket(DocumentationType.SWAGGER_2)
        .apiInfo(apiInfo())
        .select()
        .apis(RequestHandlerSelectors.basePackage("com.shareniu.web"))
        .paths(PathSelectors.any())
        .build();
  }
  private ApiInfo apiInfo() {
    return new ApiInfoBuilder()
        .title("跟着分享牛学习Springboot源码分析系列课程")
        .description("更多Spring Boot相关文章请关注分享牛的博客")
        .termsOfServiceUrl("http://www.shareniu.com/")
        .contact("牛牛")
        .license("Copyright 2017-2018 分享牛")
        .version("1.0")
        .build();
  }
}
@Configuration specifies that spring should load this class, and the @EnableSwagger2 annotation should enable the Swagger function.
The above ApiInfo will eventually be displayed on the front end. We use the scanning package method to configure the configuration, which is RequestHandlerSelectors.basePackage. The controllers in this package and sub-packages ultimately generate API documentation. (Except requests specified by the @ApiIgnore annotation).
1.2. Add new document description
After the above class declaration, we can actually call it directly, but in order to increase the readability of the document, we still need to Add some instructions to the interface. Let's first write a controller as follows:
@RestController
@RequestMapping(value="/users")
public class UserController {
  static Map users = Collections.synchronizedMap(new HashMap());
  static {
   User user = new User();
   user.setAge(18);
   user.setId(1L);
   user.setName("aa");
   users.put(1L, user);
  }
  @ApiOperation(value="获取所有用户列表", notes="")
  @RequestMapping(value={""}, method=RequestMethod.GET)
  public List getUserList() {
    List r = new ArrayList(users.values());
    return r;
  }
  @ApiOperation(value="创建新的用户", notes="根据User对象创建用户")
  @ApiImplicitParam(name = "user", value = "用户详细实体user", required = true, dataType = "User")
  @RequestMapping(value="", method=RequestMethod.POST)
  public String postUser(@RequestBody User user) {
    users.put(user.getId(), user);
    return "success";
  }
  @ApiOperation(value="获取用户详细信息", notes="根据url的id来获取用户详细信息")
  @ApiImplicitParam(name = "id", value = "用户ID", required = true, dataType = "Long")
  @RequestMapping(value="/{id}", method=RequestMethod.GET)
  public User getUser(@PathVariable Long id) {
    return users.get(id);
  }
  @ApiOperation(value="更新用户详细信息", notes="根据url的id来指定更新对象")
  @ApiImplicitParams({
      @ApiImplicitParam(name = "id", value = "用户ID", required = true, dataType = "Long"),
      @ApiImplicitParam(name = "user", value = "用户详细实体user", required = true, dataType = "User")
  })
  @RequestMapping(value="/{id}", method=RequestMethod.PUT)
  public String putUser(@PathVariable Long id, @RequestBody User user) {
    User u = users.get(id);
    u.setName(user.getName());
    u.setAge(user.getAge());
    users.put(id, u);
    return "success";
  }
  @ApiOperation(value="删除已存在的用户", notes="根据url的id来指定删除对象")
  @ApiImplicitParam(name = "id", value = "用户ID", required = true, dataType = "Long")
  @RequestMapping(value="/{id}", method=RequestMethod.DELETE)
  public String deleteUser(@PathVariable Long id) {
    users.remove(id);
    return "success";
  }
}
@ApiOperation: Used to describe the function of the interface. You can use this annotation to describe the responsibilities of the interface, return header information, method request method ("GET", "HEAD", "POST", "PUT", "DELETE", "OPTIONS" and "PATCH"), protocol (http , https, ws, wss), http status code.
@ApiImplicitParam: used to add descriptions to parameters. You can set the name of the parameter, whether it is a required item, the description information of the parameter, whether it is read-only, etc.
After the above code is submitted, start springboot and visit http://127.0.0.1:8080/swagger-ui.html
for two parts, the upper part is through the Swagger2 class After configuration, the lower part is the interface document in the UserController class.
Here we take /user as an example:
Click /user as shown below:
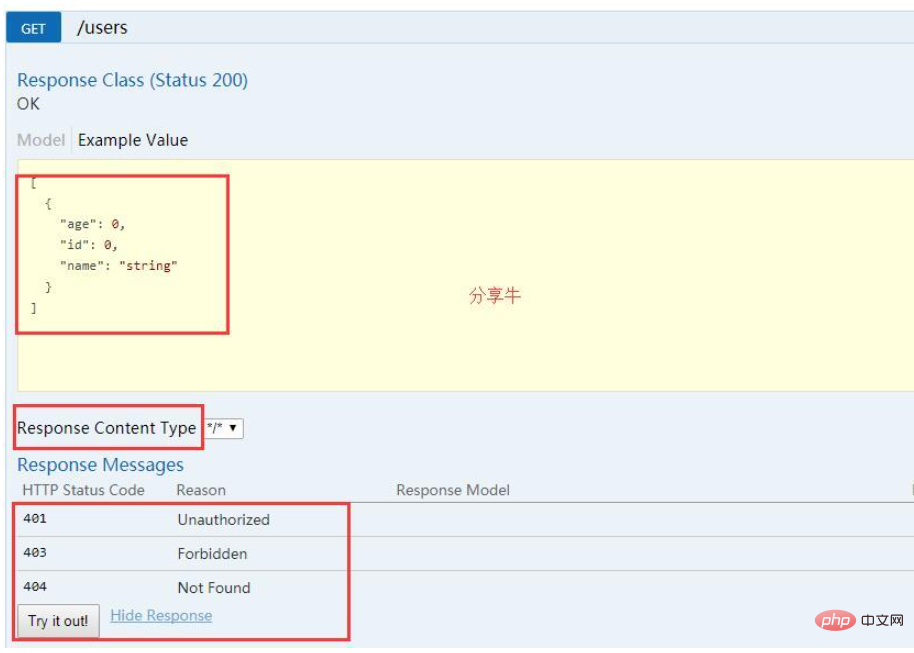
Above picture The yellow area indicates the sample data returned by the interface. That is the data structure of User. Response Content Type: Header information returned by the interface. Click Try it out. As shown below:
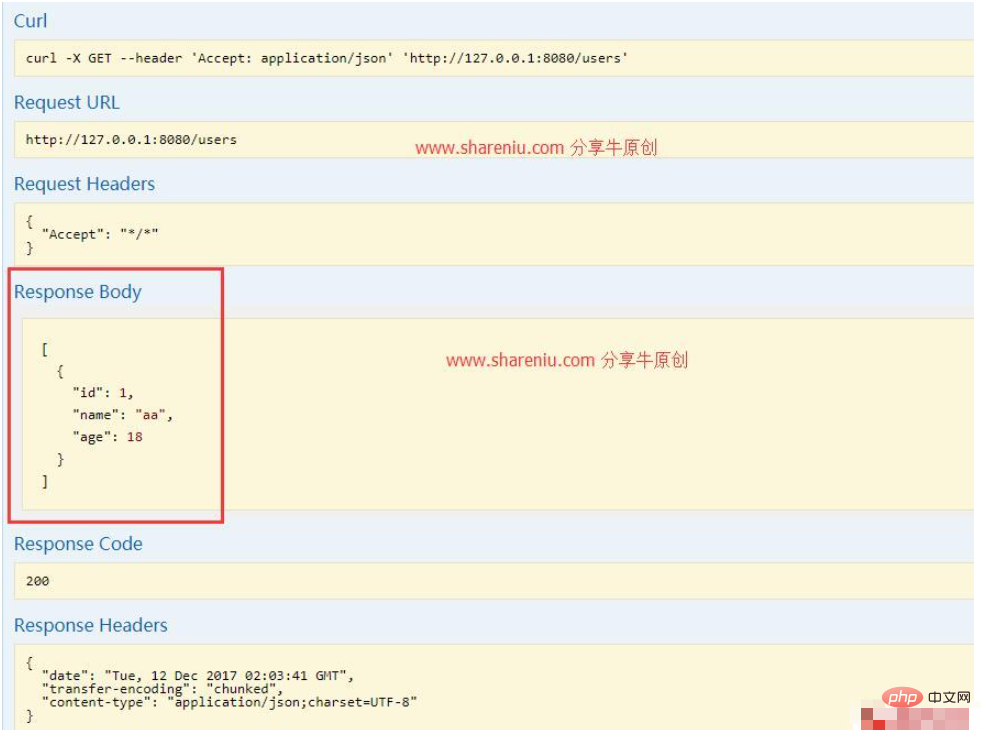
The baody, code code, and response header returned by this interface have been returned successfully.
The above is the detailed content of How to integrate the Swagger2 framework in Springboot. For more information, please follow other related articles on the PHP Chinese website!