

Spring Security is a core project of Spring. It is a powerful and highly customizable authentication and access control framework. It provides authentication and authorization capabilities as well as protection against common attacks, and it has become the de facto standard for protecting spring-based applications.
Spring Boot provides automatic configuration, which can be used by introducing starter dependencies.
Summary of Spring Security features:
Easy to use, provides Spring Boot starter dependencies, and is easy to integrate with Spring Boot projects.
Professional, providing CSRF protection, clickjacking protection, XSS protection, etc., and providing various security header integrations (X-XSS-Protection, X-Frame-Options, etc.).
Password encrypted storage, supports multiple encryption algorithms
Extremely scalable and customizable
OAuth3 JWT authentication support
Note that this article demonstrates the use of JDK and Spring Boot versions as follows:Add the following dependencies to the pom.xml file of the Spring Boot project:Spring Boot: 2.7.2
JDK: 11
Different Spring Boot versions have different configurations, but the principles are the same.
The above two dependencies are enough. 4. Configure Spring Security to use JWT authenticationorg.springframework.boot spring-boot-starter-security org.springframework.boot spring-boot-starter-oauth3-resource-server
Mainly configures HttpSecurity Bean to generate SecurityFilterBean. The configuration is as follows:Note: Different Spring Boot versions have different configurations, but the principle is the same. This article uses Spring Boot: 2.7.2.
import com.nimbusds.jose.jwk.JWK;
import com.nimbusds.jose.jwk.JWKSet;
import com.nimbusds.jose.jwk.RSAKey;
import com.nimbusds.jose.jwk.source.ImmutableJWKSet;
import com.nimbusds.jose.jwk.source.JWKSource;
import com.nimbusds.jose.proc.SecurityContext;
import org.springframework.beans.factory.annotation.Value;
import org.springframework.context.annotation.Bean;
import org.springframework.context.annotation.Configuration;
import org.springframework.security.config.annotation.method.configuration.EnableMethodSecurity;
import org.springframework.security.config.annotation.web.builders.HttpSecurity;
import org.springframework.security.config.http.SessionCreationPolicy;
import org.springframework.security.oauth3.jwt.JwtDecoder;
import org.springframework.security.oauth3.jwt.JwtEncoder;
import org.springframework.security.oauth3.jwt.NimbusJwtDecoder;
import org.springframework.security.oauth3.jwt.NimbusJwtEncoder;
import org.springframework.security.oauth3.server.resource.authentication.JwtAuthenticationConverter;
import org.springframework.security.oauth3.server.resource.authentication.JwtGrantedAuthoritiesConverter;
import org.springframework.security.oauth3.server.resource.web.BearerTokenAuthenticationEntryPoint;
import org.springframework.security.oauth3.server.resource.web.access.BearerTokenAccessDeniedHandler;
import org.springframework.security.web.SecurityFilterChain;

import java.security.interfaces.RSAPrivateKey;
import java.security.interfaces.RSAPublicKey;

/**
 * Spring Security 配置
 *
 * @author cloudgyb
 * @since 2022/7/30 18:31
 */
@Configuration(proxyBeanMethods = false)
@EnableMethodSecurity
public class WebSecurityConfigurer {
    //使用RSA对JWT做签名,所以这里需要一对秘钥。
    //秘钥文件的路径在application.yml文件中做了配置(具体配置在下面)。
    @Value("${jwt.public.key}")
    private RSAPublicKey key;
    @Value("${jwt.private.key}")
    private RSAPrivateKey priv;

     /**
      * 构建SecurityFilterChain bean
      */
    @Bean
    SecurityFilterChain defaultSecurityFilterChain(HttpSecurity http) throws Exception {
        //"/login"是系统的登录接口,所以需要匿名可访问
        http.authorizeRequests().antMatchers("/login").anonymous();
        //其他请求都需认证后才能访问
        http.authorizeRequests().anyRequest().authenticated()
                .and()

                //采用JWT认证无需session保持,所以禁用掉session管理器
                .sessionManagement().sessionCreationPolicy(SessionCreationPolicy.STATELESS).and()
                //login接口可能来自其他站点,所以对login不做csrf防护
                .csrf((csrf) -> csrf.ignoringAntMatchers("/login"))
                //配置认证方式为JWT,并且配置了一个JWT认证装换器,用于去掉解析权限时的SCOOP_前缀
                .oauth3ResourceServer().jwt().jwtAuthenticationConverter(
                        JwtAuthenticationConverter()
                );
        //配置认证失败或者无权限时的处理器
        http.exceptionHandling((exceptions) -> exceptions
                .authenticationEntryPoint(new BearerTokenAuthenticationEntryPoint())
                .accessDeniedHandler(new BearerTokenAccessDeniedHandler())
        );
         //根据配置生成SecurityFilterChain对象
        return http.build();
    }


    /**
     * JWT解码器,用于认证时的JWT解码
     */
    @Bean
    JwtDecoder jwtDecoder() {
        return NimbusJwtDecoder.withPublicKey(this.key).build();
    }
    /**
     * JWT编码器,生成JWT
     */
    @Bean
    JwtEncoder jwtEncoder() {
        JWK jwk = new RSAKey.Builder(this.key).privateKey(this.priv).build();
        JWKSource jwks = new ImmutableJWKSet<>(new JWKSet(jwk));
        return new NimbusJwtEncoder(jwks);
    }

    /**
     * JWT认证解码时,去掉Spring Security对权限附带的默认前缀SCOOP_
     */
    @Bean
    JwtAuthenticationConverter JwtAuthenticationConverter() {
        final JwtGrantedAuthoritiesConverter jwtGrantedAuthoritiesConverter = new JwtGrantedAuthoritiesConverter();
        jwtGrantedAuthoritiesConverter.setAuthorityPrefix("");
        final JwtAuthenticationConverter jwtAuthenticationConverter = new JwtAuthenticationConverter();
        jwtAuthenticationConverter.setJwtGrantedAuthoritiesConverter(jwtGrantedAuthoritiesConverter);
        return jwtAuthenticationConverter;
    }
}
application.yml
jwt:
  private.key: classpath:app.key
  public.key: classpath:app.pub
The above configuration needs to be done in Spring Boot Generate a pair of RSA keys in the project's Resource directory.
You can use the following website to generate: http://tools.jb51.net/password/rsa_encode/,
Note: The key format uses PKCS#8, and the private key password is empty.
There is one more thing that needs to be explained. I used Spring Boot’s value injection in the code: @Value("${jwt.public.key}")
private RSAPublicKey key;
@Value("${jwt.private.key}")
private RSAPrivateKey priv;
Are you curious about what Spring Boot is? How to convert the file corresponding to the string in the yaml file to RSAPublicKey and RSAPrivateKey?So far our project has supported JWT authentication.In fact, Spring Security did the processing for us. It helped us implement a converter ResourceKeyConverterAdapter in Spring Security. You can read the relevant source code for a deeper understanding.
But the user needs to carry a legal JWT in the request header Authorization to pass the authentication and then access the server resources. So how to issue a legal JWT to the user?
It's very simple. You can provide a login interface, let the user enter the user name and password, and issue the token after successful matching.
In fact, this is not necessary. There are other ways. For example, when we call a third-party interface, our usual approach is to apply to the third party first. After the application is approved, we can get a token. This process is the same as the issuance of a token after the login is passed above. Both of them obtain a token through legal means!5. Implement the login interface The login interface has only one purpose, which is to issue tokens to legitimate users!
Login API interface:
@RestController
public class SysLoginController {
    private final SysLoginService sysLoginService;

    public SysLoginController(SysLoginService sysLoginService) {
        this.sysLoginService = sysLoginService;
    }

    @PostMapping("/login")
    public String login(@RequestBody LoginInfo loginInfo) {
        return sysLoginService.login(loginInfo);
    }
}
Login logic implementation: @Service
public class SysLoginService {
private final JwtEncoder jwtEncoder;
private final SpringSecurityUserDetailsService springSecurityUserDetailsService;
public SysLoginService(JwtEncoder jwtEncoder, SpringSecurityUserDetailsService springSecurityUserDetailsService) {
this.jwtEncoder = jwtEncoder;
this.springSecurityUserDetailsService = springSecurityUserDetailsService;
}
public String login(LoginInfo loginInfo) {
//从用户信息存储库中获取用户信息
final UserDetails userDetails = springSecurityUserDetailsService.loadUserByUsername(loginInfo.getUsername());
final String password = userDetails.getPassword();
//匹配密码,匹配成功生成JWT令牌
if (password.equals(loginInfo.getPassword())) {
return generateToken(userDetails);
}
//密码不匹配,抛出异常,Spring Security发现抛出该异常后会将http响应状态码设置为401 unauthorized
throw new BadCredentialsException("密码错误!");
}
private String generateToken(UserDetails userDetails) {
Instant now = Instant.now();
//JWT过期时间为36000秒,也就是600分钟,10小时
long expiry = 36000L;
String scope = userDetails.getAuthorities().stream()
.map(GrantedAuthority::getAuthority)
.collect(Collectors.joining(" "));
//将用户权限信息使用空格分割拼为字符串,放到JWT的payload的scope字段中,注意不要改变scope这个属性,这是Spring Security OAuth3 JWT默认处理方式,在JWT解码时需要读取该字段,转为用户的权限信息!
JwtClaimsSet claims = JwtClaimsSet.builder()
.issuer("self")
.issuedAt(now)
.expiresAt(now.plusSeconds(expiry))
.subject(userDetails.getUsername())
.claim("scope", scope)
.build();
return this.jwtEncoder.encode(JwtEncoderParameters.from(claims)).getTokenValue();
}
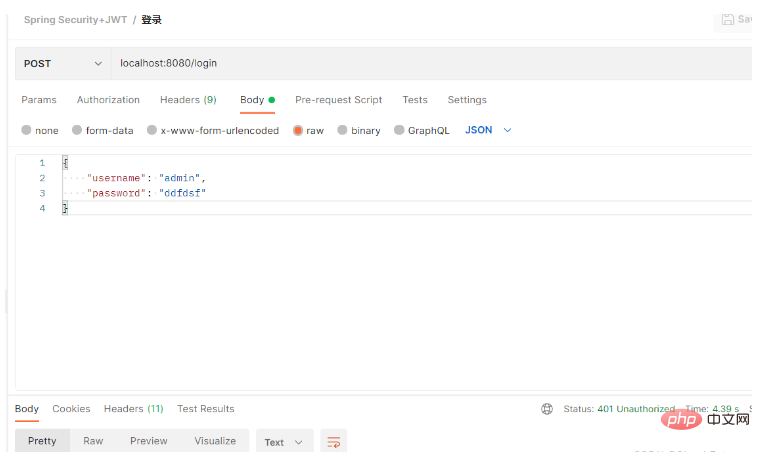
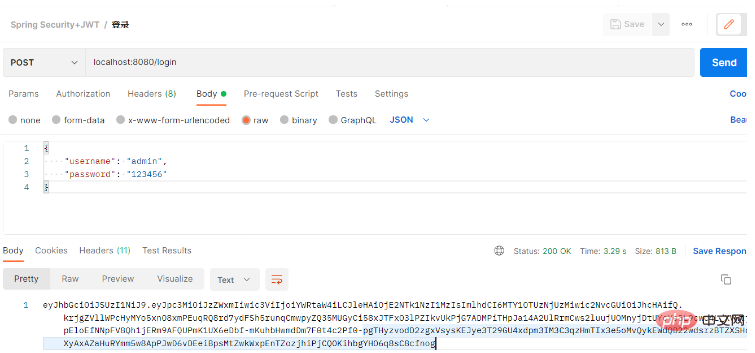
}Other non-core code will not be posted here. I put the code on github. For details, you can go to https ://github.com/cloudgyb/spring-security-study-jwt. 6. TestUse postman to test: Using the wrong password will return a 401 Unauthorized status code, indicating that our authentication failed!
I wrote a test interface:
@RestController
public class HelloController {

    @GetMapping("/")
    @PreAuthorize("hasAuthority('test')")
    public String hello(Authentication authentication) {
        return "Hello, " + authentication.getName() + "!";
    }
}
This interface requires the user to have "test" permission, but the logged-in user does not have this permission (only one app permission). At this time, the interface is called: First paste the token obtained from the previous login step into the token:
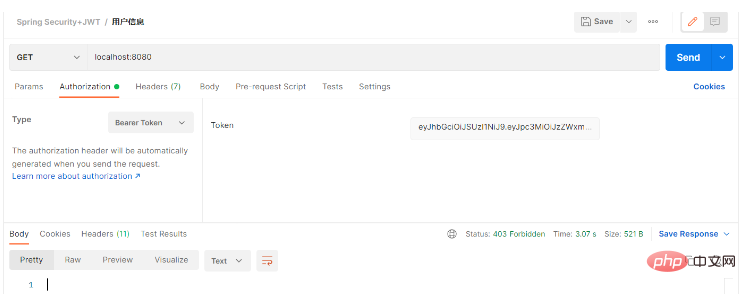
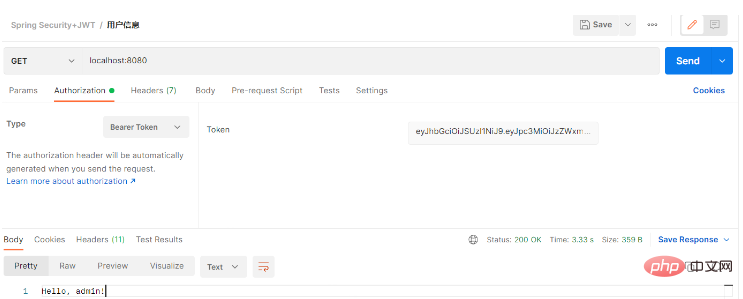
我们发送请求得到了403 Forbidden的响应,意思就是我们没有访问权限,此时我们将接口权限改为“app”:
@RestController
public class HelloController {

    @GetMapping("/")
    @PreAuthorize("hasAuthority('app')")
    public String hello(Authentication authentication) {
        return "Hello, " + authentication.getName() + "!";
    }
}
重启项目。再次发起请求:
The above is the detailed content of How to use SpringBoot+SpringSecurity+JWT to implement system authentication and authorization. For more information, please follow other related articles on the PHP Chinese website!