

Use a for loop to insert data one by one; generate an insertion sql, similar to this insert into user(name,pwd) values('aa','123 '),('cc','123')...
The advantage of this solution is that in JDBC PreparedStatement has a pre-compilation function and will be cached after pre-compilation. Afterwards, SQL execution will be faster, and JDBC can enable batch processing. This batch processing execution is very powerful.
The disadvantage is that in many cases our SQL server and application server may not be the same, so network IO must be considered. If network IO is time-consuming, it may slow down SQL execution.
The advantage of this option is that there is only one network IO. Even sharding is only a few network IOs, so this solution doesn't spend too much time on network IO.
Of course, this solution also has disadvantages. First, the SQL is too long, and may even require batch processing after sharding; second, the advantages of PreparedStatement pre-compilation cannot be fully utilized, and the SQL must be re-parsed and cannot be reused; third, the final generated SQL is too long, and the database manager must parse it. Such a long SQL also takes time.
We will use the second solution to implement it next.
If we want to increase the insertion efficiency, we definitely cannot insert one by one, we must use foreach batch insertion;
Use multi-threading for asynchronous insertion to improve performance;
We cannot submit multiple inserts at a time. A large number of insert operations will be very time-consuming and cannot be completed in a short time. It can be achieved by using scheduled tasks.
Next let’s talk about how to use code to implement it.
This case is mainly implemented based on SpringBoot integrating mybatis.
        org.springframework.boot
        spring-boot-starter-parent
        2.3.4.RELEASE


            org.springframework.boot
            spring-boot-starter-web


            mysql
            mysql-connector-java
            5.1.48


            org.mybatis.spring.boot
            mybatis-spring-boot-starter
            2.1.0


            org.projectlombok
            lombok


            org.springframework.boot
            spring-boot-starter-test
@SpringBootApplication  //引导类核心注解
@EnableScheduling //开启定时任务
public class BatchApplication {
    public static void main(String[] args) {
        SpringApplication.run(BatchApplication.class,args);
    }
}server:
port: 9999 # 指定端口号
spring:
datasource:
driver-class-name: com.mysql.cj.jdbc.Driver
url: jdbc:mysql://localhost:3306/springboot?useUnicode=true&characterEncoding=utf-8&useSSL=false&serverTimezone=UTC
username: root
password: 123
mybatis:
mapper-locations: classpath:mybatis/*.xml #指定mapper映射文件路径
type-aliases-package: com.qfedu.model # 别名Create table:
CREATE TABLE `user` (
  `id` INT(11) NOT NULL AUTO_INCREMENT,
  `username` VARCHAR(30) DEFAULT NULL,
  `pwd` VARCHAR(20) DEFAULT NULL,
  `sex` INT(11) DEFAULT NULL,
  `birthday` DATETIME DEFAULT NULL,
  PRIMARY KEY (`id`)
) ENGINE=MyISAM  DEFAULT CHARSET=utf8
Note: MyISAM efficiency will be faster than INNODB.
User.java
@Data
public class User {
    private int id;
    private String username;
    private String pwd;
    private int sex;
    private LocalDate birthday;
}UserMapper.java
@Mapper
public interface UserMapper {
    void insertBatch(@Param("userList") List userList);
}
UserMapper.xml
        insert  into user (username,pwd,sex,birthday) values

            (#{item.username}, #{item.pwd}, #{item.sex}, #{item.birthday})
SpringBoot integrates scheduled by default. The usage steps are as follows:
In booting Add the @EnableScheduling annotation to the class to enable scheduled tasks;
Add the @Scheduled annotation to the business layer method to define periodic execution of the cron expression.
The threads started in the business layer method can be modified according to the current machine configuration. We have opened 7 threads here, and each thread executes 20 loops and adds 5,000 pieces of data at a time. It should be noted here that when mybatis batch inserts, it is not recommended to exceed 10,000 errors. Because the amount of data is too large, stack memory overflow is prone to occur.
@Component
public class UserServiceImpl {
    @Autowired
    private UserMapper userMapper;
    @Autowired
    //线程池
    private ThreadPoolExecutor executor;
    @Scheduled(cron = "0/20 * * * * ?") //每隔20秒执行一次
    public void  addList(){
        System.out.println("定时器被触发");
        long start = System.currentTimeMillis();
        for (int i = 0; i < 7; i++) {

            Thread thread = new Thread(() -> {
                try {
                    for (int j = 0; j < 20; j++) {
                        userMapper.addList(UserUtil.getUsers(5000));
                    }
                } catch (Exception e) {
                    e.printStackTrace();
                }
            });
            try {
                executor.execute(thread);
            } catch (Exception e) {
                System.out.println(e.getMessage());
            }
        }
    }
}We use it to simulate generating data to be inserted. In actual business development, it can be data imported from excel.
public class UserUtil {
private static Random random = new Random();
public static List getUsers(int num){
List users = new ArrayList<>();
for (int i = 0;i8. Thread pool configuration
Thread pool parameters:
corePoolSize number of core threads, the minimum number of threads to be guaranteed in the thread pool;
mainumPoolSize is the maximum number of threads, the maximum number of threads that can run in the thread pool;
keepAliveTime guarantees the survival time, when the thread is idle, how long it will take to recycle the thread;
unit is used in conjunction with keepAliveTime , time unit;
workQueue work queue, used to store tasks before the tasks are executed.
@Configuration
public class ThreadPoolExecutorConfig {
@Bean
public ThreadPoolExecutor threadPoolExecutor() {
//线程池中6个线程,最大8个线程,用于缓存任务的阻塞队列数5个
ThreadPoolExecutor executor = new ThreadPoolExecutor(6, 8, 5, TimeUnit.SECONDS, new ArrayBlockingQueue<>(100));
executor.allowCoreThreadTimeOut(true);//允许超时
return executor;
}
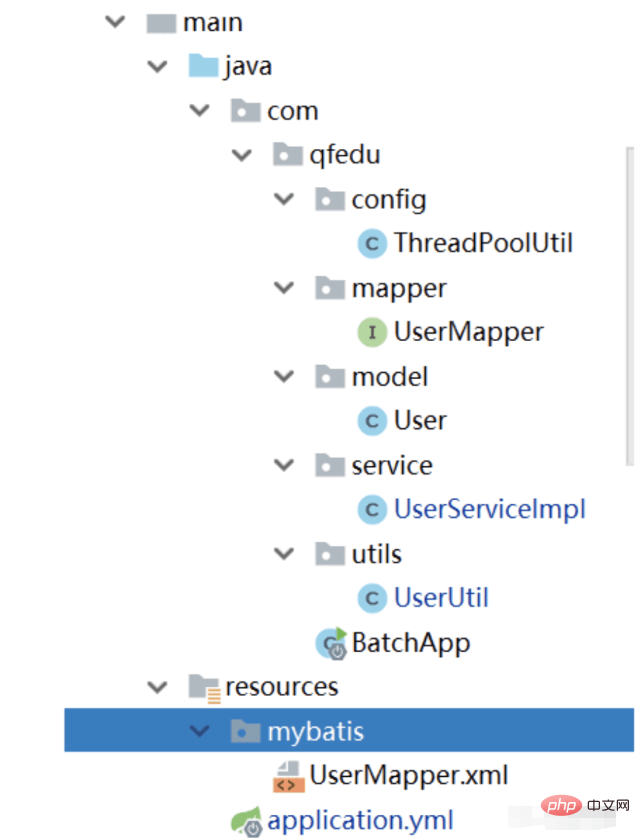
}9. Complete project structure
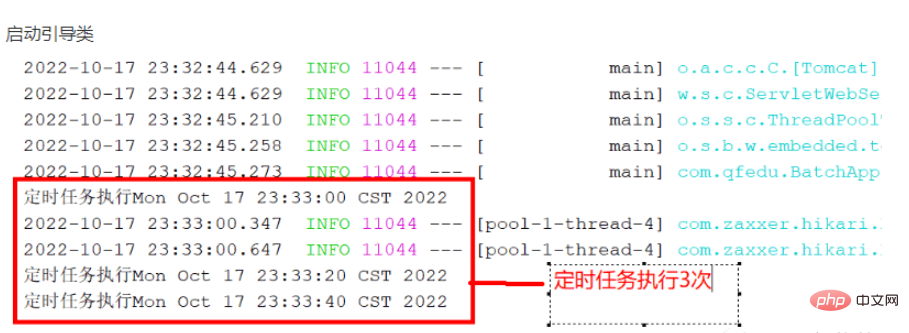
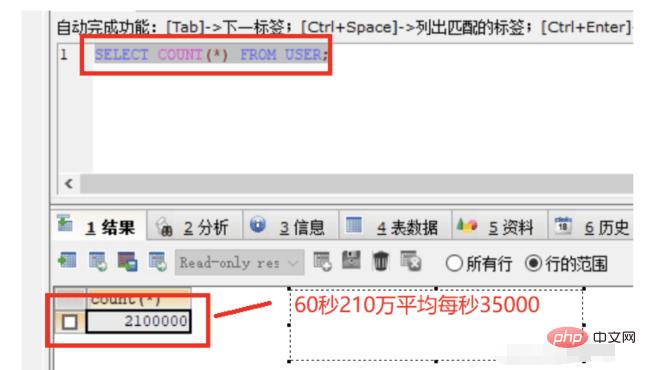
10. Test
The above is the detailed content of How to use springboot+mybatis to quickly insert large amounts of data. For more information, please follow other related articles on the PHP Chinese website!