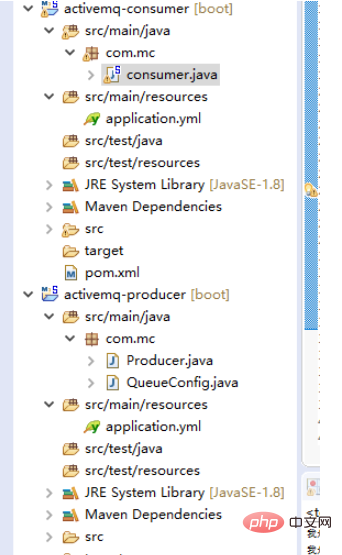
Directory structure

Introduce maven dependencies
    org.springframework.boot
    spring-boot-starter-parent
    1.5.4.RELEASE


    UTF-8
    UTF-8
    1.8


      org.springframework.boot
      spring-boot-starter


      org.springframework.boot
      spring-boot-starter-web


      org.springframework.boot
      spring-boot-starter-test
      test


      org.springframework.boot
      spring-boot-starter-activemq


        org.springframework.boot
        spring-boot-maven-plugin
Introduce application .yml configuration
spring:
 activemq:
  broker-url: tcp://127.0.0.1:61616
  user: admin
  password: admin
queue: springboot-queue
server:
 port: 8080
Create QueueConfig
@Configuration
public class QueueConfig {
  @Value("${queue}")
  private String queue;

  @Bean
  public Queue logQueue() {
    return new ActiveMQQueue(queue);
  }

  @Bean
  public JmsTemplate jmsTemplate(ActiveMQConnectionFactory activeMQConnectionFactory, Queue queue) {
    JmsTemplate jmsTemplate = new JmsTemplate();
    jmsTemplate.setDeliveryMode(2);// 进行持久化配置 1表示非持久化,2表示持久化
    jmsTemplate.setConnectionFactory(activeMQConnectionFactory);
    jmsTemplate.setDefaultDestination(queue); // 此处可不设置默认,在发送消息时也可设置队列
    jmsTemplate.setSessionAcknowledgeMode(4);// 客户端签收模式
    return jmsTemplate;
  }

  // 定义一个消息监听器连接工厂,这里定义的是点对点模式的监听器连接工厂
  @Bean(name = "jmsQueueListener")
  public DefaultJmsListenerContainerFactory jmsQueueListenerContainerFactory(
      ActiveMQConnectionFactory activeMQConnectionFactory) {
    DefaultJmsListenerContainerFactory factory = new DefaultJmsListenerContainerFactory();
    factory.setConnectionFactory(activeMQConnectionFactory);
    // 设置连接数
    factory.setConcurrency("1-10");
    // 重连间隔时间
    factory.setRecoveryInterval(1000L);
    factory.setSessionAcknowledgeMode(4);
    return factory;
  }
}
Create producer:
@SpringBootApplication
@Component
@EnableScheduling
public class Producer {

  @Autowired
  private JmsMessagingTemplate jmsMessagingTemplate;

  @Autowired
  private Queue queue;

  @Scheduled(fixedDelay=3000)
  public void send() {
    String result = System.currentTimeMillis()+"---测试";
    System.out.println("result"+result);
    jmsMessagingTemplate.convertAndSend(queue,result);
  }
  public static void main(String[] args) {
    SpringApplication.run(Producer.class, args);
  }
}
Create consumer application.yml
spring:
 activemq:
  broker-url: tcp://127.0.0.1:61616
  user: admin
  password: admin
queue: springboot-queue
server:
 port: 8081
Create consumer:
@Component
@SpringBootApplication
public class consumer {

  private int count =0;

  @JmsListener(destination = "${queue}")
  public void receive(TextMessage textMessage,Session session) throws JMSException {
    String text = textMessage.getText();

    System.out.println("消费:"+text+"第几次获取消息count:"+(++count));

    System.out.println();
    String jmsMessageID = textMessage.getJMSMessageID();
  }

  public static void main(String[] args) {
    SpringApplication.run(consumer.class,args);
  }
}
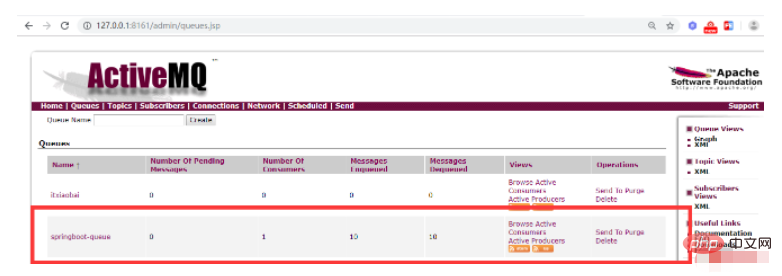
The result is displayed:

The above is the detailed content of How to integrate ActiveMQ in SpringBoot. For more information, please follow other related articles on the PHP Chinese website!