

SpringBoot uses profiles to implement configuration switching in different environments, such as common development environments, test environments, and production environments.
There are two main types of commonly used configuration files in SpringBoot: properties files and yml files. For properties files, it is mainly implemented through multiple profile configuration files; for yml files, it is mainly implemented through multiple fragments (configuration fragments are divided into three horizontal bars in a yml file).
Profile is more convenient to use in actual work. After the SpringBoot program is developed, it will eventually be packaged into a jar package for use. We can put the configuration file externally and specify the profile name in the external configuration file, thus Configuration parameters that determine which environment (development environment, test environment, production environment) to use.
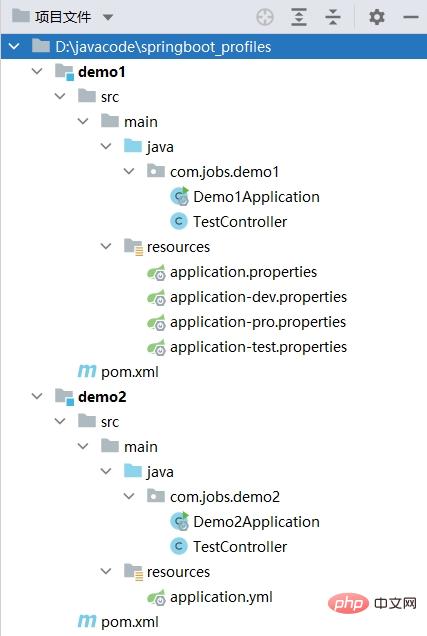
The Demo of this blog builds 2 SpringBoot projects, showing how to use the 2 profiles respectively.
Demo1 is implemented through multiple properties files, and Demo2 is implemented through a single yml file. The construction results are as follows:
For SpringBoot, if When the class you write is under the package or sub-package where the startup class is located, you do not need to configure the scanning package on the startup class, because SpringBoot will scan all classes under the package where the startup class is located and its sub-packages by default. Annotations in the file. Therefore, for the convenience of demonstration, subsequent demos will write class files under the package or sub-package where the startup class is located.
The TestController class with the same code is written in both Demos to provide parameter-free interface access. The returned result is the currently enabled profile name and the port number configured in the profile configuration file, which is convenient for everyone. To verify the results during the Demo test, you can also directly check the information printed in the IDEA console to verify the results. The specific contents of the TestController class are listed below:
import org.springframework.beans.factory.annotation.Autowired;
import org.springframework.core.env.Environment;
import org.springframework.web.bind.annotation.RequestMapping;
import org.springframework.web.bind.annotation.RestController;

@RestController
public class TestController {

    @Autowired
    private Environment env;

    @RequestMapping("/getport")
    public String getPort()
    {
        StringBuilder sb = new StringBuilder();

        String[] activeProfiles = env.getActiveProfiles();
        sb.append("启动的 profile 名称为:").append(activeProfiles[0]);

        sb.append("
");

        String portValue = env.getProperty("server.port");
        sb.append("启动的端口为:").append(portValue);
        return sb.toString();
    }
}The SpringBoot program in Demo1 uses the properties file as the configuration file, so the multi-file configuration method is used to implement the profile.
The configuration file of SpringBoot must start with application. For the properties file, the naming form of application-profile name.properties is used to implement profile multi-environment configuration. Application-dev.properties is used in Demo1, application -test.properites, application-pro.properties three files represent the configuration files of the development environment, test environment, and production environment. The configuration contents are as follows. For convenience, only the startup port of SpringBoot is configured here for demonstration:
# application-dev.properties 配置内容
# 配置文件必须以 application 开头
# 后面的 dev 表示 profile 配置文件的名称
server.port=8081
# application-test.properties 配置内容
# 配置文件必须以 application 开头
# 后面的 test 表示 profile 配置文件的名称
server.port=8082
# application-pro.properties 配置内容
# 配置文件必须以 application 开头
# 后面的 pro 表示 profile 配置文件的名称
server.port=8083
If you want to use a specific profile configuration file, you need to configure the profile name in application.properties:
# application-pro.properties 配置内容
# 本 Demo 中编写了多个以 application 开头的配置文件
# 通过以下配置项指定 profile 名称,设置所要启动的配置文件
spring.profiles.active=test
Then start the SpringBoot program of Demo1. For example, in the above example, the profile is test, which corresponds to The startup port is 8082, so access the localhost:8082/getport interface provided in TestController to verify the profile configuration information.
The SpringBoot program in Demo2 uses the yml file as the configuration file, so the multi-fragment configuration method is used to implement the profile.
Use three horizontal bars (---) in application.yml to separate configuration fragments, as shown below:
# 本 Demo 中只编写了一个 application.yml 的配置文件
# 通过三个横杠(---)来分隔开 3 种配置文件
# 通过 spring.config.activate.on-profile 设置 profile 的名称

# 通过以下配置项指定 profile 名称,设置所要启动的配置文件
spring:
  profiles:
    active: pro
---
server:
  port: 9091

spring:
  config:
    activate:
      on-profile: dev
---
server:
  port: 9092

spring:
  config:
    activate:
      on-profile: test
---
server:
  port: 9093

spring:
  config:
    activate:
      on-profile: pro
Then start the SpringBoot program of Demo2, as used in the above example The profile is pro, and the corresponding startup port is 9093. Therefore, you can verify the profile configuration information by accessing the localhost:9093/getport interface provided in TestController.
After the SpringBoot program is developed, it will be packaged into a jar package together with the configuration file, making it impossible to change the configuration file. Therefore, we can copy the configuration file to the outside, put it together with the jar package, use the command line to start the SpringBoot program, and specify the external configuration file path used through the command line parameter (--spring.config.location). The profile configuration can be modified in the external configuration file to switch configurations in different environments.
We put the jar package and configuration file packaged by Demo1 in the d:\javacode\demo1 folder, as shown in the following figure:

Then Run the following command line in this directory to start the SpringBoot program:
D:\javacode\demo1> java -jar .\demo1-0.0.1-SNAPSHOT.jar --spring.config.location=.\application.properties
Since the profile configured in application.properties is test, port 8082 is started.
We put the jar package and configuration file packaged by Demo2 in the d:\javacode\demo2 folder, as shown in the following figure:

Then Run the following command line in this directory to start the SpringBoot program:
D:\javacode\demo2> java -jar .\demo2-0.0.1-SNAPSHOT.jar --spring.config.location=.\application.yml
Since the profile configured in application.yml is pro, port 9093 is started.
The above is the detailed content of How does SpringBoot realize configuration switching in different environments through Profile?. For more information, please follow other related articles on the PHP Chinese website!