

1. First of all, all the dependencies required for spring boot to configure mybatis are as follows:
org.springframework.boot
spring-boot-starter-parent
1.5.1.RELEASE


    org.springframework.boot
    spring-boot-starter-web
    1.5.1.RELEASE


    org.mybatis.spring.boot
    mybatis-spring-boot-starter
    1.2.0


    com.oracle
    ojdbc6
    11.2.0.4.0-atlassian-hosted
Here we mainly talk about the above database driver package, oracle and Mysql introduces different dependencies, don’t forget them. If you forget to introduce it, a driver class not found exception will be reported.
2. Then, add the following content to the application.properties configuration file:
##数据库连接信息
spring.datasource.url=jdbc:oracle:thin:@//192.168.1.171:1521/orcl
spring.datasource.username=znxd
spring.datasource.password=znxd
spring.datasource.driver-class-name=oracle.jdbc.driver.OracleDriver
##指向mapper的xml文件位置
mybatis.mapper-locations=classpath:mapper/*Mapper.xml
##指向实体类的位置
mybatis.type-aliases-package=cloud.user.models.*
The content starting with spring.datasource above actually has There are many, for details, just enter them in the application.properties file and see what you can click on.
By default, springboot will collect the information starting with spring.datasource, configure the DataSource object, and then configure the sqlSessionFactory and other related database connection configurations, so many other people will talk about what configuration class to write. , ones that I feel are unnecessary. (Configuring druid requires a @Bean)
Of course, if it is particularly detailed, and the relevant configuration cannot be clicked through spring.datasource in the application.properties file , then you may need to configure classes or something.
mybatis.mapper-locations The location pointed to starts from src/main/resource. Classpath needs to be added in front. It points to the location where your mapper.xml file is placed. .
3. I am the entity class, mapper, etc. generated by mybatis through reverse engineering of the database table. First, I will post the specific placement structure of the project as follows:
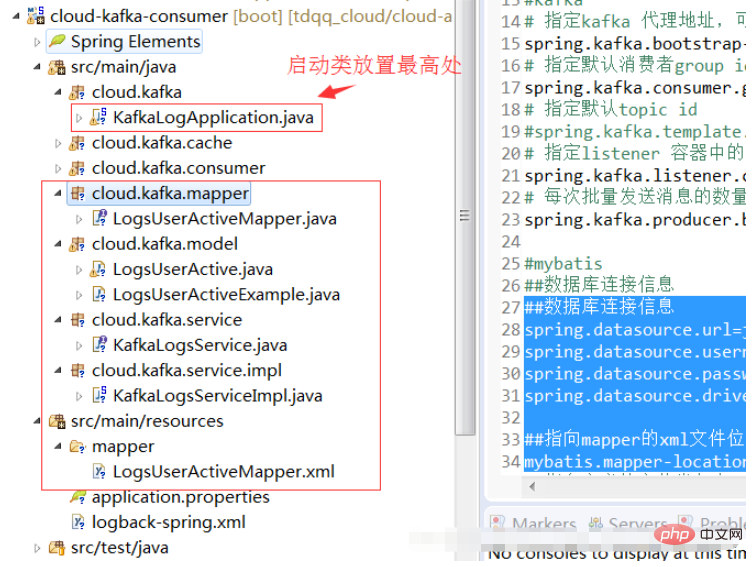
The explanation for the above picture is as follows:
The startup class must be placed at the highest point in the project relative to other classes. As mentioned in the previous article, spring boot does not have the traditional spring project configuration In the above picture, the service is placed higher than its implementation class. If there are two services A and B, and there are Aimpl and Bimpl in the implementation class, if Aimpl calls B, it may be in When starting the container, "a field named ‘B’ not found" appears. This error appears, indicating that the container scanning sequence is wrong. The best solution to this situation is to put the service at a high place like I did. When the container starts, it scans the service first, and then scans the impl, so that it can be found when implementing class scanning. service, this error will not occur. Another solution is to add an additional annotation when introducing the service: @Lazy In short, if there is a relationship between calling and being called, you must remember that the callee must first be scanned into the spring boot built-in container , that is, the callee's package position should be placed higher (the positions must be at least equal). 4. A @Service annotation needs to be added to the service implementation class. This may not be necessary, I haven't tried it yet. 5.spring boot mybatis In addition to these requirements, you also need to add an annotation @MapperScan to the startup class, as follows: The following is the value of namespace in my mapper.xml **This completes the configuration of mybatis. is to add two annotations on the basis of mybatis 1. The required annotations are spring-tx.jar This package is actually in When configuring mybatis to introduce dependencies, they have been automatically introduced, which is the following: So as long as the above dependencies are introduced, the transaction does not need to introduce the package again, 2. First, Find your service implementation class and add the For example, the following method of inserting data adds a transaction: If you don’t know what is inside, you can check this article, spring, mybatis transaction management configuration and the use of @Transactional annotation 3. After configuration, the spring boot startup class must enable transactions, and the annotation used to enable transactions is This is done Transaction configuration. @Autowired
@Lazy //这样就会延迟加载,上图不需要,这里只是解释这注解
LogsUserActiveMapper logsUserActiveMapper;
package cloud.kafka;
import org.mybatis.spring.annotation.MapperScan;
import org.springframework.boot.SpringApplication;
import org.springframework.boot.autoconfigure.SpringBootApplication;
import org.springframework.transaction.annotation.EnableTransactionManagement;

@SpringBootApplication
@EnableTransactionManagement //如果mybatis中service实现类中加入事务注解,需要此处添加该注解
@MapperScan("cloud.kafka.mapper")  //扫描的是mapper.xml中namespace指向值的包位置
public class KafkaLogApplication {
    public static void main(String[] args){
        SpringApplication.run(KafkaLogApplication.class, args);
    }
}2. Transaction configuration
@ EnableTransactionManagement and @Transactional are two, they come from the following package:
@Transactional annotation. If you add it to the class, then all methods of the class will be managed by transactions. If you add it to the method, then only the method conforms to the specific affairs. Of course, we usually add it to the method. Because only adding, deleting, and modifying will require transactions. @Override
@Transactional(propagation = Propagation.REQUIRED,isolation = Isolation.DEFAULT,timeout=36000,rollbackFor=Exception.class)
public Integer add(Cbf_jtcy t) {
return cbf_jtcyMapper.insert(t);
}@EnableTransactionManagement, as follows: @SpringBootApplication
@EnableTransactionManagement
@MapperScan("microservice.qssj.mapper")//必须加这个,不加报错,如果不加,也可以在每个mapper上添加@Mapper注释,并且这里还要多填一个注释,那个我忘了,我一直用这个注解
public class QssjServiceApplication {
public static void main(String[] args) {
SpringApplication.run(QssjServiceApplication.class, args);
}
}
The above is the detailed content of How to configure mybatis and transaction management in springboot. For more information, please follow other related articles on the PHP Chinese website!