

When we write concurrent programs, a very common requirement is to ensure that only one thread executes a certain piece of code at a certain time, like This kind of code is called a critical section, and the usual way to ensure that only one thread executes the code in the critical section at a time is to lock. In this article, we will carefully analyze and learn about spin locks. The so-called spin lock is implemented through a while loop, which allows the thread that has obtained the lock to enter the critical section to execute the code, and allows the thread that has not obtained the lock to continue to die while. Loop, this is actually the thread "spinning" itself in the while loop, so this kind of lock is called a spin lock.
Before talking about spin locks, we have to talk about atomicity. The so-called atomicity simply means that each operation is either not done or done all. Doing all means that it cannot be interrupted during the operation. For example, adding one to the variable data has the following three steps:
Load data from memory to register.
Add one to the value of data.
Write the result back to memory.
Atomicity means that when a thread performs an increment operation, it cannot be interrupted by other threads. Only when this thread completes these three processes can other threads be able to manipulate data. data.
Let’s experience it now with code. In Java, we can use AtomicInteger to perform atomic operations on integer data:
import java.util.concurrent.atomic.AtomicInteger;

public class AtomicDemo {

  public static void main(String[] args) throws InterruptedException {
    AtomicInteger data = new AtomicInteger();
    data.set(0); // 将数据初始化位0
    Thread t1 = new Thread(() -> {
      for (int i = 0; i < 100000; i++) {
        data.addAndGet(1); // 对数据 data 进行原子加1操作
      }
    });
    Thread t2 = new Thread(() -> {
      for (int i = 0; i < 100000; i++) {
        data.addAndGet(1);// 对数据 data 进行原子加1操作
      }
    });
    // 启动两个线程
    t1.start();
    t2.start();
    // 等待两个线程执行完成
    t1.join();
    t2.join();
    // 打印最终的结果
    System.out.println(data); // 200000
  }
}
From the above code analysis, we can know that if it is a general integer If two threads operate on variables at the same time, the final result will be less than 200,000.
Let's now simulate the process of problems with general integer variables:
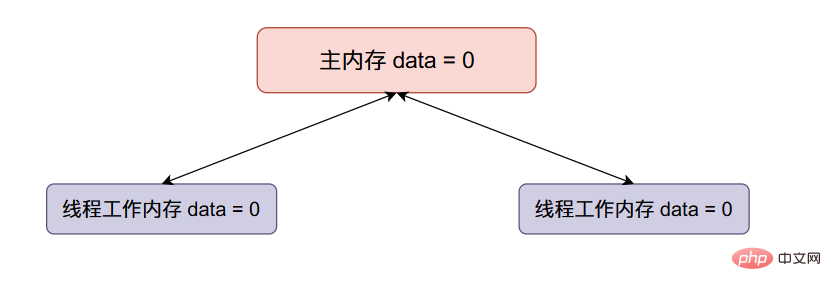
The initial value of main memory data is equal to 0, and the initial value of data obtained by both threads is equal to 0.
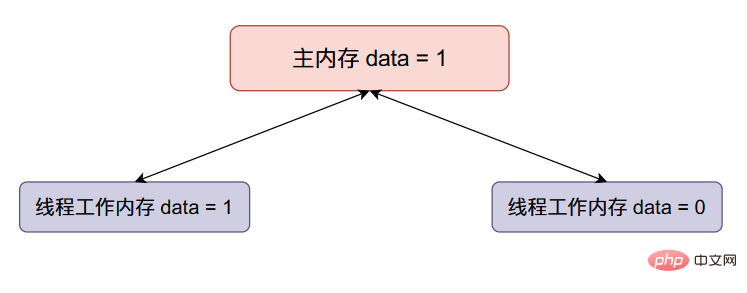
Now thread one adds one to data, and then thread one synchronizes the value of data back to the main memory. The data in the entire memory changes as follows:
Now the data of thread two is increased by one, and then the value of data is synchronized back to the main memory (overwriting the original value of the main memory):
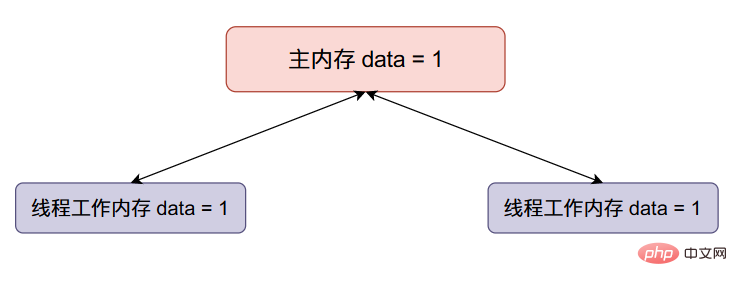
We originally hoped that the value of data would become 2 after the above changes, but thread two overwrote our value, so in the case of multi-threading, our final result will become smaller.
But in the above program, our final output result is equal to 20000. This is because the operation of 1 to data is atomic and indivisible. During the operation, other threads cannot operate on data. of. This is the advantage of atomicity.
AtomicInteger class
Now that we have understood the role of atomicity, let’s now understand the AtomicInteger class Another atomic operation - compareAndSet, this operation is called compare and swap (CAS), it is atomic.
public static void main(String[] args) {
  AtomicInteger atomicInteger = new AtomicInteger();
  atomicInteger.set(0);
  atomicInteger.compareAndSet(0, 1);
}
The meaning of the compareAndSet function: First, it will compare the first parameter (corresponding to the above code is 0) and the value of atomicInteger. If they are equal, they will be exchanged, that is, the value of atomicInteger will be set to the second parameter. (The corresponding code above is 1). If these operations are successful, the compareAndSet function will return true. If the operation fails, it will return false. The operation failure may be because the value of the first parameter (expected value) is not equal to atomicInteger. If they are equal, It may be because it failed when changing the value of atomicInteger (because there may be multiple threads operating, and because of the existence of atomicity, only one thread can operate successfully).
Spin lock implementation principle
We can use the AtomicInteger class to implement the spin lock. We can use the value 0 to indicate that it is not locked, and the value of 1 to indicate that it has been locked. locked.
The initial value of the AtomicInteger class is 0.
When locking, we can use the code atomicInteger.compareAndSet(0, 1) to implement it. We have mentioned before that only one thread can complete this operation, which means that only one thread can call it. This line of code then returns true and the other threads return false. These threads that return false cannot enter the critical section, so we need these threads to stop at atomicInteger.compareAndSet(0, 1). This line of code cannot be executed further. We can use The while loop keeps these threads parked here while (!value.compareAndSet(0, 1));. Only the thread that returns true can break out of the loop, and the other threads will keep looping here. We call this behavior spin. This kind of lock is also called a spin lock.
线程在出临界区的时候需要重新将锁的状态调整为未上锁的上状态,我们使用代码value.compareAndSet(1, 0);就可以实现,将锁的状态还原为未上锁的状态,这样其他的自旋的线程就可以拿到锁,然后进入临界区了。
自旋锁代码实现
import java.util.concurrent.atomic.AtomicInteger;

public class SpinLock {

  // 0 表示未上锁状态
  // 1 表示上锁状态
  protected AtomicInteger value;

  public SpinLock() {
    this.value = new AtomicInteger();
    // 设置 value 的初始值为0 表示未上锁的状态
    this.value.set(0);
  }

  public void lock() {
    // 进行自旋操作
    while (!value.compareAndSet(0, 1));
  }

  public void unlock() {
    // 将锁的状态设置为未上锁状态
    value.compareAndSet(1, 0);
  }

}
上面就是我们自己实现的自旋锁的代码,这看起来实在太简单了,但是它确实帮助我们实现了一个锁,而且能够在真实场景进行使用的,我们现在用代码对上面我们写的锁进行测试。
测试程序:
public class SpinLockTest {

  public static int data;
  public static SpinLock lock = new SpinLock();

  public static void add() {
    for (int i = 0; i < 100000; i++) {
      // 上锁 只能有一个线程执行 data++ 操作 其余线程都只能进行while循环
      lock.lock();
      data++;
      lock.unlock();
    }
  }

  public static void main(String[] args) throws InterruptedException {
    Thread[] threads = new Thread[100];
    // 设置100个线程
    for (int i = 0; i < 100; i ++) {
      threads[i] = new Thread(SpinLockTest::add);
    }
    // 启动一百个线程
    for (int i = 0; i < 100; i++) {
      threads[i].start();
    }
    // 等待这100个线程执行完成
    for (int i = 0; i < 100; i++) {
      threads[i].join();
    }
    System.out.println(data); // 10000000
  }
}
在上面的代码单中,我们使用100个线程,然后每个线程循环执行100000data++操作,上面的代码最后输出的结果是10000000,和我们期待的结果是相等的,这就说明我们实现的自旋锁是正确的。
可重入自旋锁
在上面实现的自旋锁当中已经可以满足一些我们的基本需求了,就是一个时刻只能够有一个线程执行临界区的代码。但是上面的的代码并不能够满足重入的需求,也就是说上面写的自旋锁并不是一个可重入的自旋锁,事实上在上面实现的自旋锁当中重入的话就会产生死锁。
我们通过一份代码来模拟上面重入产生死锁的情况:
public static void add(int state) throws InterruptedException {
  TimeUnit.SECONDS.sleep(1);
  if (state <= 3) {
    lock.lock();
    System.out.println(Thread.currentThread().getName() + "\t进入临界区 state = " + state);
    for (int i = 0; i < 10; i++)
      data++;
    add(state + 1); // 进行递归重入 重入之前锁状态已经是1了 因为这个线程进入了临界区
    lock.unlock();
  }
}
在上面的代码当中加入我们传入的参数state的值为1,那么在线程执行for循环之后再次递归调用add函数的话,那么state的值就变成了2。
if条件仍然满足,这个线程也需要重新获得锁,但是此时锁的状态是1,这个线程已经获得过一次锁了,但是自旋锁期待的锁的状态是0,因为只有这样他才能够再次获得锁,进入临界区,但是现在锁的状态是1,也就是说虽然这个线程获得过一次锁,但是它也会一直进行while循环而且永远都出不来了,这样就形成了死锁了。
可重入自旋锁思想
针对上面这种情况我们需要实现一个可重入的自旋锁,我们的思想大致如下:
在我们实现的自旋锁当中,我们可以增加两个变量,owner一个用于存当前拥有锁的线程,count一个记录当前线程进入锁的次数。
如果线程获得锁,owner = Thread.currentThread()并且count = 1。
当线程下次再想获取锁的时候,首先先看owner是不是指向自己,则一直进行循环操作,如果是则直接进行count++操作,然后就可以进入临界区了。
我们在出临界区的时候,如果count大于一的话,说明这个线程重入了这把锁,因此不能够直接将锁设置为0也就是未上锁的状态,这种情况直接进行count--操作,如果count等于1的话,说明线程当前的状态不是重入状态(可能是重入之后递归返回了),因此在出临界区之前需要将锁的状态设置为0,也就是没上锁的状态,好让其他线程能够获取锁。
可重入锁代码实现
实现的可重入锁代码如下:
public class ReentrantSpinLock extends SpinLock {

  private Thread owner;
  private int count;

  @Override
  public void lock() {
    if (owner == null || owner != Thread.currentThread()) {
      while (!value.compareAndSet(0, 1));
      owner = Thread.currentThread();
      count = 1;
    }else {
      count++;
    }

  }

  @Override
  public void unlock() {
    if (count == 1) {
      count = 0;
      value.compareAndSet(1, 0);
    }else
      count--;
  }
}
下面我们通过一个递归程序去验证我们写的可重入的自旋锁是否能够成功工作。
测试程序:
import java.util.concurrent.TimeUnit;

public class ReentrantSpinLockTest {

  public static int data;
  public static ReentrantSpinLock lock = new ReentrantSpinLock();

  public static void add(int state) throws InterruptedException {
    TimeUnit.SECONDS.sleep(1);
    if (state <= 3) {
      lock.lock();
      System.out.println(Thread.currentThread().getName() + "\t进入临界区 state = " + state);
      for (int i = 0; i < 10; i++)
        data++;
      add(state + 1);
      lock.unlock();
    }
  }

  public static void main(String[] args) throws InterruptedException {
    Thread[] threads = new Thread[10];
    for (int i = 0; i < 10; i++) {
      threads[i] = new Thread(new Thread(() -> {
        try {
          ReentrantSpinLockTest.add(1);
        } catch (InterruptedException e) {
          e.printStackTrace();
        }
      }, String.valueOf(i)));
    }
    for (int i = 0; i < 10; i++) {
      threads[i].start();
    }
    for (int i = 0; i < 10; i++) {
      threads[i].join();
    }
    System.out.println(data);
  }
}
上面程序的输出:
Thread-3 Entering the critical section state = 1
Thread-3 Entering the critical section state = 2
Thread-3 Entering the critical section state = 3
Thread-0 Entering the critical section state = 1
Thread-0 Entering the critical section state = 2
Thread-0 Entering the critical section state = 3
Thread-9 Entering the critical section state = 1
Thread-9 Entering the critical section state = 2
Thread-9 Entering the critical section state = 3
Thread-4 Entering the critical section state = 1
Thread-4 Entering the critical section state = 2
Thread-4 Entering the critical section state = 3
Thread-7 Entering the critical section state = 1
Thread-7 Entering the critical section state = 2
Thread-7 Entering the critical section state = 3
Thread-8 Entering the critical section state = 1
Thread- 8 Entering the critical section state = 2
Thread-8 Entering the critical section state = 3
Thread-5 Entering the critical section state = 1
Thread-5 Entering the critical section state = 2
Thread-5 Entering Critical section state = 3
Thread-2 Enter the critical section state = 1
Thread-2 Enter the critical section state = 2
Thread-2 Enter the critical section state = 3
Thread-6 Enter the critical section state = 1
Thread-6 Entering the critical section state = 2
Thread-6 Entering the critical section state = 3
Thread-1 Entering the critical section state = 1
Thread-1 Entering the critical section state = 2
Thread-1 Enter the critical section state = 3
300
From the above output results, we can know that when a thread can acquire the lock, it can re-enter. And the final output result is also correct, so it is verified that the reentrant spin lock we wrote is effective!
The above is the detailed content of How to implement manual spin lock using Java. For more information, please follow other related articles on the PHP Chinese website!