

In the past two years, the combination of springmvc + mybatis has been quite popular. As for the original poster, I have never really come into contact with mybatis. I will learn mybatis while I have some free time these days. This time, I plan to do a series of tutorials about mybatis based on my own learning progress, record my learning process, and also explore it for friends who have not yet come into contact with mybatis. This series of tutorials is intended to go from shallow (use) to deep (analyzing mybatis source code implementation), so it may take several days to complete the update. Okay, let’s start this mybatis learning journey. This is the first tutorial. Let’s simply write a demo and get to know mybatis together.
For convenience, I use maven. As for how to use maven, I will not introduce it. If you have never used Maven, it will not affect your reading.
1. Mybatis environment setup and simple examples
1. Create a new web project and add dependency packages: mybatis package, database driver package (I use mysql), Log package (I use log4j), since I am a maven project, adding dependency packages is simple, just add dependencies directly in pom.xml.
pom.xml:
      junit
      junit
      4.11
      test


        log4j
      log4j
        1.2.16


        org.mybatis
      mybatis
        3.2.6


        mysql
        mysql-connector-java
        5.1.12
2. Configure log4j, configure mybatis
Create a configuration file on the classpath for configuring log4j log4j.properties, and then create a configuration file configuration.xml for configuring Mybatis (the file can be named arbitrarily). I won’t say much about the configuration of log4j. Here I will mainly talk about configuration.xml:
configuration.xml:
1 2 56 7 8 9 10 11 12 14 1513 16 36 37 3817 3518 19 26 27 28 3429 30 31 32 33 39 41 4240
3. Start writing Demo
First, create a table user:
in mysql database test1 
Then, start writing java code.
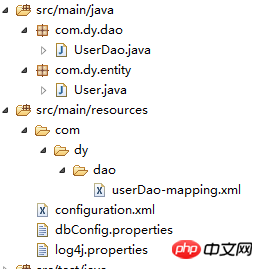
Take a look at my project structure:
First write an entity class User: The User class is used to correspond to the User table .
User:
 1 package com.dy.entity;
 2
 3 public class User {
 4
 5     private int id;
 6     private String name;
 7     private String password;
 8     private int age;
 9     private int deleteFlag;
 10
 11     public int getId() {
 12         return id;
 13     }
 14     public void setId(int id) {
 15         this.id = id;
 16     }
 17     public String getName() {
 18         return name;
 19     }
 20     public void setName(String name) {
 21         this.name = name;
 22     }
 23     public String getPassword() {
 24         return password;
 25     }
 26     public void setPassword(String password) {
 27         this.password = password;
 28     }
 29     public int getAge() {
 30         return age;
 31     }
 32     public void setAge(int age) {
 33         this.age = age;
 34     }
 35     public int getDeleteFlag() {
 36         return deleteFlag;
 37     }
 38     public void setDeleteFlag(int deleteFlag) {
 39         this.deleteFlag = deleteFlag;
 40     }
 41
 42 }
Write another UserDao interface:
UserDao:
 1 package com.dy.dao;
 2
 3 import java.util.List;
 4
 5 import com.dy.entity.User;
 6
 7 public interface UserDao {
 8
 9     public void insert(User user);
 10
 11     public User findUserById (int userId);
 12
 13     public List findAllUsers();
 14
 15 }
Write another userDao-mapping.xml (you can name it whatever you want):
userDao-mapping.xml:
1 2 56 7 10 11
userDao-mapping.xml相当于是UserDao的实现, 同时也将User实体类与数据表User成功关联起来。
4. 下面编写junit测试代码UserDaoTest:
UserDaoTest:
 1 public class UserDaoTest {
 2
 3     @Test
 4     public void findUserById() {
 5         SqlSession sqlSession = getSessionFactory().openSession();
 6         UserDao userMapper = sqlSession.getMapper(UserDao.class);
 7         User user = userMapper.findUserById(2);
 8         Assert.assertNotNull("没找到数据", user);
 9     }
 10
 11     //Mybatis 通过SqlSessionFactory获取SqlSession, 然后才能通过SqlSession与数据库进行交互12     private static SqlSessionFactory getSessionFactory() {
13         SqlSessionFactory sessionFactory = null;
14         String resource = "configuration.xml";
15         try {
16             sessionFactory = new SqlSessionFactoryBuilder().build(Resources
17                     .getResourceAsReader(resource));
18         } catch (IOException e) {
19             e.printStackTrace();
20         }
21         return sessionFactory;
22     }
23
24 }
好啦,这样一个简单的mybatis 的demo就能成功运行啦。通过这个demo, 应该你就也能初步看出mybatis的运行机制,如果不清楚,也没关系。从下一篇文章开始,才开始正式讲解mybatis。
以上就是深入浅出Mybatis系列(一)---Mybatis入门 的内容,更多相关内容请关注PHP中文网(m.sbmmt.com)!