ホームページ >ウェブフロントエンド >jsチュートリアル >React コンポーネントのライフサイクル例の分析
この記事では主に React コンポーネントのライフサイクルについて説明します。React コンポーネントのライフサイクルには多数の関連関数がありますが、それらは実際には単なるプッシュフック関数です。 React コンポーネント作成のさまざまな段階で特定のフック関数をトリガーします。皆さんのお役に立てれば幸いです。
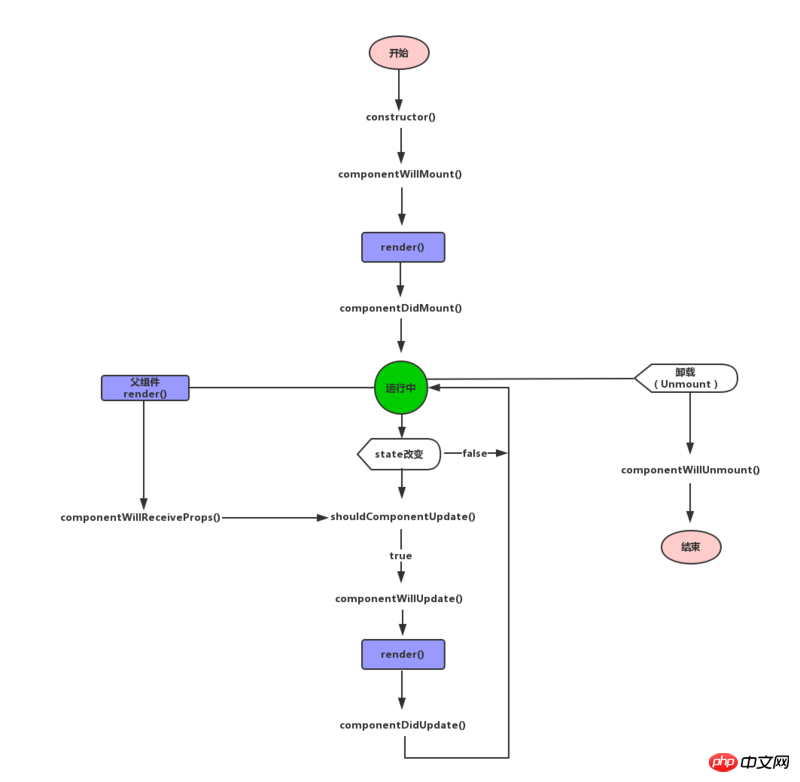
まず下の図をご覧ください: 
constructor
コンストラクターは、コンポーネントの作成時に 1 回呼び出されます。
constructor(props, context)
componentWillMount
は、コンポーネントがマウントされる前に一度呼び出されます。この関数で setState が呼び出された場合、render() は状態が変更されたことを認識し、状態を 1 回だけレンダリングします。
void componentWillMount()
render
render は、React コンポーネントにとって不可欠なコア関数です。レンダリング時に状態を変更しないでください。 DOM の読み取りや書き込み、あるいはサーバーとの対話を行わず、render() メソッドを純粋な状態に保ちます。
ReactElement render()
componentDidMount
は、コンポーネントがマウントされた後に一度呼び出されます。このとき、サブコンポーネントもマウントされ、ここで ref を使用できます。
void componentDidMount()
shouldComponentUpdate
このメソッドは、レンダリングの初期化時には実行されませんが、小道具や状態が変更されたときに実行されます。この関数はデフォルトで true を返すため、再レンダリングする必要があります。 false を返すと再レンダリングされません。また、componentWillUpdate メソッドとcomponentDidUpdate メソッドも呼び出されません。より複雑なアプリケーションでは、一部のデータ変更はインターフェイスの表示に影響を与えません。レンダリング効率を最適化するためにここで判断できます。
boolean shouldComponentUpdate(
    object nextProps, object nextState
)
componentWillUpdate
shouldComponentUpdate が true を返した後、componentWillUpdate が呼び出されます。特に注意が必要なのは、この関数では状態を変更するために this.setState を使用しないことです。それ以外の場合、この関数は無限ループで実行されます。この関数が呼び出された後、nextProps と nextState はそれぞれ this.props と this.state に設定されます。この関数の直後に、render() が呼び出され、インターフェースが更新されます。
void componentWillUpdate(
  object nextProps, object nextState
)
componentDidUpdate
最初のレンダリング後のcomponentDidMountの呼び出しを除き、componentDidUpdateは他のすべてのレンダリングの後に呼び出されます。
void componentDidUpdate()
componentWillReceiveProps
props は、親コンポーネントから子コンポーネントに渡されます。親コンポーネントがレンダリングされると、子コンポーネントはcomponentWillReceivePropsを呼び出します(プロパティが更新されたかどうか、または親コンポーネントと子コンポーネント間でデータ交換が行われたかどうかに関係なく)。このコールバック関数では、プロパティの変更に従って this.setState() を呼び出すことでコンポーネントの状態を更新できます。古いプロパティは this.props を通じて引き続き取得できます。ここで update state を呼び出しても、追加のレンダリング呼び出しはトリガーされません。 。
void componentWillReceiveProps(nextProps) {
    this.setState({...});
}
componentWillUnmount
コンポーネントがインターフェースから削除されるとき、componentWillUnmount() が呼び出されます。この関数では、タイマーやネットワーク要求のキャンセルなど、コンポーネント関連のクリーンアップ作業を実行できます。待って。
void componentWillUnmount()
var React = require('react');
var ReactDOM = require('react-dom');
class Parent extends React.Component {
constructor(){
super()
console.log("%cparent -- constructor","color:green");
this.state = {
name : 'Lucy'
}
}
componentWillMount(){
console.log("%cparent -- componentWillMount","color:green");
}
componentDidMount(){
console.log("%cparent -- componentDidMount","color:green");
}
componentWillReceiveProps(){
console.log("%cparent -- componentWillReceiveProps","color:green");
}
shouldComponentUpdate(){
console.log("%cparent -- shouldComponentUpdate","color:green");
return true;
}
componentWillUpdate(){
console.log("%cparent -- componentWillUpdate","color:green");
}
componentDidUpdate(){
console.log("%cparent -- componentDidUpdate","color:green");
}
componentWillUnmount(){
console.log("%cparent -- componentWillUnmount","color:green");
}
changeName(){
this.setState({name : 'Jone'})
}
unmountComponent(){
ReactDOM.unmountComponentAtNode(document.getElementById("app"));
}
render(){
console.log("%cparent -- render","color:green");
return(
<p style={{border:'1px solid #000',color:'green'}}>
<h2>Parent:</h2>
<h3>hello {this.state.name}</h3>
<button onClick={this.changeName.bind(this)}>state改变</button>
<button onClick={this.unmountComponent.bind(this)}>卸载组件</button>
<Child props1="haha"></Child>
</p>
)
}
}
class Child extends React.Component {
constructor(){
super()
console.log(" %cchild -- constructor","color:blue");
this.state = {
}
}
componentWillMount(){
console.log(" %cchild -- componentWillMount","color:blue");
}
componentDidMount(){
console.log(" %cchild -- componentDidMount","color:blue");
}
componentWillReceiveProps(){
console.log(" %cchild -- componentWillReceiveProps","color:blue");
}
shouldComponentUpdate(){
console.log(" %cchild -- shouldComponentUpdate","color:blue");
return true;
}
componentWillUpdate(){
console.log(" %cchild -- componentWillUpdate","color:blue");
}
componentDidUpdate(){
console.log(" %cchild -- componentDidUpdate","color:blue");
}
componentWillUnmount(){
console.log(" %cchild -- componentWillUnmount","color:blue");
}
changeName(){
this.setState({name : 'Jone'})
}
render(){
console.log(" %cchild -- render","color:blue");
return(
<p style={{border:'1px solid #000',margin:'10px',color:'blue'}}>
<h2>Child:</h2>
</p>
)
}
}
ReactDOM.render(
<Parent></Parent>,
document.getElementById('app')
);

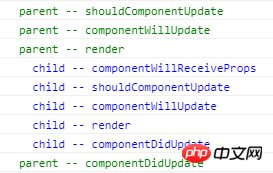
親コンポーネントの状態を変更します:
コンポーネントをアンインストールした後:

関連する推奨事項:
コンポーネントの簡単な紹介React Native のライフサイクル
以上がReact コンポーネントのライフサイクル例の分析の詳細内容です。詳細については、PHP 中国語 Web サイトの他の関連記事を参照してください。